
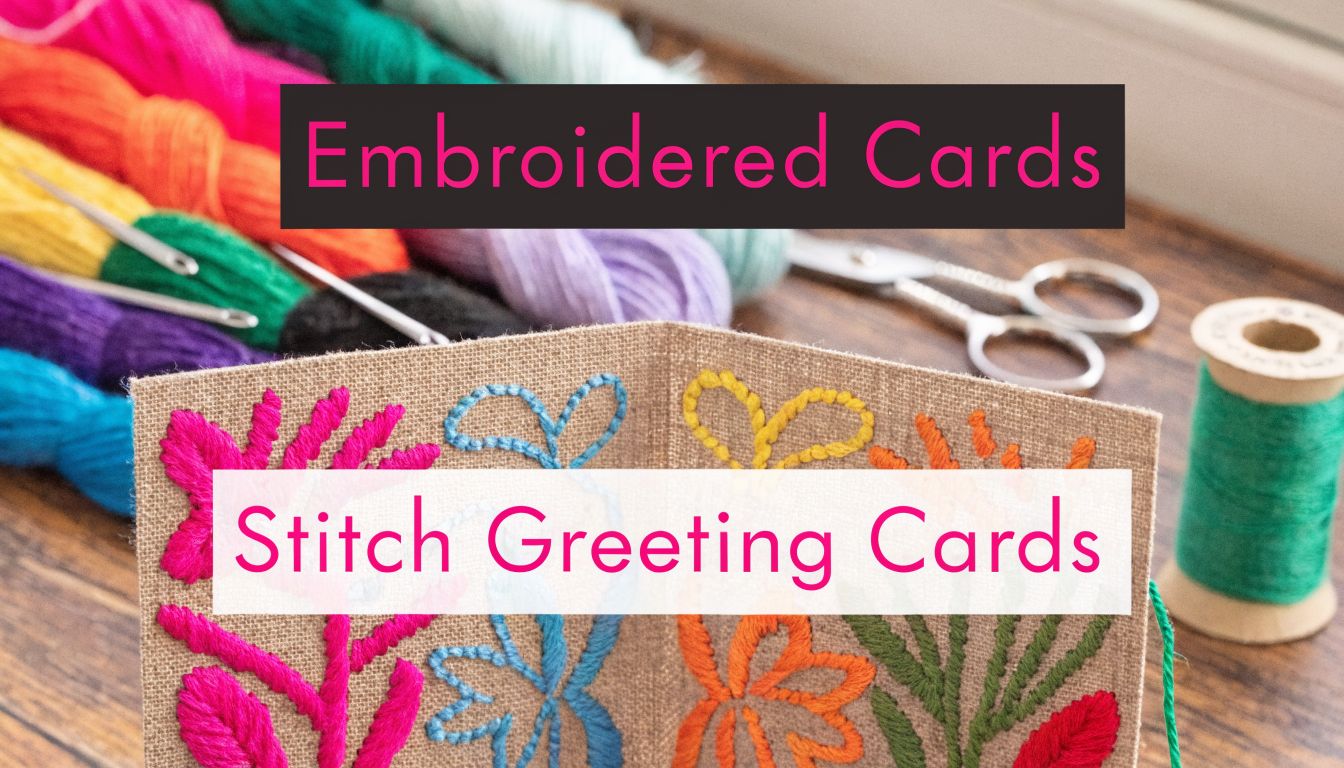
You’ve probably got a stack of blank cards, a box of thread, and that familiar urge to make something small but memorable. Embroidery on cards fits that mood perfectly. It’s tactile, slow in the best way, and satisfying for quilters and stitchers who already love texture, color, and detail.
A stitched card does something a printed card can’t. It feels handled. Kept. Set aside instead of tossed. And if you already sew, quilt, or embroider, you’re closer to this craft than you might think.
The Timeless Charm of Hand-Stitched Cards
A hand-stitched card turns a quick greeting into a keepsake. The paper holds the thread differently than fabric does, so every stitch reads clearly. Even a simple motif like a star, flower, or heart feels deliberate.
That appeal isn’t new. During World War I, production of embroidered postcards peaked in France, where they became immensely popular among Allied soldiers who sent them home. These cards carried military, patriotic, and sentimental themes, and by the 1950s, over 10 million vintage embroidered postcards had been produced and distributed worldwide, showing just how much this craft resonated across generations and borders, as noted in this history of vintage embroidered postcards.
Why paper embroidery still works now
Digital messages are fast. Stitched cards are memorable.
Paper embroidery sits in a sweet spot between sewing and paper crafting. It has the structure of card making, the rhythm of embroidery, and the personal touch of a handmade gift. Quilters often take to it quickly because the same instincts apply. Balance the design. Respect the material. Let texture do some of the visual work.
A few things make embroidery on cards especially rewarding:
- The project is manageable. You can finish one in an evening.
- The supplies are familiar. Thread, needles, small scissors, and marking tools all carry over from sewing.
- The result feels special. Even a beginner design looks thoughtful because the stitch itself adds dimension.
Cards that suit the technique best
Not every card needs a dense stitched centerpiece. Some of the prettiest versions stay simple.
Try motifs that suit the scale of a greeting card:
- Seasonal designs like stars, trees, ornaments, and snowflakes
- Floral outlines with a few satin-stitched petals
- Monograms for weddings, showers, and thank-you notes
- Mini quilt-inspired geometry using repeated holes and clean lines
If you’re planning holiday makes, this round-up of cute Christmas cards is a useful inspiration source for themes, layouts, and message ideas that translate well into stitched paper designs.
A stitched card doesn’t need to be complicated to feel valuable. Clean placement and thoughtful color do most of the heavy lifting.
Choosing the Right Materials for Perfect Results
Most problems in embroidery on cards start with the paper. If the card tears, fuzzes, buckles, or splits at the holes, no thread choice will rescue it. Good results come from matching paper strength to stitch density.

Many crafters report 40-50% failure rates on standard, thin cardstock due to tearing after just a few dozen stitches, while beginner guides often recommend 65-pound cardstock as a minimum and suggest skipping holes in dense areas to avoid breakage, according to this beginner card embroidery video guide.
Start with cardstock that can take a stitch
Thin craft paper is tempting because it’s easy to pierce. It’s also the quickest way to frustration. A sturdier card resists tearing at the hole line and stays flatter while you work.
For hand stitching, I prefer cardstock that feels firm in the hand and doesn’t flex much when lifted by one corner. Smooth finishes also help because the needle glides more cleanly and the holes stay crisp.
Here’s a practical comparison.
Cardstock Weight Comparison for Embroidery
| Cardstock Weight | Best Use Case | Pros | Cons |
|---|---|---|---|
| 65 lb | Very simple outlines, light stitching, beginner experiments | Easy to pierce, widely available | Can tear in dense areas, often needs skipped holes |
| 80 lb | Everyday greeting cards, floral outlines, lettering | Better structure, still easy to handle | May struggle with heavy fills or tight curves |
| 110 lb | Dense motifs, layered stitching, cards that need to mail well | Stronger support, cleaner finish, resists warping better | Harder to pierce by hand, needs a sharp tool and patience |
Thread, needles, and the small tools that matter
The best thread for paper isn’t always the thickest or the flashiest. Paper has no weave to absorb stress, so smooth passage matters more than dramatic bulk.
A practical supply list looks like this:
- Embroidery floss works well for hand stitching when you adjust the strand count to the design.
- Fine cotton or machine embroidery thread is useful for delicate lines and smaller holes.
- Tapestry or chenille needles can both work. The right choice depends on the hole size you’ve pierced and how much thread you’re pulling through.
- A piercing mat or foam pad supports the card while you make holes cleanly.
- An awl, tambour hook, or sturdy needle gives you control during the piercing stage.
- Low-tack tape helps secure thread tails on the back without making a sticky mess.
For trimming thread ends close to the card surface, a pair of specialized embroidery scissors with a fine curved tip is especially helpful around corners and tight motifs.
What not to overlook
Quilters already know this lesson from batting, stabilizer, and needle pairings. The base material dictates the success of the finish.
Paper embroidery benefits from a few habits:
- Test first. Stitch a corner sample before committing to the full card.
- Match thread weight to hole size. Thick thread in tiny holes roughs up the paper edge.
- Avoid aggressive adhesives. Strong tapes can peel fibers from the card back.
- Keep your design open. Dense stitching belongs on stronger stock.
Practical rule: If the cardstock bends easily before stitching, it usually won’t improve after dozens of needle passes.
Mastering Hand Embroidery Stitches on Paper
Hand stitching on paper rewards accuracy more than speed. Fabric gives you room to correct. Paper remembers every hole.

Transfer the design with clarity
Simple line art works best. A flower, a sprig, a starburst, a name, or a quilt-block-inspired motif all translate nicely.
Graph paper is useful because it keeps spacing predictable. Mark the stitch points before you touch the card. If the motif curves, simplify the curve rather than forcing too many holes close together.
The cleanest workflow is to place the pattern over the card, secure it lightly, and pierce through both layers onto foam backing. That keeps the guide aligned while you work.
Pierce before you stitch
This is the stage that decides whether the finished card feels crisp or ragged. For best results on paper, pierce holes at 1-2mm intervals, use 110-160gsm cardstock, and secure thread tails with low-tack tape so you don’t block nearby holes. Uneven spacing is a common problem and can cause up to 40% of thread breakage, as explained in this tutorial on designing embroidered cards.
A few piercing habits make a big difference:
- Work on foam backing so the tool passes through cleanly.
- Pierce the endpoints first on long curves or corners.
- Keep the tool vertical instead of leaning it.
- Check the back often because paper burrs usually show there first.
Choose stitches that suit paper
Not every embroidery stitch behaves well on cardstock. Paper likes stitches that travel neatly from hole to hole without requiring too much drag.
These are the most dependable:
Backstitch
Backstitch gives you crisp outlines and readable lettering. It’s the first stitch I’d recommend for embroidery on cards because it creates strong definition without building too much bulk.
Use it for:
- floral stems
- names and short words
- geometric borders
- simple motifs like stars or ornaments
Running stitch
Running stitch is lighter and more open. It works well when you want a sketch-like line or a delicate frame around the card front.
It’s also useful for beginner practice because it teaches rhythm and spacing without putting too much stress on the card.
Satin stitch in small areas
Satin stitch can look beautiful on paper, but keep it controlled. Small petals, tiny leaves, or a little heart work better than broad filled shapes.
Large satin areas often pull unevenly and make the card front ripple.
French knots used sparingly
French knots add charm, especially for flower centers or berry details. Use them in moderation. On paper, too many clustered knots can create bulk on the back and distort the front.
Pull the thread only until the stitch sits flat. If you tug past that point, the paper starts doing the warning for you.
Keep tension gentle
Most paper damage doesn’t happen when the needle goes in. It happens when the stitch is tightened too hard.
That’s a familiar lesson for anyone who’s quilted curves or worked with delicate fabrics. The thread should lie on the surface, not cinch it.
Watch for these signs:
- Paper dimpling around holes means the stitch is too tight.
- Frayed hole edges often mean the thread is too thick or being dragged repeatedly.
- A bowed card front usually points to cumulative tension.
If you notice any of those, stop and adjust. It’s much easier to correct after a few stitches than after the whole motif is finished.
Keep the back manageable from the start
The neatest finishes begin during stitching, not after it. Short thread lengths help. So does planning your path before you start.
A clean back comes from a few simple decisions:
- start in an area that can be covered easily later
- avoid long thread jumps across open space
- secure ends flat with small pieces of low-tack tape
- trim tails close, but not so close that they slip free
For beginners, the best first projects are small motifs with open spacing. A single snowflake, a stemmed flower, or a geometric heart teaches almost every core skill without overwhelming the card.
Using Your Embroidery Machine for Paper Projects
Machine embroidery on paper feels familiar at first, then quickly reminds you that paper isn’t fabric. It won’t recover from over-punching, and it won’t forgive a dense design.

The good news is that many sewing and quilting habits transfer well. Stabilizer choice, clean folding, accurate placement, and slower stitching all matter here.
Adjust the design before it ever hits the hoop
Paper can’t support the same stitch density you’d use on cotton or linen. For successful machine embroidery on paper, reduce design density by 20-30%, remove underlay, use a float technique with a medium-weight tear-away stabilizer, and run the machine at 600-750 stitches per minute with 40-60wt polyester thread, which minimizes tearing and can achieve a 95%+ success rate, according to this machine embroidery on paper tutorial.
That single change in mindset matters most. Don’t ask a fabric file to behave well on a card without editing it first.
A good paper-friendly design usually has:
- lighter stitch coverage
- open areas instead of dense fills
- minimal overlap
- clear travel paths
- no underlay
Float the card instead of hooping it
Hooping paper directly invites crease lines and distortion. Floating is the cleaner approach.
Hoop the stabilizer. Prepare the card separately. Then place the card onto the hooped support with careful alignment. Medium-weight tear-away is a dependable choice because it supports the stitching without making removal too aggressive.
If the card is folded, score that fold neatly before embroidery. A sloppy fold creates placement trouble that shows immediately on the finished front.
Machine setup that helps
Paper rewards restraint. That includes the machine settings.
Keep an eye on:
- Needle choice. A sharp machine needle makes a clean puncture.
- Thread selection. Smooth polyester embroidery thread moves cleanly through paper.
- Speed. Slower is better because the card has no give.
- Design orientation. Check card direction before stitching, especially with folded blanks.
A visual demo helps if you’ve never floated paper before.
Common machine mistakes
The usual trouble spots are predictable.
Dense motifs puncture the paper into weakness. Adhesive overspray can leave a messy residue. Fast machine speeds can shred edges around small details. And if the fold line isn’t square, the finished design looks off-center no matter how well it stitched.
For quilters, this part of embroidery on cards often becomes addictive quickly. It uses the same precision mindset as machine appliqué or stitch-and-flip construction, just on a smaller canvas.
Finishing Your Card for a Polished Look
A beautiful stitched front can lose impact the moment someone turns the card over. Finishing matters because it controls bulk, protects thread ends, and gives the whole project a more intentional feel.

Many tutorials recommend simple tape for finishing the back, but that can lead to warping or lumps. At the same time, demand for “3D embroidered cards” rose 25% year over year, while many guides still don’t address how to finish dimensional designs cleanly, according to this guide on finishing embroidered greeting cards.
Why the back deserves as much attention as the front
A tidy back does more than look nice. It protects the stitching from catching when the card is handled or removed from an envelope.
Simple tape can work for very light designs, but it often creates its own problems. Too much adhesive can ripple the paper. Thick knots show through. Unevenly placed tape can pull the card out of shape.
That’s why quilting-inspired finishes work so well here. They’re built around managing layers.
Better finishing options
These methods produce a cleaner result than a quick strip of tape across the threads:
- A cut liner panel glued or taped smoothly inside the card to cover the stitching area
- Thin batting under a liner for a softly padded front on dimensional motifs
- Light fusible interfacing to help flatten thread tails before the final cover layer goes on
- Inset backing paper trimmed slightly smaller than the card panel for a framed interior look
Best upgrade: Keep knots and thread tails as flat as possible, then add a neatly cut liner panel. Most cards look more professional immediately.
Mailing and handling
A stitched card often has more texture than a store-bought one. Plan for that.
Use an envelope with a little breathing room. If the design includes knots, layered stitching, or raised details, slide the card into a protective sleeve or wrap it lightly in tissue before mailing. That extra step helps preserve both the thread and the card surface.
For gift-giving by hand, dimensional finishes are worth exploring. A lightly padded floral center or a raised holiday motif can make the card feel halfway between stationery and textile art.
Next Steps and Creative Project Ideas
The easiest way to build confidence with embroidery on cards is to make several small designs instead of one ambitious one. Repetition teaches more than a single perfect project.
Start with cards tied to occasions you already need. That keeps the project useful and gives you a reason to finish.
A few ideas that stitch up well
A birthday card can be as simple as a cupcake outline with stitched sprinkles, a candle, or a monogrammed initial. Bright thread colors make small motifs feel lively fast.
Holiday cards are especially good for paper embroidery. Snowflakes, stars, ornaments, holly, and tiny trees all suit the structure of pre-pierced holes and clean repeated stitches.
Thank-you cards are another strong fit. A single leaf, a minimal flower stem, or a geometric border gives you a set that feels coordinated without becoming repetitive to stitch.
Quilting skills that translate beautifully
If you come from quilting, use that background. It gives you a strong eye for composition and color balance.
These habits carry over well:
- Scrap thinking helps with thread choices and small design planning
- Block-based design sense makes geometric cards easy to layout
- Layer awareness improves finishing on the inside of the card
- Precision habits make piercing and alignment much easier
Keep a small card kit ready
This craft becomes much more enjoyable when the basics are already gathered in one place.
A practical card kit might include:
- blank cards or heavyweight cardstock
- a few thread colors you reach for often
- a piercing tool
- foam backing
- hand needles in a couple of sizes
- low-tack tape
- liner paper for the inside
- small sharp scissors
That kind of setup makes it easy to stitch one card at a time without turning the project into a full studio reset.
The nicest surprise with embroidered cards is how often people keep them. They get tucked into books, pinned to bulletin boards, or displayed on shelves long after the occasion has passed. That’s a strong reason to keep making them.
If you’re ready to start your own embroidery on cards project, browse the threads, needles, stabilizers, batting, and finishing notions at Linda's Electric Quilters. It’s a great place to pull together the right supplies for both hand-stitched and machine-embroidered cards, especially if you already love quilting and want to bring those skills into paper crafting.


