
Discover how to create stunning feather designs and intricate quilting patterns using your domestic machine—no longarm required
For years, I watched longarm quilting videos with a mixture of awe and frustration. Those gorgeous, flowing feather designs and intricate free-motion patterns seemed like they belonged to an exclusive club that required a $20,000 machine to join. But what if I told you that everything you see on those impressive longarm demonstrations can be achieved right at your kitchen table with your trusty domestic sewing machine?
Corey Pearson from Linda's Electric Quilters recently opened my eyes to this possibility, and I'm excited to share everything I learned about bringing professional-level free-motion quilting to your home studio. The secret isn't in having the most expensive equipment—it's in understanding the right techniques, using the proper tools, and most importantly, practicing the fundamentals that many quilters skip over.
The Drawing Revolution: Why Your Pencil is Your Most Important Quilting Tool
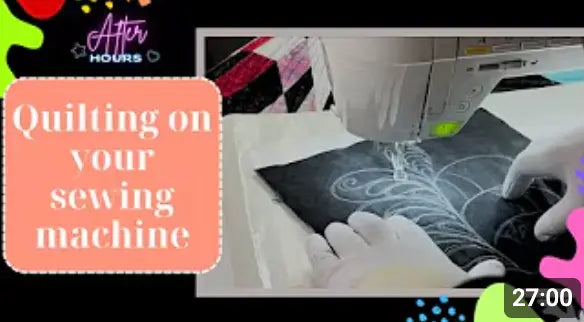
Here's something that might surprise you: the most crucial part of successful free-motion quilting happens before you even turn on your sewing machine. Corey demonstrated this beautifully by starting his feather design not with fabric, but with black paper and a white pencil.
This isn't just busy work or an optional step for artistic types. Drawing your quilting designs builds muscle memory in a way that nothing else can. When you trace those flowing curves and intricate patterns by hand, you're programming your brain and muscles to understand the rhythm and flow of the design. By the time you sit down at your sewing machine, your hands already know where they want to go.
I watched Corey work through a complex feather design from the "But Wait! More Really Fancy Feathers!" book, and what struck me was how deliberate and confident his movements were. He wasn't hesitating or second-guessing himself because he'd already worked through the design multiple times on paper. The drawing phase becomes your blueprint, your practice session, and your confidence builder all rolled into one.
The beauty of this approach is that it's completely accessible. You don't need expensive equipment or special skills—just paper, a pencil, and the willingness to practice. And unlike fabric, paper is forgiving. You can make mistakes, try different approaches, and experiment with variations without any pressure or cost.
The Game-Changing Power of Fusible Batting
One of the biggest challenges in free-motion quilting is managing your quilt sandwich. Traditional methods involve safety pins, spray basting, or hand basting—all of which can create bumps, shifting, or restrictions in fabric movement. But Corey introduced me to a technique that eliminates all these problems: fusible batting.
Using Hobbs 80/20 fusible batting transforms your quilt preparation completely. This double-sided fusible batting temporarily adheres your layers together with just the heat of a dry iron. No pins, no spray, no wrestling with shifting fabric while you're trying to concentrate on your quilting design.
The process is surprisingly simple. You layer your top fabric, the fusible batting, and your backing fabric on a wool pressing mat. Then, using a hot, dry iron (no steam!), you press the layers together. The fusible coating activates with heat, creating a stable sandwich that moves as one unit but isn't permanently bonded. This gives you the stability you need for precise quilting while maintaining the flexibility to make adjustments if needed.
What I love about this technique is how it eliminates one of the most frustrating aspects of free-motion quilting: fabric shifting. When your layers are properly fused, you can focus entirely on your quilting design instead of constantly fighting with bunching or puckering fabric.
The Essential Tool Kit for Domestic Free-Motion Success
While you don't need a longarm machine to achieve professional results, having the right tools makes an enormous difference in your quilting experience. Corey demonstrated several key items that transform how your domestic machine handles free-motion work.
The Sew Slip mat is perhaps the most immediately noticeable game-changer. This slick surface sits on your sewing machine table and allows your quilt sandwich to glide effortlessly in any direction. The difference is dramatic—what once felt like pushing a heavy quilt through thick mud suddenly becomes as smooth as ice skating.
Paired with the Sew Slip mat, Machingers gloves provide the grip and control you need to guide your fabric precisely. These aren't just any gloves—they're specifically designed with grippy fingertips that give you purchase on the fabric while allowing your hands to move smoothly across the surface. The combination of the slick mat and grippy gloves creates the perfect balance of movement and control.
For curved designs like the feather patterns Corey demonstrated, ruler feet and templates become invaluable. The 6-inch arch template he used allows you to create perfect, consistent curves that would be nearly impossible to achieve freehand. The ruler foot keeps the template at the proper distance from the needle, ensuring even stitching and preventing the template from interfering with your machine's operation.
The Hook & Snip tool might seem like a small detail, but it's incredibly useful for pulling up bobbin threads and making small adjustments without having to stop and reach for scissors. These little efficiencies add up to a much more pleasant quilting experience.
The Art of Machine Speed and Movement
One of the most challenging aspects of free-motion quilting is finding the right relationship between machine speed and fabric movement. Too fast with the machine and slow with your hands, and you get tiny, dense stitches. Too slow with the machine and fast with your hands, and you get long, uneven stitches.
Corey emphasized finding a comfortable machine speed and maintaining consistent movement. This isn't something you can rush—it takes practice to develop the coordination between your hands and the machine's rhythm. The key is starting slowly and building up speed gradually as your confidence grows.
What I found particularly helpful was his advice about stopping and repositioning. You don't have to complete an entire design in one continuous motion. It's perfectly acceptable to stop, lift the presser foot, reposition your hands for better control, and continue. This takes the pressure off and allows you to focus on quality rather than trying to be a quilting superhero.
The drawing practice really pays off here because your hands already know the general direction they want to move. Instead of constantly thinking about where to go next, you can focus on the mechanical aspects of speed and movement coordination.
Customization: Making Designs Your Own
One of the most exciting aspects of free-motion quilting is the ability to customize and combine design elements. Corey demonstrated this beautifully by taking a basic feather outline and filling it with different patterns—traditional feather plumes on one side and geometric arches with figure-eight fills on the other.
This approach transforms quilting books from rigid instruction manuals into idea catalogs. Instead of feeling like you have to execute a design exactly as shown, you can use the patterns as starting points for your own creative exploration. Want to combine the flowing curves of a feather with the geometric precision of a grid pattern? Go for it. Interested in mixing traditional motifs with modern elements? The only limit is your imagination.
The "But Wait! More Really Fancy Feathers!" book that Corey used is a perfect example of this philosophy. Rather than presenting finished designs that must be copied exactly, it offers components and ideas that can be mixed, matched, and modified to suit your project and personal style.
The Magic of Removable Marking
One concern many quilters have about drawing designs on their fabric is whether the marks will come out completely. Corey demonstrated the ultimate marking pencil, which creates clear, visible lines that disappear completely with heat. Watching those intricate feather guidelines vanish under the iron was almost magical.
This removable marking system gives you the confidence to draw detailed guidelines without worrying about permanent marks on your finished quilt. You can be as detailed as you need to be during the planning and quilting phases, knowing that all evidence of your guidelines will disappear in the final pressing.
The key is allowing your fabric to cool completely after the initial fusing process before drawing your design. If the fabric is still warm from the iron, the marking pencil lines may not adhere properly and could disappear prematurely during quilting.
Building Confidence Through Practice
Perhaps the most important message from Corey's demonstration is that free-motion quilting success comes from practice, not perfection. Every quilter starts with wobbly lines and uneven stitches. The difference between those who give up and those who develop beautiful free-motion skills is simply persistence and practice.
The drawing exercises provide a low-pressure way to build the muscle memory and confidence you need. You can practice the same design multiple times, experimenting with different approaches and building familiarity with the patterns. By the time you move to fabric, the movements feel natural rather than foreign.
Starting with simpler designs and gradually working up to more complex patterns allows you to build skills progressively. There's no shame in spending weeks perfecting basic stippling before moving on to feathers or other intricate motifs. Every expert quilter went through this learning process.
The Domestic Machine Advantage
While longarm machines certainly have their place, domestic machine quilting offers some unique advantages that are often overlooked. The smaller throat space actually provides better control for detailed work, allowing you to see exactly where your needle is going and make precise adjustments.
Domestic machines are also more accessible for practice. You can sit down for a quick 15-minute practice session without the setup time and space requirements of a longarm. This accessibility means you can practice more frequently, which accelerates your skill development.
The portability factor is significant too. Your domestic machine can travel to classes, retreats, and guild meetings, allowing you to continue practicing and learning in different environments with different teachers and fellow quilters.
Troubleshooting Common Challenges
Even with the right tools and techniques, free-motion quilting can present challenges. Thread tension issues are common when transitioning from regular piecing to free-motion work. The key is making small adjustments and testing on scraps before working on your actual project.
Fabric puckering often indicates that you're moving the fabric too quickly relative to your machine speed, or that your quilt sandwich isn't properly stabilized. The fusible batting technique Corey demonstrated eliminates most puckering issues by keeping your layers properly aligned.
Uneven stitch length is usually a matter of coordination between machine speed and hand movement. This improves naturally with practice, but starting with slower machine speeds and focusing on consistent hand movement helps accelerate the learning process.
The Creative Possibilities
Once you master the basic techniques of domestic free-motion quilting, the creative possibilities are endless. You can add custom quilting to purchased quilt tops, create unique wholecloth quilts, or incorporate free-motion elements into traditional pieced quilts.
The ability to customize your quilting designs means every project can be truly unique. You're not limited to pantograph patterns or the designs available from your local longarm quilter. You become the designer, creating quilting that perfectly complements your fabric choices and personal style.
Modern quilting has embraced free-motion techniques as a way to add texture, movement, and personal expression to quilts. Dense quilting in some areas contrasted with open space in others creates dramatic visual effects that simply aren't possible with traditional straight-line quilting.
Making It Sustainable
One of the best aspects of developing domestic free-motion quilting skills is the long-term sustainability. Once you've invested in the basic tools and developed the fundamental skills, you can quilt any project without additional costs or scheduling constraints.
The tools Corey demonstrated—the Sew Slip mat, Machingers gloves, ruler foot, templates, and marking pencils—represent a one-time investment that will serve you for years. Compare this to the ongoing costs of professional quilting services, and the economics become very attractive.
More importantly, the creative control you gain is invaluable. You can quilt exactly what you envision, when you want to quilt it, without compromising your design vision to fit someone else's capabilities or schedule.
Your Free-Motion Journey Starts Now
The path to beautiful free-motion quilting on your domestic machine is clearer than you might think. It starts with a pencil and paper, progresses through proper preparation techniques, incorporates the right tools, and develops through consistent practice.
You don't need to wait until you have the perfect setup or feel completely confident. Start with simple designs, practice the drawing exercises, and gradually build your skills. Every expert free-motion quilter started exactly where you are now.
The tools and techniques Corey demonstrated are available right now, and many of them are surprisingly affordable. The Sew Slip mat, Machingers gloves, and marking pencils cost less than a single professional quilting job, but they'll serve you for countless projects.
Your domestic sewing machine is more capable than you might realize. With the right approach, it can produce quilting that rivals anything done on expensive longarm equipment. The only question is: are you ready to discover what you and your machine can accomplish together?
Your Free-Motion Questions Answered
Do I really need to draw the designs first, or can I just wing it? Drawing builds crucial muscle memory and confidence. While you might eventually be able to improvise simple designs, complex patterns like feathers benefit enormously from the practice and planning that drawing provides.
What if my domestic machine doesn't have a lot of throat space? Smaller throat space actually provides better control for detailed work. You'll need to roll or fold your quilt more frequently, but the precision you gain often makes up for the slight inconvenience.
How do I know if my machine can handle free-motion quilting? Most modern domestic machines can do free-motion quilting. The key requirements are the ability to drop feed dogs and use a darning or free-motion foot. Check your manual or contact your dealer if you're unsure.
What's the best thread for free-motion quilting? High-quality cotton or polyester thread in 40 or 50 weight works well for most applications. Avoid bargain threads that can cause tension issues or break frequently.
How long does it take to learn free-motion quilting? Everyone progresses at their own pace, but with regular practice, most quilters see significant improvement within a few weeks. The key is consistent practice rather than marathon sessions.
Ready to start your free-motion quilting journey? Visit Linda's Electric Quilters for all the tools and resources mentioned in this guide. Your domestic machine is more capable than you think—it's time to discover what you can create together!
SEO Keywords: free motion quilting, domestic sewing machine quilting, feather quilting designs, free motion quilting tools, Sew Slip mat, Machingers gloves, fusible batting quilting, quilting on home machine, free motion quilting techniques, domestic machine quilting tips, quilting ruler foot, free motion quilting practice, home quilting setup, quilting design books


