
Hey everyone. Today we're making a cozy lap quilt, and we're starting where every good quilt starts — with a clean, honest cut.
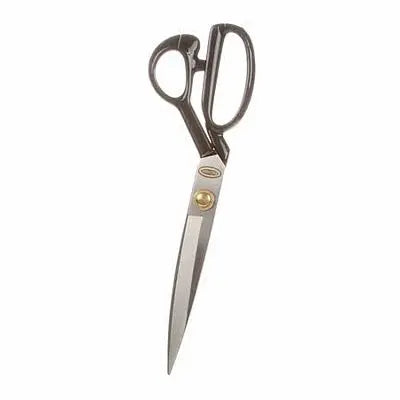
Before we sew one stitch, let's talk about the tool doing the cutting. These are the 12in Tailor Scissors from Brewer. Twelve inches is a serious pair of shears, y'all. They are hand finished and tuned, with an all stainless steel finish. The blades are precision-ground, and the tension is adjustable. That matters more than folks think.
The handle tells the rest of the story. It has a classic offset design. That offset keeps the blades flat along your table while you cut. So you get clean, even cuts instead of that lifted, wobbly line. The oval handle and thumb ring sit natural in your hand. Good control, less fighting the fabric. If I can do this, y'all can do it.
The Project: A Simple Lap Quilt
Our lap quilt finishes at about 48 by 60 inches. That's a good couch size. Big enough to share. Small enough to finish without losing steam.
Why do these scissors suit this project? A lap quilt means long cuts. Strips, borders, batting, and backing, all in one sitting. A 12-inch blade takes a longer bite with each snip. Fewer stops means straighter edges. And straighter edges mean your seams line up later. We're not reinventing the wheel here. Good cutting just makes everything downstream easier.
Materials
- About 2 1/2 yards of quilting cotton for the top, in prints and solids you love
- 1 3/4 yards of backing fabric
- A batting piece about 56 by 68 inches
- 1/2 yard of fabric for binding, cut into 2 1/2-inch strips
- 50-weight cotton thread for piecing
- Your 12in Tailor Scissors, a rotary cutter and mat, pins, and your machine
- An 80/12 needle for piecing, set to about 10 to 12 stitches per inch
Brief Steps
Here we go. First, press your fabric. Wrinkles lie to you about size, folks.
Second, cut your top fabric into 6 1/2-inch strips. Then crosscut those strips into 6 1/2-inch squares. Keep that offset handle flat on the table and let the blades do the work. Don't force them.
Third, lay out your squares in rows of 8 by 10. Move things around until the colors make you smile. Completely up to you.
Fourth, sew the squares into rows with a 1/4-inch seam. Press the seams, then join the rows. Take your time. It's not a race.
Fifth, layer backing, batting, and top. Baste it well. Then quilt it your way. Stitch in the ditch is a fine place to start. Echo quilting and a gentle meander work too.
Sixth, trim the edges square. This is where those long scissors really shine. One slow pass beats three choppy ones. Then bind, and you're done. Just like that.
Practical Tips
I'll be honest with you. I have rushed a cut and watched a strip come out crooked. Every single time, I was hurrying. Slow down at the cutting table. A rushed cut costs you more time than it saves.
Keep your free hand flat and well clear of the blade path. Cut away from your body. And if the blades start chewing instead of cutting, check that adjustable tension first. A small tweak often fixes it.
Use your scissors for fabric only. Paper dulls good blades fast. That's not quilt police talk, that's just saving your tools.
And here's your permission beat, friends. Your points may not all match. Mine don't always match either. A finished quilt that gets used beats a perfect top that lives in a closet. You're your own worst critic. Everyone else just sees a quilt made with love.
Alrighty. Pick fabrics that make you happy, cut them clean, and sew them with joy. Thanks so much for spending a little time with me today. We'll see you next time. Bye.
Shop the 12in Tailor Scissors at Linda's Electric Quilters.


