
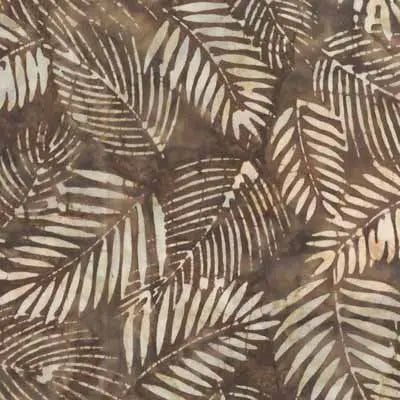
Hey everyone! Today we're making a simple wall hanging with one beautiful batik, and I'm going to show you how to let the fabric do the talking.
Here we go.
Meet the fabric
This is the Anthology 402Q-7 Tobacco 45" wide fabric per yard from Fabric Fanatics.
It's a batik. It's 45" wide. And it's sold by the yard here at Linda's.
The name on this one is Tobacco. Anthology is the collection name in the title, and 402Q-7 is its number. That is all you need to find the exact same fabric again.
Now, why do I love a batik for a wall hanging? Batiks have that rich, layered look. The color is not flat. It shifts a little as the light changes. Hang it on a wall, and it catches your eye all day long.
A wall hanging is also a kind place to start. You are not committing to a bed-size quilt. You are making one pretty panel for your wall. Super duper doable.
Completely up to you how you use it, of course. One big, uncut piece lets the batik shine on its own. Cutting it into wide strips gives you a little more piecing to play with. I will show you the simple version first.
The project: a batik wall hanging
We're making a wall hanging that finishes about 24" by 32".
That is a good size, folks. Big enough to fill a hallway spot. Small enough to finish in a weekend.
Why does this fabric suit it? Because a batik does not need a busy pattern fighting it. One generous piece, some straight quilting lines, and a clean binding is plenty. Your quilting stitches will show as gentle texture, not as a test you have to pass.
Materials
- 1 yard of Anthology 402Q-7 Tobacco for the front
- 1 yard of a backing fabric, plus a strip for a hanging sleeve
- Batting cut about 28" by 36", so you have extra all around
- Thread that blends with the fabric
- Rotary cutter, ruler, and mat
- Pins or clips, and a walking foot if you have one
- A wooden dowel or slim rod for hanging, about 26" long
One yard at 45" wide gives you room to trim your front to size and still have a little left over. Save those scraps. Batik scraps are gold for applique later.
Brief steps
One. Press your fabric first. Use a hot, dry iron. Batiks press crisp and flat, and that makes every later step easier.
Two. Trim the front to 24 1/2" by 32 1/2". That extra 1/2" is your seam allowance all the way around. Measure twice, then cut once. Just like that, you are rolling.
Three. Layer backing face down, batting, then your batik front face up. Smooth from the middle out. Pin about every 4" so nothing shifts while you quilt.
Four. Quilt it simply. I like stitch in the ditch if you added strips, or straight echo lines about 1" apart on a single piece. Put in an 80/12 needle, lengthen your stitch a touch to about 2.5, and go slow. Slow down at the edges or you can snap a needle right on a thick spot. Ask me how I know. I have done it, y'all.
Five. Trim the edges even. Then bind with double-fold binding cut at 2 1/2" wide. That width wears well and frames the batik like a picture frame.
Six. Add a hanging sleeve on the back. A strip about 4" wide, sewn into a tube and hand-stitched along the top back edge, works really really well. Slide your dowel through, and hang it up.
Practical tips
Test your quilting lines on a scrap sandwich first. Ten minutes of testing saves you an hour with a seam ripper. We are not reinventing the wheel here.
Want options? You have them. Quilt it by hand for a soft look. Use ruler work for crisp lines. Or meander freehand across the whole piece. All three are right. My preference is simple echo lines, but it is completely up to you.
And here's the permission beat, because I mean it every time. It does not have to be perfect. A wavy line is still a finished wall hanging. You're your own worst critic, folks, and nobody visiting your home is bringing a ruler. Take your time. It's not a race. If I can do this, y'all can do it.
Alrighty. Thanks so much for sewing along with me today. We'll see you next time. Bye.
Shop the Anthology 402Q-7 Tobacco 45" wide fabric per yard at Linda's Electric Quilters.


