
How to Build a Western Quilt Around a John Wayne Panel: Framing, Borders, and Finishing Ideas
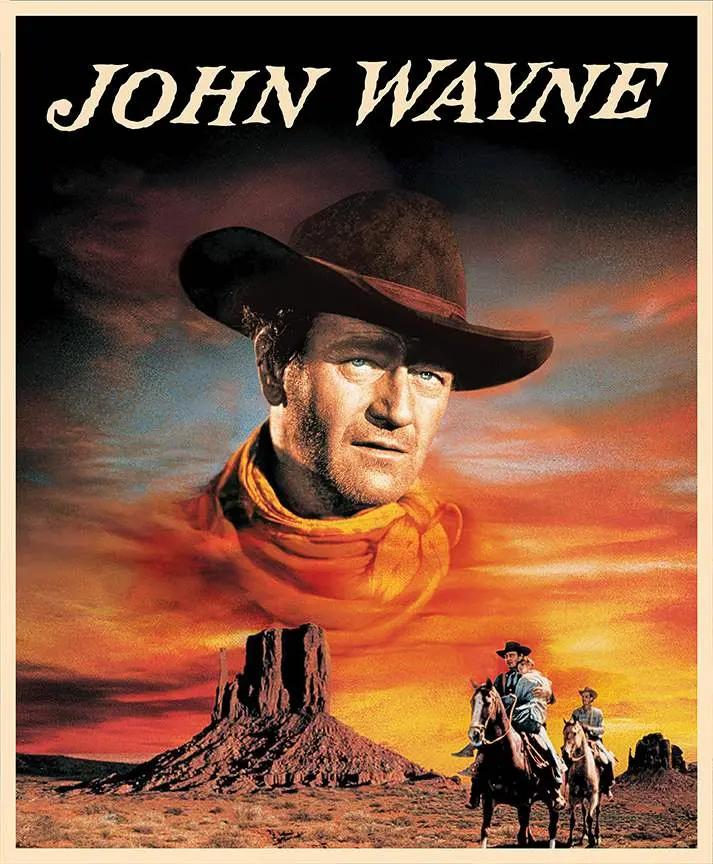
A fabric panel does the hardest part of a quilt for you: it gives you a finished focal image, so your work is framing it well rather than piecing a center from dozens of small pieces. The John Wayne American West John Wayne Panel for Riley Blake Designs is a digitally printed panel featuring images of John Wayne on a western landscape. It measures 35 1/2" x 43", is printed on 100% cotton, and is an official licensed product. Riley Blake made the collection for quilting, apparel, and home decor.
Because the artwork is already composed, the panel is best where one strong western image should carry the whole piece: a throw or lap quilt, a wall hanging, a cabin or ranch house accent, or a gift quilt for a classic western film fan. Used whole, it keeps the portrait and landscape intact. Cutting it apart would break up that composition, so build outward from the full panel instead of treating it as yardage.
Step One: Square and Frame the Panel
Start by pressing the panel flat and checking that its edges are square. Printed panels can shift slightly in finishing, so measure the width at the top, middle, and bottom, and trim only the minimum needed to make opposite sides equal. Avoid trimming into the printed image; leave a small margin of background around the artwork so the scene does not feel crowded once seam allowances are taken.
Next, add a narrow first border — often called a frame or inner border. A slim, dark, or solid strip separates the busy landscape from pieced outer borders and makes the panel read like a framed picture. Cut those strips accurately and sew them to the sides first, then to the top and bottom, pressing seams away from the panel. Measure through the center of the panel, not along the edge, when you cut each border length; that keeps the frame square instead of wavy.
Building Outward: Borders, Blocks, and Size
At 35 1/2" x 43", the panel alone is smaller than a typical throw, so borders do the work of growing it. One framed border plus one wider border can bring it to a generous wall hanging. For a lap quilt, follow the frame with a pieced border — simple squares, rectangles, or a row of straightforward patchwork blocks in coordinating western prints — then finish with another solid or tonal border to rest the eye. Work out your target finished size first, then divide the inches you need to add evenly between both sides so the panel stays centered.
For color pairing, pull your colors from the landscape itself rather than guessing: the dusty blues, tans, browns, and muted reds of a western scene pair naturally with denim tones, leather browns, and faded Americana accents. Use busier coordinating prints in the outer pieced border, and keep the fabrics closest to the panel quieter so nothing competes with John Wayne's image. If a coordinate feels too bright, test a strip of it against the panel in daylight before cutting — the panel should stay the brightest, clearest element in the quilt.
Other Ways to Use the Panel
Backed and bound on its own with batting, the panel becomes a quick wall hanging. Set into a larger top, it can anchor a bed quilt built from coordinating blocks around it. It can also become the front of a large cushion cover or a ranch-style table topper, as long as the full image fits your finished dimensions.
Quilting, Finishing, and Care
Quilt lightly over the panel itself — stitch in the ditch around the frame and use gentle quilting that follows the landscape — and save denser quilting for the borders, where it will not distract from the printed portrait. Finish with a binding that echoes your inner frame. For care, follow the instructions given for this fabric: machine wash cold and tumble dry low, which helps protect both the cotton and the clarity of the digital print.
Shop the John Wayne American West John Wayne Panel at Linda's Electric Quilters.


