
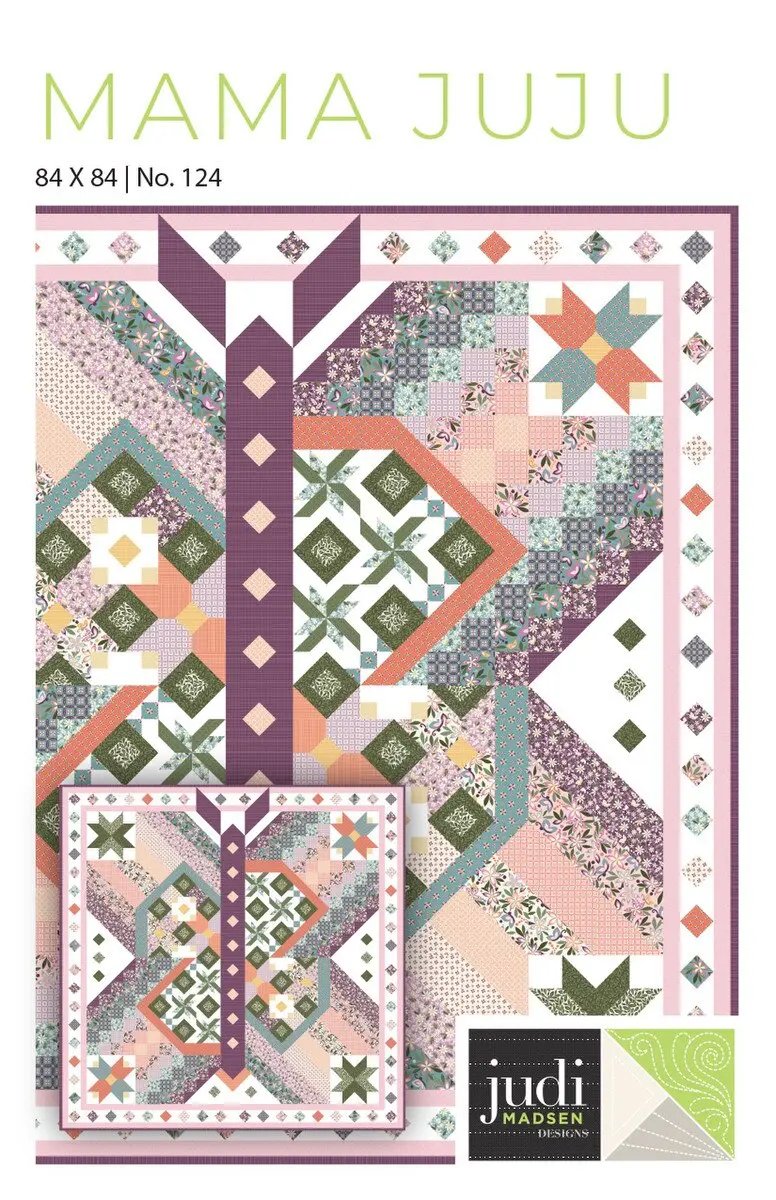
How to Piece a Large Butterfly Quilt: Tackling the Mama Juju Quilt Pattern
Some quilts are quick finishes, and some are the project you remember making. The Mama Juju Quilt by Judi Madsen Designs belongs in the second group. Described as the ultimate quilt challenge, it uses traditional piecing to build a gorgeous butterfly quilt at a finished size of 84 inches by 84 inches. If you love butterflies and piecing that rewards patience, approach this pattern with a plan, not a rush.
What This Pattern Is
Mama Juju is a quilt pattern designed by Judi Madsen for Riley Blake Designs. The butterfly is built with traditional piecing, which means the image emerges seam by seam as you join cut pieces together. That method is part of the appeal: a pieced butterfly has crisp geometry and a graphic quality printed fabric alone cannot give you.
The finished quilt is square, 84 inches by 84 inches — large enough to be the focus of a room, as a bed quilt, a generous throw, or a statement piece. Because the motif is large, your fabric choices will show in every wing, so choosing them well matters more here than in a busy scrap quilt.
Set Yourself Up Before You Cut
For a challenge quilt, the work before the first cut pays for itself. Read the whole pattern through once without cutting, so you understand how sections are built and where they join. Then organize: label bags or trays for each fabric and section, and keep cut pieces in order. Traditional piecing depends on consistency — the same seam allowance, the same pressing habit, and pieces that stay identifiable from table to machine.
Cut a small group of pieces at a time rather than everything in one long session. Check measurements as you go, square up units where the pattern allows, and press carefully so sections stay flat. Small inaccuracies compound across an 84-inch top, so measuring early saves frustration at final assembly.
Choosing Colors for a Butterfly
A butterfly quilt lives or dies on contrast. The wings need to read clearly against the background, so place a definite light, medium, and dark in conversation before you commit: a background that is clearly separate in value from the wing fabrics, wing colors that stand out against it, and a darker or contrasting detail color so the butterfly's structure does not disappear. Lay your candidates out together in daylight and squint, or take a phone photo and view it in black and white — if the butterfly shape vanishes in grayscale, you need more value contrast.
Within the wings, you can go natural or expressive. Garden-inspired greens, sky tones, and floral colors echo a real butterfly in its habitat, while saturated jewel tones or soft pastels make the same piecing feel modern or gentle. Because the quilt is square and centered on one motif, it also tolerates a bold choice well: one strong wing color, kept consistent, will look intentional rather than busy.
Piecing and Finishing a Large Square Quilt
Work in sections and join the quilt in stages, checking that the top still measures true as it grows. When the top is complete, give it a thorough press and measure through the center before adding any finishing steps, so the quilt stays square. An 84-inch top needs clear floor or table space for layering and basting, and extra support beside and behind your machine while quilting so the weight does not pull against your stitching. Choose quilting that supports the butterfly rather than competing with it — echoing the wing shapes or using an even overall texture both let the piecing remain the star.
Take your time, and enjoy the challenge for what it is: a chance to build, piece by piece, a butterfly that covers a whole quilt.
Shop the Judi Madsen Designs Mama Juju Quilt Pattern at Linda's Electric Quilters.


