
Hey everyone, today we're building an 18 by 42 inch classic grid runner from a jelly roll, and you'll learn how strip sets, crosscut into squares, build the grid.
It suits a confident beginner: 12 strips when each set yields six squares, 15 if a fifth set is needed.
What is the finished size, and what are the key numbers?
Finished size: 18 by 42 inches, nominal. Before binding, the top measures 18½ by 42½ inches: 21 squares in 3 by 7, each finishing 6 inches square. Seam allowance: ¼ inch throughout; the outer allowances set the finished size.
Why build the grid from strip sets?
Unlike a charm pack grid, three strips sewn together make a band one square wide; crosscut it into squares — six per set when 39 usable inches remain after end-squaring — and rotating alternate squares adds a woven rhythm.
What do you need?
| Material or tool | What you need | Required or optional |
|---|---|---|
| Jelly roll strips, 2½ in. wide, cotton | 12 strips in 4 sets; 15 if a fifth set is needed | Required |
| Backing fabric | One piece at least 24 by 48 in. | Required |
| Batting | One piece at least 24 by 48 in. | Required |
| Binding fabric | ⅓ yard, for four 2½-in. strips | Required |
| Thread | All-purpose quilting thread | Required |
| Quarter-inch foot, pins, marking pencil | Seams, pinning, numbering | Required |
| Rotary cutter, ruler, mat, seam ripper, iron | Cutting, fixing, pressing | Required |
| Walking foot | Even feeding while quilting | Optional |
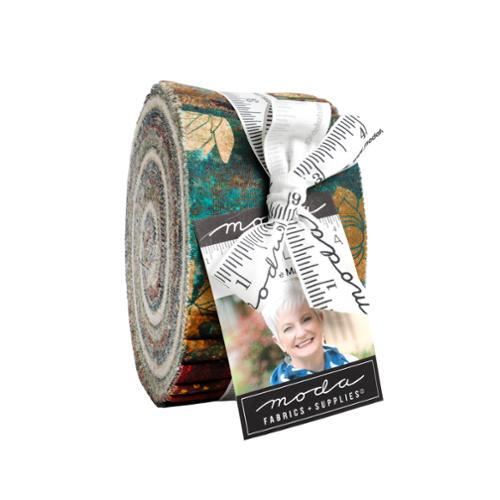
Featured roll: the Tranquil Patina Jelly Roll by Debbie Maddy for Moda.
What gets cut, and what comes from the roll?
- From the roll: nothing cut before sewing; strips are sewn into sets, then crosscut.
- Backing and batting: one piece each, 24 by 48 minimum — about 2¾ in. extra per side, more if your method wants it.
- Binding: four 2½-inch strips by width of fabric. Joined, after the three joining seams, they should measure well beyond the 122-inch perimeter, with length for corners and the final join; check first.
How do you sew it?
- Sort by value first. Sort strips into lights, mediums, darks. Build each set with one of each where the roll allows, lightest at one edge, so squares share a light-to-dark order.
- Test one set before sewing the rest. Measure a strip's width first. Sew three strips with your usual ¼-inch seam, press, and check the set measures 6½ inches wide. Off? Adjust the seam allowance, not the strip, and retest; set a genuinely undersized strip aside.
- Sew the remaining sets. Chain piece, threads uncut between sets. Within each set, sew the second seam opposite the first, supporting strips without pulling, to help keep sets straight. Press both allowances toward the dark-edge side.
- Crosscut the squares. Square one end, trim unusable ends, confirm 39 usable inches before counting six squares. Crosscut 6½-inch squares and check each measures 6½ both ways.
- Lay out the grid. Arrange 21 squares, 3 by 7, setting aside any not measuring true. Turn alternate squares a quarter turn, so stripes alternate direction. Swap squares landing heavy in one corner.
- Join squares into rows. Sew each row of 3. Pin at both grid seams — unpinned seams are one way corners drift. Press row seams alternating by row, so long seams nest.
- Join the rows. Sew the 7 rows together, pinning at every intersection. If a corner fights the join, re-sew that one seam; small mismatches that sit flat can stay. It does not have to be perfect.
- Layer and baste. Backing wrong side up, batting, top centred. Baste outward.
- Quilt it simply. Stitch in the ditch along long seams, then add straight lines spaced to suit your batting maker's quilting-distance guidance, at 8 to 10 stitches per inch.
- Bind. Join the four strips with straight seams, fold in half, press, sew to the front, mitring corners. Fold to the back, stitch down. Take your time — it's not a race.
How does the precut math work?
Yield per set: three strips at 2½ inches make 7½; two ¼-inch seams take ½ inch at each join, 1 inch in all, leaving a 6½-inch band. Six crosscuts need 39 usable inches after end-squaring — verify that length before counting six. Four full sets give 24 squares; 21 are used. If sets yield five each, sew a fifth set — 15 strips, 25 squares — and choose the best 21.
Finished-size math: each square measures 6½ inches, finishes 6. Three across: 19½ minus two seams is 18½, finishing 18 after the outer allowances. Seven down: 45½ minus six seams is 42½, finishing 42.
Pinked edges: if your strips arrive pinked, do not trim the pinking. Measure the strips as they are, then judge by the test set: 6½ inches wide pressed, or adjust the seam allowance. Each square's crosscut ends are fresh cuts; its other edges are the set's outside edges.
What can go wrong, and how do you fix it?
| Symptom | Likely cause | Fix |
|---|---|---|
| A set measures under 6½ in. wide | Seams may exceed ¼ in., or a strip is undersized | Adjust the seam allowance and retest; set an undersized strip aside |
| A set bows along its length | Strips may have stretched, or seams all sewn one direction | Support without pulling; alternate direction within the set |
| Grid corners drift apart | Intersections may not be pinned, or row seams not nested | Pin at every intersection; press rows opposite ways |
What do people ask before making this runner?
How many jelly roll strips does this runner use?
Twelve strips when each set yields six squares; fifteen if a fifth set is needed. Save any unused strips.
Do I have to trim the pinked edges off the strips?
No, if your strips have them. Measure the strips as they are; the test set proves the make: three strips sewn with ¼-inch seams should press to 6½ inches wide.
Can I make the same grid from a charm pack instead?
Not the same pieced design: whole charm squares make a plain grid in the same arrangement, without the stripes.
How do you care for it, and change the size?
Care follows the components: follow every component's care guidance — batting, backing, and thread included — and wash, dry, and press by the most delicate component in the runner. Longer: 24 squares make 8 rows, 18 by 48. Shorter: 6 rows finish 18 by 36. Completely up to you. For the back, see our supporting fabric guides: Natural Bella Solids Wideback on one-panel backing and Natural Bella Solids on calm neutrals.
Shop the Tranquil Patina Jelly Roll at Linda's Electric Quilters.
Thanks, folks. We'll see you next time. Bye.


