
Hey everyone. Today we're making a strip-pieced lap quilt from one layer cake. You'll learn to cut squares into strips and join them into rows.
We are making a strip-pieced quilt that targets a finished size of about 48 by 57 inches, for a confident beginner with a steady quarter-inch seam. Sizes here are edge-to-edge measurements.
What is the finished size, and what are the key numbers?
The pieced top measures 48½ by 57½ inches before quilting. The target finished size is 48 by 57 inches after quilting, squaring, and binding. Seam allowances are ¼ inch throughout. The plan uses 36 of 42 squares, cut into 144 strips, in 24 rows of 6.
Why cut layer cake squares into strips?
Whole squares give you a plain grid. Sliced into strips, those same prints read as long patchwork lines.
What do you need?
You need one layer cake, backing, batting, binding fabric, and basic supplies.
| Material or tool | What you need | Required or optional |
|---|---|---|
| Layer cake (10 in. squares) | 1 pack, 42 squares; 36 used, 6 left whole | Required |
| Backing fabric | One piece at least 58 by 67 in. | Required |
| Batting | One piece at least 58 by 67 in. | Required |
| Binding fabric | ½ yard, for six 2½-in. strips | Required |
| Sewing machine and needle | Machine seams | Required |
| Thread | 50-weight cotton, recommended | Required |
| Walking foot, basting safety pins | Even feeding; holding the layers | Required |
| Rotary cutter, mat, ruler, iron | Cutting and pressing | Required |
| Hand-sewing needle, seam ripper | Hand finishing (or finish by machine); fixes | Optional |
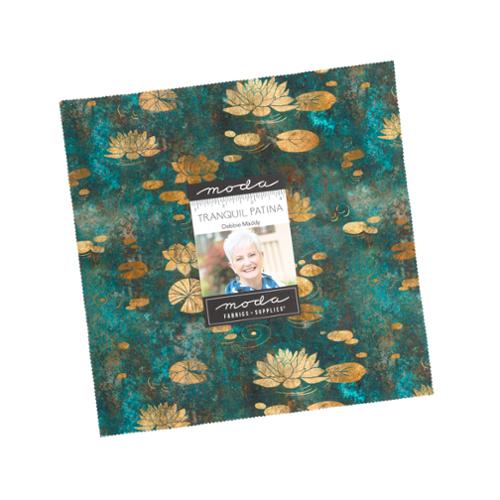
My pick is the Tranquil Patina Layer Cake by Debbie Maddy for Moda. Our Natural Bella Solids guide helps pick a neutral solid.
What gets cut, and from where?
From 36 squares: cut each into 4 strips, each 2½ by 10 inches, for 144 strips. Keep 6 squares whole as spares. From the binding fabric, trim selvages and cut 6 strips, each 2½ inches by width of fabric, at least 40 inches usable each.
How do you sew it?
Sort, test, cut, join rows, layer, quilt, and bind, in that order.
- Sort the 36 squares by value: lights, mediums, darks. Plan rows around one value family each, with a few contrast strips.
- Test first. Pick one reference, body or pinking tips, that keeps a square at 10 inches. Cut one square into 4 strips, join 2 end to end: they should measure 19½ by 2½ inches. If not, adjust your seam and retest.
- Cut the remaining 35 squares the same way.
- Sew 6 strips end to end along their 2½-inch edges, chain piecing. Each row should measure 57½ by 2½ inches. Make 24 rows and number them.
- Press seams in odd rows one way, even rows the other, so cross-seams nest.
- Join the 24 rows along their long edges. Pin at every cross-seam; skip the pins and columns can drift. Alternate direction, or the panel can bow.
- Check the panel: it should measure 48½ by 57½ inches. If a row is off, fix its seam; save squaring for after quilting.
- Layer and baste: backing wrong side up, batting, top right side up, centered, with about 4¾ inches to spare per side. Pin baste center outward.
- Quilt it simply, following your batting maker's maximum distance: stitch in the ditch along enough row seams to keep gaps within it. Slow down at cross-seams.
- Square and bind. After quilting, measure the sandwich: square it to 48 by 57 inches if dimensions allow; otherwise square to the largest even rectangle. The final size may be slightly smaller from quilting take-up. Join the 6 strips end to end, fold in half, press, sew to the front, mitering corners; leave a tail, join the final ends, trim excess. Fold to the back; stitch down by hand or machine. Take your time; it's not a race.
How does the layer cake math work?
Yield: 42 squares per pack, 4 strips each, so 36 squares give the 144 needed; 6 stay whole as spares at the start. For another row count: rows times 6, divided by 4, rounded up.
Sewn-size math: six strips joined end to end measure 57½ inches: 60 minus five joins at ½ inch each. Twenty-four rows measure 48½ inches: 60 minus 23 joins at ½ inch each. Binding does not shrink it; step 10 squares the sandwich toward 48 by 57, and the trimmed size determines the approximate finished dimensions before washing.
Pinked edges: squares arrive pinked. Do not trim them. Use the reference your step-2 test proved for every cut and seam.
What can go wrong, and how do you fix it?
For a short row, check sizes and seams; for drift, pin cross-seams; for bowing, alternate direction. These checks can help.
| Symptom | Possible cause | Fix |
|---|---|---|
| One row measures short | Seams crept wider than ¼ in., or strips cut under size | Re-sew with a scant seam; if pieces are short, swap in strips from a spare square |
| Columns drift out of line | Cross-seams not pinned when rows joined | Pin at every cross-seam; press rows before joining |
| Panel bows like a banana | Every long seam sewn in one direction | Alternate direction; support the panel's weight |
| Lumps where seams meet | Cross-seams pressed the same way | Press odd and even rows opposite ways |
Frequently asked questions
How many layer cakes do I need?
One pack of 42 squares. The plan uses 36 and keeps 6 whole as spares.
Do I have to trim the pinked edges?
No. Pick the reference that keeps a square at 10 inches, prove it with the step-2 test, and use it throughout.
Can I sew the squares whole instead?
Yes; that makes a plain grid quilt with different math.
What if my stitches at cross-seams look a little off?
Re-sew any open or puckered seam; it will not lie flat. Small print mismatches are only cosmetic. It does not have to be perfect.
How do you care for it?
Care follows the components: follow the gentlest guidance for your fabrics and thread, and check your batting maker's label first.
How can you change the size?
Bigger uses all 42 squares and targets 56 by 57 inches; smaller uses 18 rows and targets 36 by 57. Both follow step 10: square to the target if dimensions allow, otherwise to the largest even rectangle. Bigger: 168 strips in 28 rows, backing and batting at least 66 by 67 inches, 7 binding strips from ¾ yard. Smaller: 27 squares make 108 strips. Next, our Natural Bella Solids Wideback guide shows a one-panel backing route.
Shop the Tranquil Patina Layer Cake at Linda's Electric Quilters.
Thanks, folks. See you next time. Bye.


