

Before you can even think about making that first stitch, you have to get your design onto your fabric. This is where the magic really starts, and learning how to transfer embroidery patterns is the first real step toward a beautiful, hand-stitched piece.
The basic idea is simple: move a design from paper to fabric. You can do this by tracing it with a light source, using a special carbon paper for darker fabrics, applying a hot-iron transfer, or even using a clever water-soluble stabilizer. What works best really depends on your project—the fabric's color and thickness, plus how complicated your design is. To finish your project with professional results, having the right transfer tools is essential, and Linda's has an amazing selection to get you started.
Choosing the Right Embroidery Transfer Method
Getting your pattern onto the fabric sets the stage for your entire project. I can't tell you how many times a clean, crisp transfer has saved me from a frustrating stitching session. The method you pick can be the difference between a professional-looking piece and one that just feels a little... off.
There’s no single "best" way to do it. The perfect technique is all about what you're working with.
For example, a light-colored, thin linen is an absolute dream for tracing with a lightbox. But try that same method on a thick, dark denim jacket? Forget about it. You won't see a thing.
To nail it every time, just ask yourself a few questions:
- Fabric Color and Weight: Can I see a pattern through this fabric if I hold it up to a window? Is the material so thick that a marking pen won't leave a clear line?
- Design Complexity: Am I stitching a few simple lines, or is this a super-detailed pattern that would be a nightmare to trace by hand?
- Permanence of Marks: Do I need these lines to vanish completely when I'm done? Or will my stitches cover them up anyway?
Each method has its own quirks. Knowing the pros and cons ahead of time will help you sidestep common problems, like those stubborn blue lines that refuse to wash out or a pattern that slips and slides around while you’re tracing.
Think of a clean transfer as the blueprint for your stitching. Taking a few extra minutes to choose the right method and do it carefully will save you hours of headaches later on. I promise.
This little chart gives you a quick visual on how easy each method is to get the hang of.
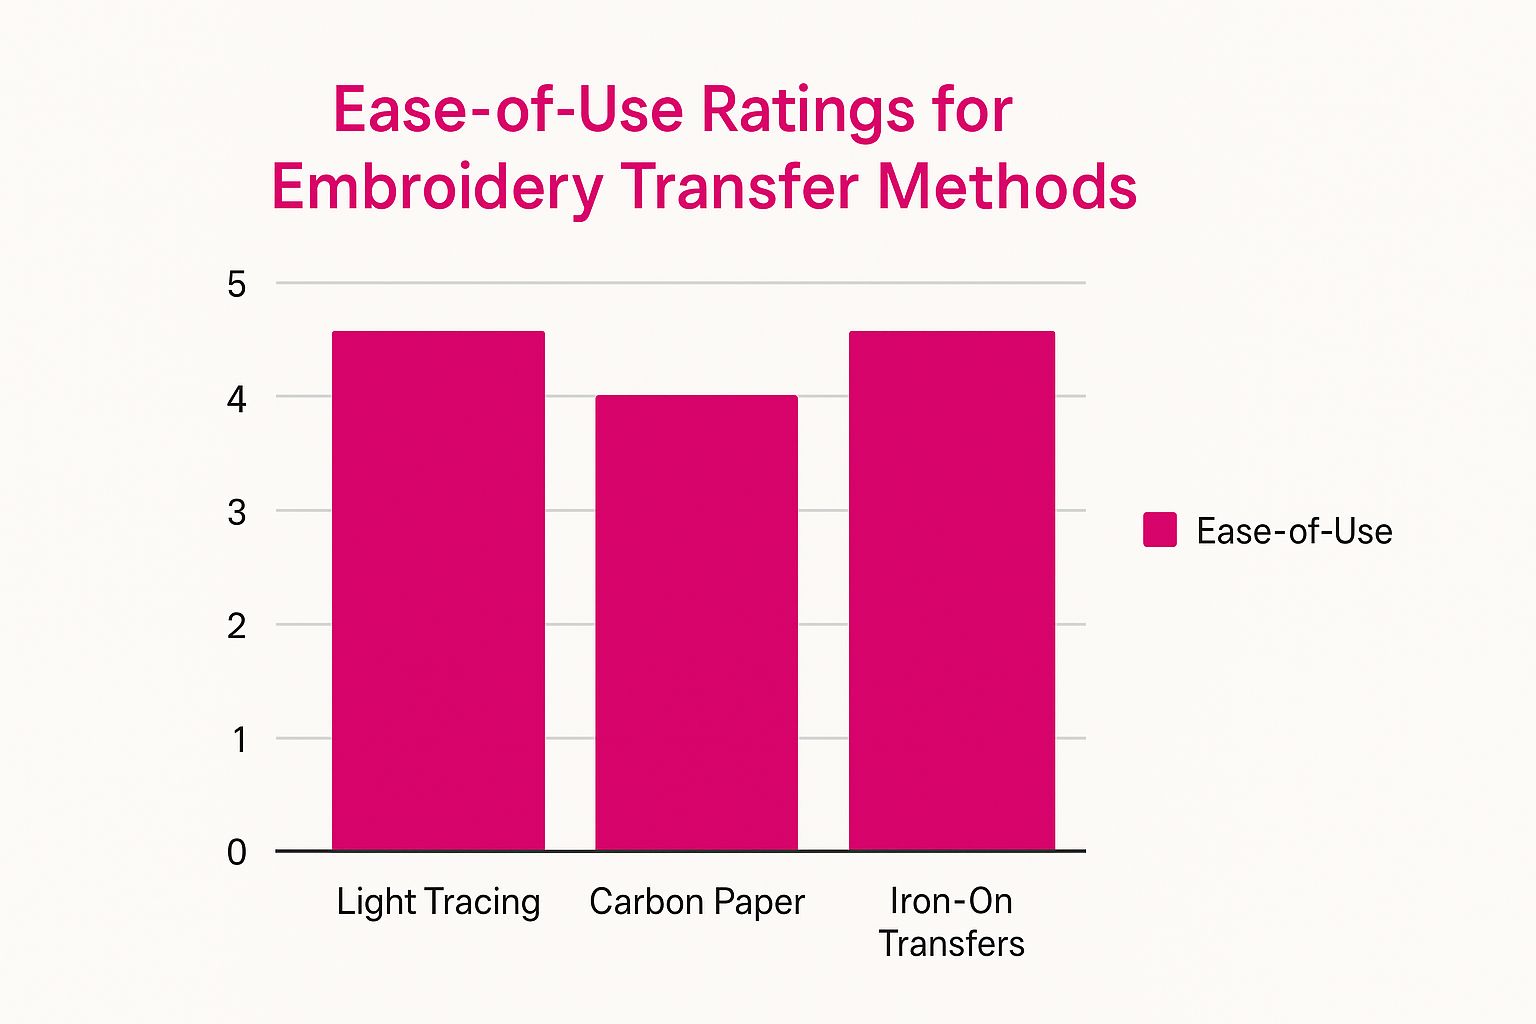
As you can see, tracing with a light source and using iron-on transfers are generally the easiest for beginners, while using carbon paper can take a little more practice to get just right.
Choosing the best way to get your pattern onto fabric can feel like a big decision, but it's really just about matching the tool to the task. To help you sort through the options, I've put together a quick comparison table.
Embroidery Transfer Method Comparison
| Method | Best For | Pros | Cons |
|---|---|---|---|
| Light Tracing | Light-colored, lightweight fabrics like cotton and linen. | Very precise; uses simple tools; marks can be easily removed. | Doesn't work on dark or thick fabrics; can be tedious for large designs. |
| Carbon Paper | Dark, thick, or non-stretchy fabrics like denim or canvas. | Creates clear, crisp lines; great for fabrics you can't see through. | Marks can be difficult to remove; can smudge if you're not careful. |
| Iron-On | Quick projects, repeating patterns, and most cotton/linen fabrics. | Super fast and easy; produces a perfect transfer every time. | A one-time use pattern; marks are permanent and must be fully covered by stitches. |
| Stabilizer | Intricate designs, stretchy fabrics like t-shirts, or textured materials. | Provides fabric stability; pattern washes away completely with water. | Adds bulk while stitching; requires an extra step (soaking/rinsing) to remove. |
This table should give you a solid starting point for your next project. Don't be afraid to experiment to find what you enjoy most!
Key Transfer Techniques at a Glance
Before we get into the nitty-gritty of each method, let's do a quick fly-by of the most popular options. The four main techniques every stitcher should have in their back pocket are Light Tracing, Carbon Paper, Water-Soluble Stabilizers, and Iron-On Transfers.
Having the right supplies for these methods is half the battle. You can learn more about essential gear in our guide to the Stitcher's Friend. Each of these techniques opens up a world of creative possibilities, whether you're adding a little flair to a t-shirt or creating a detailed masterpiece on canvas. And of course, you can find all the amazing products you need for your next project right here at Linda's.
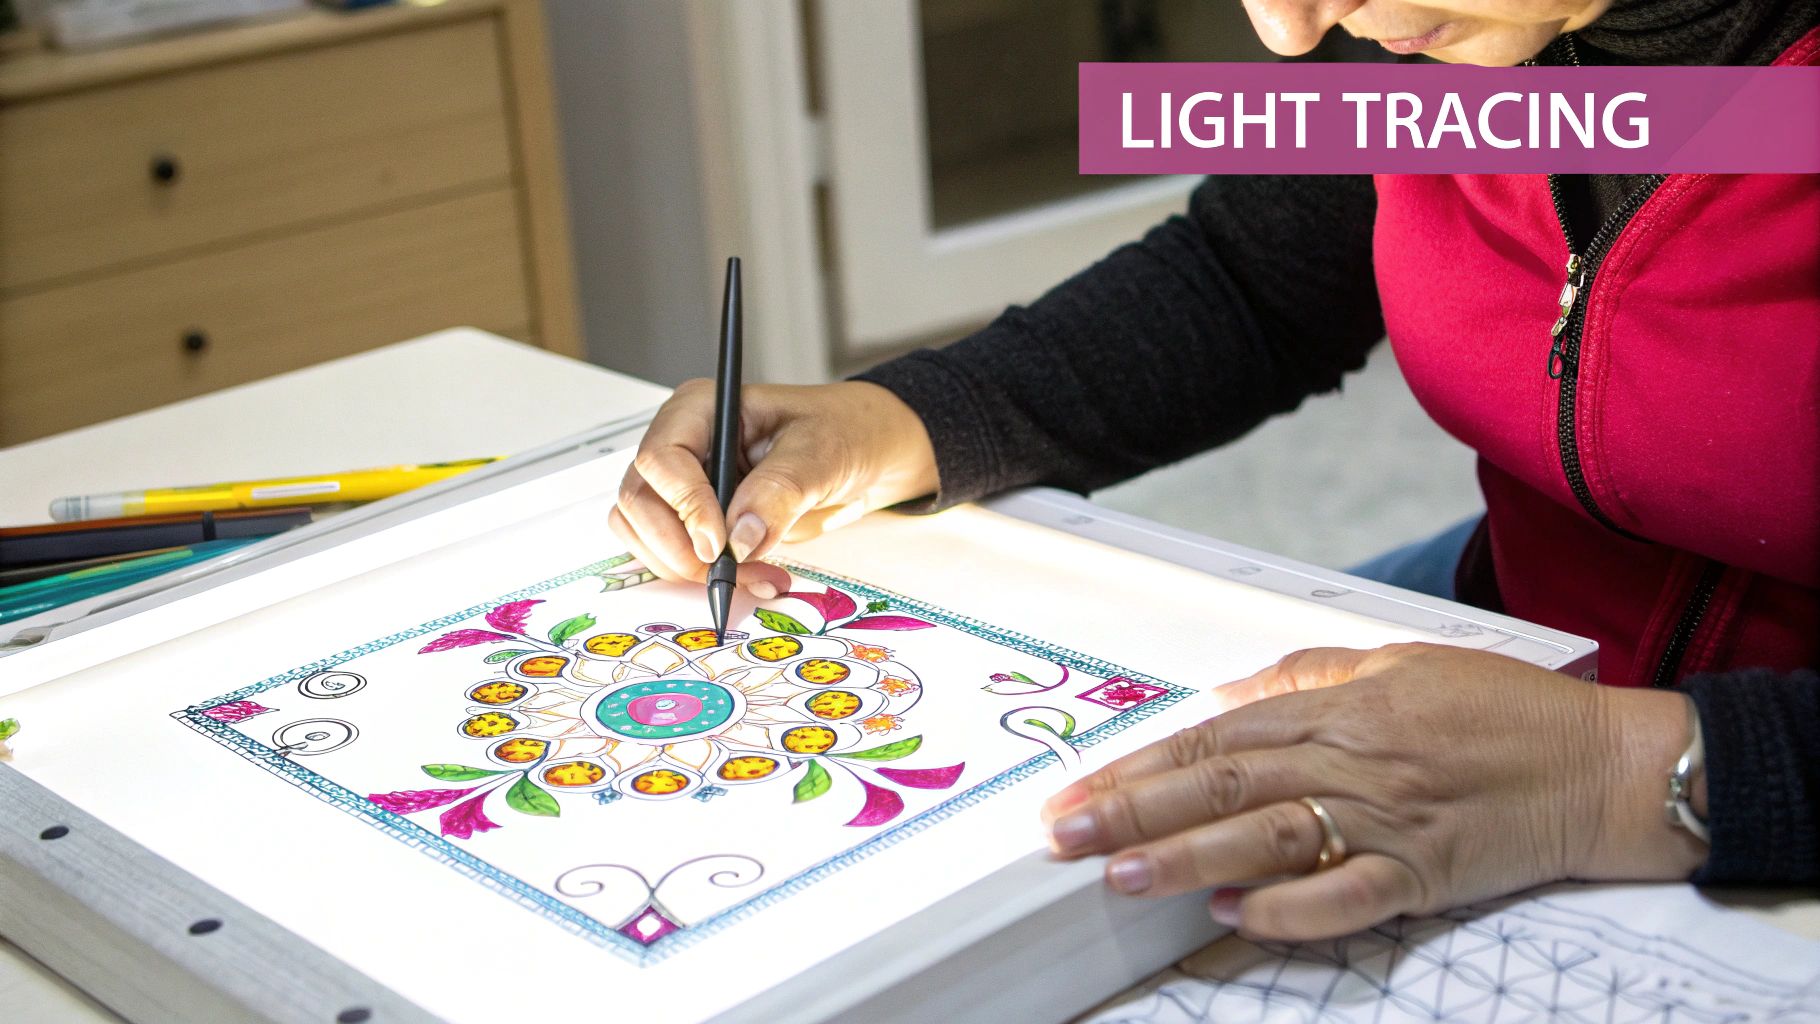
Using Light for a Classic Tracing Method
Sometimes the simplest way is the best way. Using a light source to trace your embroidery pattern is a time-tested technique that doesn't require a lot of fancy equipment, which makes it perfect for anyone just getting started. It’s a wonderfully direct, hands-on method that really connects you to the craft's roots.
This whole process is a throwback to some of the earliest forms of pattern transfer. Before modern tools, artisans simply drew their designs right onto the fabric with chalk or ink. This was especially popular back in 18th-century Europe, where embroidery was a cherished pastime. If you're a history buff, you can learn more about [the history of embroidery pattern transfers from ikfoundation.org](https://www.ikfoundation.org/itextilis/transferring- embroidery-designs.html).
Setting Up for Success
The big idea here is simple: put your pattern down, lay your fabric on top, and shine a light from underneath so you can see the design and trace it. You have two fantastic options for your light source: a lightbox or a sunny window.
- A Lightbox: If you see a lot of tracing in your future, a lightbox is a great investment. It gives you a consistent, even glow, meaning you can work comfortably at a table whenever inspiration strikes—day or night.
- A Sunny Window: Don't have a lightbox? No problem at all. A bright window works just as well. Just tape your pattern right onto the glass, then tape your fabric over it. It’s a completely free solution that gets the job done beautifully.
No matter which light source you choose, the secret to a sharp transfer is making sure nothing wiggles around. Use some painter's tape or washi tape to secure both the pattern and your fabric. Pull the fabric taut, but don't stretch it out, or you'll end up with a distorted design.
Choosing the Right Marking Tool
Picking the right marking tool is absolutely key for a clean final product. You want lines that are easy to see while you're stitching but will vanish without a trace when you're done.
My personal go-to for light-colored cotton is a heat-erasable pen. The lines are fine and dark, making them easy to see, and they vanish with a quick pass of a hot iron or even a hairdryer. It feels like magic every single time.
Here are a few great options you can find right here at Linda’s:
- Water-Soluble Pens: These make blue or purple lines that wash away with just a little spritz of cool water. They work on most fabrics, but it's always smart to test them on a small corner first.
- Heat-Erasable Pens: Like I said, these are a favorite for a reason. The special gel ink disappears with heat, making them a top choice for quilters and embroiderers who value precision.
- A Hard-Lead Pencil: In a pinch, a sharp 2H pencil can work. Just be sure to use a very light touch so you don't leave a permanent mark in the fabric fibers. This is best for designs where your stitches will completely cover every line.
Once you’ve got your setup ready, you can start tracing! Here at Linda's, we carry all the high-quality marking pens and notions you need to make your project a success. Take a look at our selection and find the perfect tools to bring your creative vision to life.
Transferring Patterns to Dark or Thick Fabrics
Tracing a pattern onto light-colored cotton is one thing. But what about when you want to stitch on dark denim, thick wool felt, or a sturdy canvas bag? Holding those up to a window just isn't going to work.
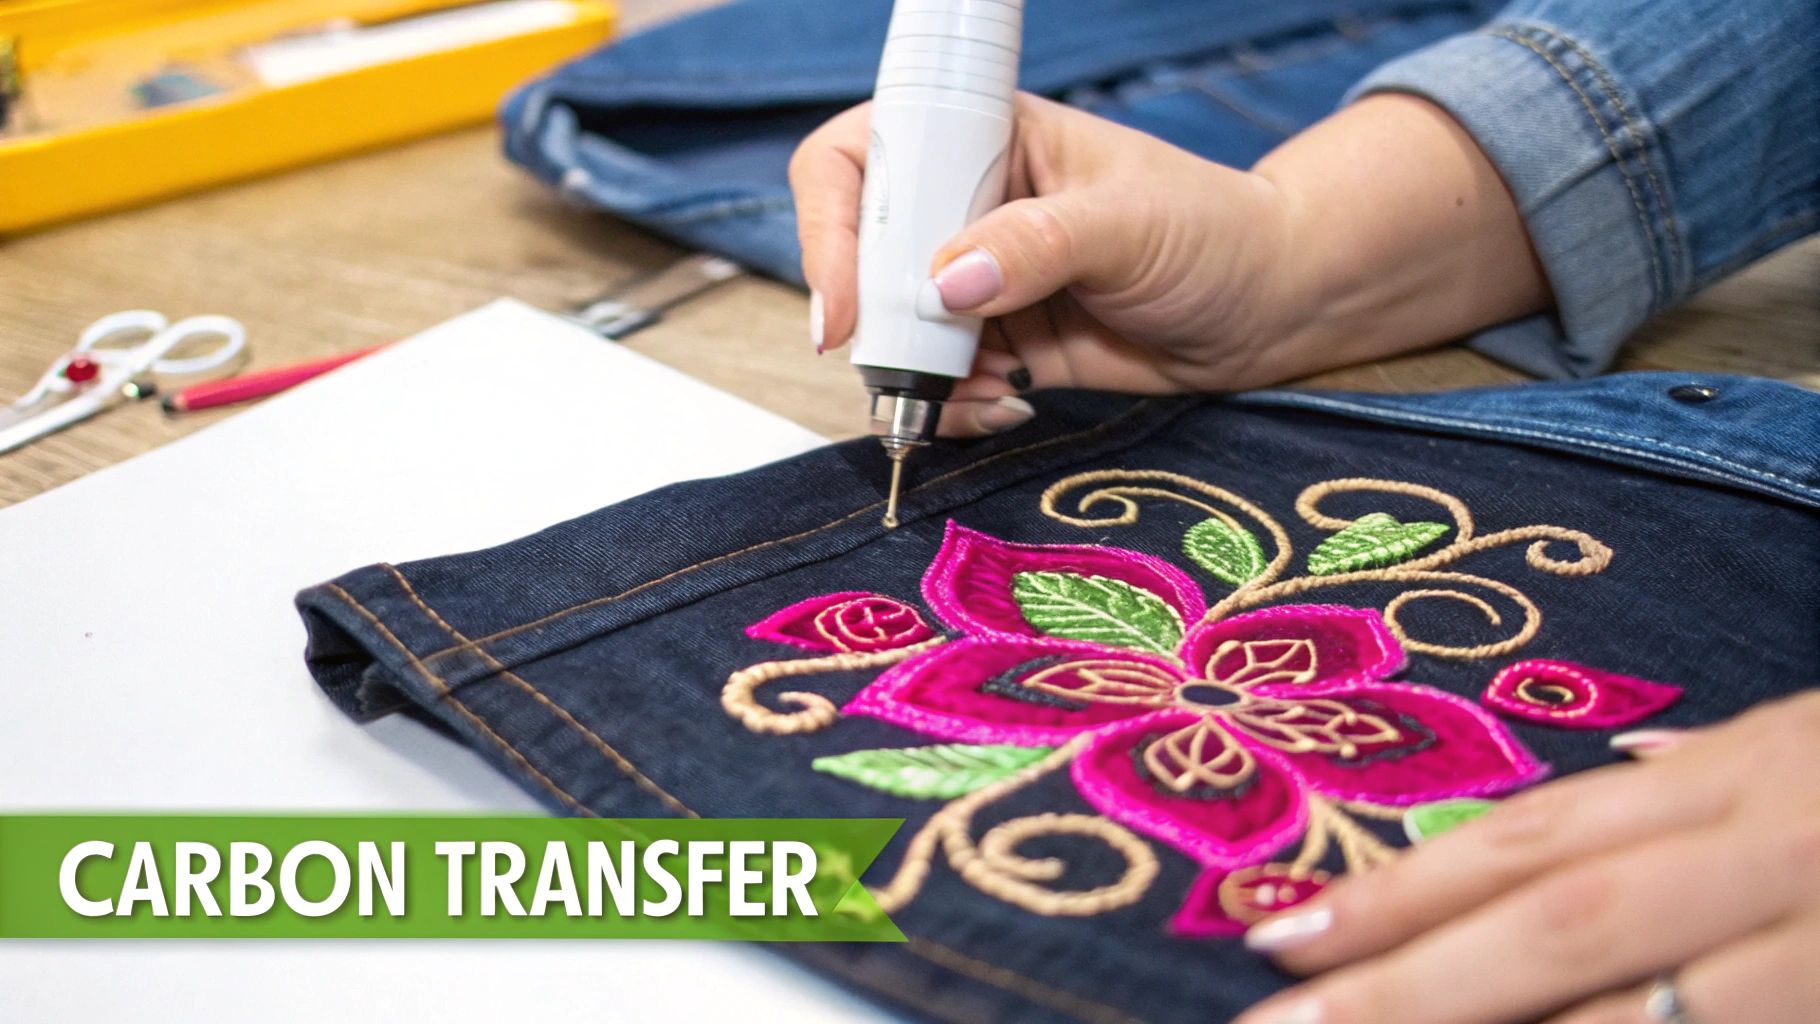
This is exactly when I reach for my secret weapon: dressmaker's carbon paper. It’s a tried-and-true method that has been around forever for one simple reason—it gets the job done on fabrics that light can't shine through.
What Exactly Is Dressmaker's Carbon Paper?
Don't confuse this with the old, inky carbon paper you might find in an antique office desk. The dressmaker's version is designed specifically for fabric, with a waxy, chalk-like coating on one side that leaves a temporary mark when you apply a bit of pressure.
The best part? It comes in a bunch of different colors. This is key, because you need your lines to pop against your fabric. I always keep white and yellow on hand for black or navy fabrics, and some darker blues or reds work beautifully on medium-toned materials.
Here's a pro-tip I learned the hard way: always double-check that you're using carbon paper made for fabric. Office-grade carbon will leave a permanent, greasy stain on your project. Trust me, it's a mistake you only make once!
To get started, you just need a few things you probably already have:
- Your printed embroidery pattern
- A sheet of dressmaker's carbon in a color that contrasts with your fabric
- A tracing tool with a hard, smooth point—a stylus, a blunt knitting needle, or even an empty ballpoint pen works great
- A little bit of tape to keep everything from wiggling around
The Carbon Paper Transfer Method
First, find a hard, flat surface to work on. Lay your fabric down, then place the carbon paper on top with the waxy, colorful side facing your fabric. Now, place your printed pattern over the carbon paper and use a few pieces of tape to secure all the layers. You don't want anything shifting mid-trace!
Using your stylus, trace over the lines of your design with firm, steady pressure. You're not trying to tear the paper, but you need to be firm enough to transfer a nice, clean line. It feels a lot like drawing with a slightly dull pencil.
The pressure you'll need can change depending on the fabric. Heavy canvas or thick wool felt might require a bit more oomph. If you’re working with multiple layers, like in quilting, understanding the foundation is key. You can learn more about batting choices from The Warm Company to get a better handle on how different supports behave.
I cannot stress this enough: always test this method on a small scrap of your project fabric first. This little step is non-negotiable. It lets you confirm that your lines are visible and, more importantly, that they can be removed later. Most chalk lines will brush or wash away, but it's always better to be safe than sorry.
Once you’ve done your test, you'll be ready to transfer your design with total confidence. Ready to give it a try? You can find the perfect tracing paper and stylus for your next project right here at Linda’s.
Getting Perfect Results with Water Soluble Stabilizers
When you're working with intricate patterns or tricky fabrics like velvet, water-soluble stabilizers are a total game-changer. They give your stitches a solid foundation, which helps you avoid the dreaded puckering and distortion that can completely ruin a project.
It’s best to think of it as a temporary support system. It holds everything in place while you work, and then magically washes away to reveal your perfectly neat stitches. This technique really simplifies transferring embroidery patterns, especially on fabrics where other methods just won't work. The end result? Crisp, clean designs with no permanent lines left behind.
The Magic Behind Water Soluble Stabilizers
So, what is this stuff? It’s a thin, flexible sheet that sometimes comes with a sticky back. You can draw on it, or even better, print your design directly onto it with a standard home printer. You just secure it to your fabric, stitch your design right through both layers, and rinse it away with water when you're done. Simple as that.
You'll generally find two main types:
- Plain Stabilizer Sheets: These are semi-transparent sheets, like the classic Sulky Solvy, that you can trace a design onto with a pencil or pen. Once you’ve got your pattern down, you just hoop the stabilizer along with your fabric and get to stitching.
- Stick-and-Stitch Stabilizer: This is my personal favorite, especially for complex designs. These sheets come with an adhesive backing. You can print your design right onto the paper, cut it out, peel off the backing, and stick it exactly where you want it on your fabric. No tracing needed!
Both options are incredible for providing support, particularly on stretchy materials like t-shirt knits or heavily textured fabrics like corduroy. While stabilizers add structure for embroidery, understanding foundational materials is key in other crafts, too. If quilting is also your jam, our guide on quilting and batting choices offers some great insights that are surprisingly similar.
Using a water-soluble stabilizer is like having a perfect, pre-drawn canvas that just disappears when you’re done. It’s the closest thing to foolproof embroidery you can get.
From Application to Finished Stitching
The process itself is wonderfully straightforward. After you've traced or printed your design onto the stabilizer, you just have to secure it to your fabric. If you’re using a plain sheet without adhesive, hooping it tightly with the fabric is usually all it takes. For the stick-and-stitch kind, just press it down firmly.
As you work, your needle will go through both the fabric and the stabilizer. I’ve noticed that with the adhesive version, you might get a little sticky residue on your needle. It's no big deal—just wipe it off with a damp cloth or an alcohol pad every now and then to keep your stitching smooth and easy.
This method is really just a modern take on a concept that's been around for centuries. Historically, embroiderers used techniques like 'pouncing,' where they pricked a design into paper and dusted it with chalk to transfer the lines. It was a crucial step for creating the incredibly detailed, repetitive designs you see in medieval work. You can discover more about these historical embroidery techniques at cottesimple.com.
Once all your stitching is complete, you get to the most satisfying part. Just submerge your project in cool or warm water and swish it around a bit. The stabilizer will completely dissolve, leaving nothing but your beautiful, flawless embroidery.
Ready to take on that ambitious project you’ve been dreaming about? Explore the amazing selection of high-quality water-soluble stabilizers at Linda's and give your next masterpiece the perfect foundation.
Using Fast and Easy Iron-On Transfers
Sometimes, you just want to get straight to the fun part—the stitching. For those moments, iron-on transfers are your best friend. They're a fantastic, no-fuss way to get a perfectly crisp pattern onto your fabric in just a few seconds.
This method is an absolute lifesaver if you're making several pieces with the same design and need them to be identical. It's pretty much a foolproof way to transfer any embroidery pattern.
Believe it or not, this technique has been around for ages. Back in the late 19th century, companies like Briggs & Co. completely changed the game by patenting and selling catalogs of iron-on transfers. By 1880, this meant embroiderers could simply order gorgeous, ready-to-use designs, making the craft accessible to so many more people. You can take a fascinating dive into the history of these patented transferring papers on needlenthread.com.
The Iron-On Transfer Process
These days, you have a couple of great options. You can either buy pre-made patterns, which come in a dizzying array of beautiful designs, or you can draw your own custom transfers with a special iron-on transfer pen. Either way, you'll end up with a clean, semi-permanent design that’s ready for your needle and thread.
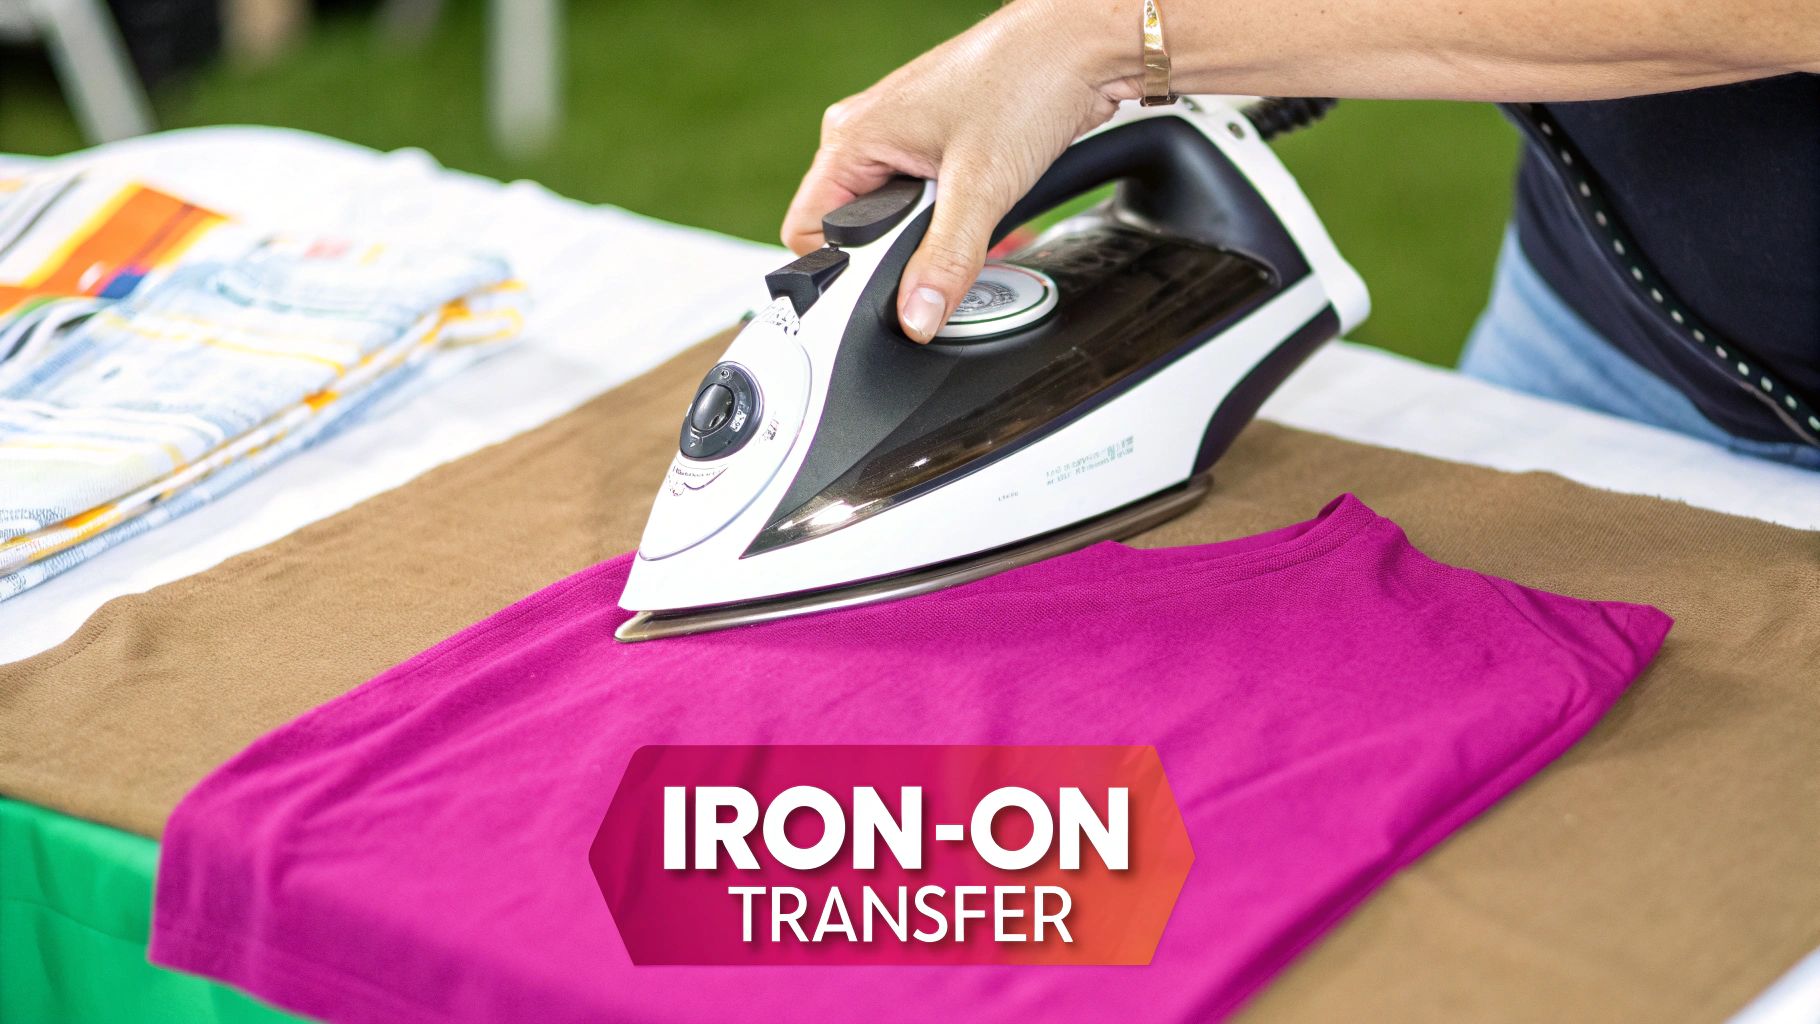
The actual application process is the same no matter which you choose. First thing's first: find a hard, heat-resistant surface to work on. A wooden cutting board is perfect. Avoid using a padded ironing board—it’s just too soft and can lead to a blurry transfer.
Next, get your iron ready. Set it to a medium-high temperature (the cotton setting usually works well) and make sure it's a dry iron. This is a big one: turn the steam function completely off. Any moisture will make the transfer ink smudge and ruin your pattern.
Achieving a Perfect Transfer
Once your iron is nice and hot, place the transfer paper ink-side down onto your fabric. Now, press the iron firmly onto the paper for about 5-10 seconds, applying good, even pressure.
Don't slide the iron around like you’re ironing a shirt! Instead, use a press-and-lift motion, slightly overlapping each section until you’ve heated the entire design.
My best advice is to resist the urge to peek too early! Lifting a corner before the ink has fully set can cause a blurry or incomplete transfer. Give it a moment to cool slightly before gently peeling back the paper to reveal your pattern.
Keep in mind that the transferred lines from this method are permanent, so your stitches will need to cover them completely. For a deeper dive into getting the heat and pressure just right, you can master the art of iron-on transfers with some more detailed guides.
Getting settings right is crucial, whether it's the heat on your iron or the tension on your machine. If you're exploring the mechanical side of the craft, have a look at our recommendations for deciding on a sewing machine.
To make your next project a breeze, check out the fantastic iron-on transfer pens and pre-made patterns available at Linda's. They're a surefire way to get a beautiful result every single time.
Common Questions About Transferring Embroidery Patterns
No matter how prepared you are, a few questions are bound to pop up during any creative project. It's just part of the process! When you're figuring out how to get an embroidery pattern onto your fabric, a handful of challenges seem to come up time and time again.
Let’s dive into some of the most common questions we hear from embroiderers. Think of this as your go-to guide for getting your designs transferred cleanly so you can start every project with confidence.
What Is the Easiest Transfer Method for a Total Beginner?
If you're just starting out, my best advice is to keep it simple. The most straightforward and budget-friendly way to begin is with the classic window tracing method. All you need is a light-colored fabric and a heat-erasable pen. It’s a low-fuss approach that gives you a crisp line, and when you’re done, the marks disappear with a little heat from your iron. Easy.
But if you want something truly foolproof, I highly recommend a pre-printed stick-and-stitch stabilizer. There's zero tracing involved. You literally just peel the pattern off the backing paper, stick it right onto your fabric, and start stitching. As a bonus, it gives your fabric a little extra support, which really helps with controlling your first few stitches.
How Do I Transfer a Pattern onto a Stretchy T-Shirt?
Ah, the dreaded stretchy t-shirt! Fabrics like jersey knit are notorious for shifting and warping as you work, which can be incredibly frustrating. The absolute best tool for this job—and I mean, it's a total game-changer—is a stick-and-stitch water-soluble stabilizer.
Using a stabilizer makes the fabric temporarily firm, almost like a piece of quilting cotton, so it won’t stretch or pucker while you stitch. Once you're done, you just rinse the project in water, and the stabilizer dissolves away completely. You're left with soft fabric and beautiful, secure stitches. Trust me, you'll want to avoid tracing or iron-on methods here; they just don't offer the stability you need.
Think of a stabilizer on a t-shirt like a temporary scaffold for a building. It provides a firm structure during construction (stitching) and is removed once the work is complete, revealing a strong, stable design.
How Do I Remove the Pattern Lines After Stitching?
Getting rid of your guide marks all comes down to which tool you used in the first place. This is why it’s so important to know how your marking tool works before you put it on your project fabric.
- Water-Soluble Pens or Stabilizers: For these, all it takes is a gentle rinse in cool or lukewarm water. Just submerge your piece and swish it around a bit until the marks or the stabilizer film have completely disappeared.
- Heat-Erasable Pens: A quick pass with a warm iron or even a blast from a hairdryer will make the ink lines vanish like magic. A word of caution: be careful not to get the iron too hot, as you don't want to scorch your beautiful thread or fabric.
- Carbon Paper: The waxy lines left by dressmaker's carbon paper are really meant to be covered up entirely by your stitches. While you can sometimes lift light marks with a kneaded eraser, they aren't designed to be fully removed.
My number one tip? Always, always test your marking tool on a scrap of your project fabric first. This little five-minute check can save you from the heartache of a permanent, unwanted mark on your finished piece. If you're ever stuck or just want to bounce ideas off other crafters, connecting with people can be a huge help. You can learn more about finding your local crafting community in our other guides.
Here at Linda's, we believe that having the right tools and a little bit of know-how is all you need to unlock your creativity. Whether you're looking for that perfect heat-erasable pen, a pack of water-soluble stabilizer, or just some friendly advice, we have everything you need to bring your embroidery projects to life. Explore our amazing collection of over 30,000 craft products at https://lindas.com and get started on your next masterpiece today.


