

The star quilt block is one of those timeless, wonderfully versatile designs that feels like a cornerstone of quilting. With its sharp, geometric points and radiant shape, it’s a favorite for just about any project you can imagine—from classic bed quilts to stunning modern wall hangings. This guide will teach you how to master this iconic design, turning fabric and thread into a stunning work of art.
The Enduring Allure of the Star Quilt Block
For centuries, the star has been a design that captivates quilters. It’s more than just a beautiful pattern; it’s a real testament to a maker’s skill. A star quilt block isn't just a collection of fabric pieces; it's history stitched together, connecting us to the generations of crafters who came before us. You can explore more about how quilting inspires generations in our detailed article. It's this deep-rooted appeal that keeps it a go-to for so many of us today.
A Legacy in Every Stitch
The star block is easily one of the most recognizable patterns in American quilting history, with roots that trace all the way back to 18th-century England. Getting that classic eight-pointed star look just right requires nailing those precise 45-degree angles—a challenge that originally gave women a way to show off their incredible needlework skills.
This history adds a special kind of depth to every star block you make. It’s a chance to take part in a rich tradition while putting your own unique spin on it.
The true beauty of the quilt block star is its adaptability. It can be the centerpiece of an elaborate heirloom or a simple, charming accent on a handmade pillow.
Whether you're making a cozy throw for the couch or a decorative table runner, this block creates a perfect focal point. And with the right tools and fabrics, achieving those crisp, satisfying points is a totally achievable and rewarding goal.
This guide will walk you through each step, giving you the confidence to dive into your next project. Ready to start? Find a fantastic selection of fabrics and notions right here at Linda's to begin.
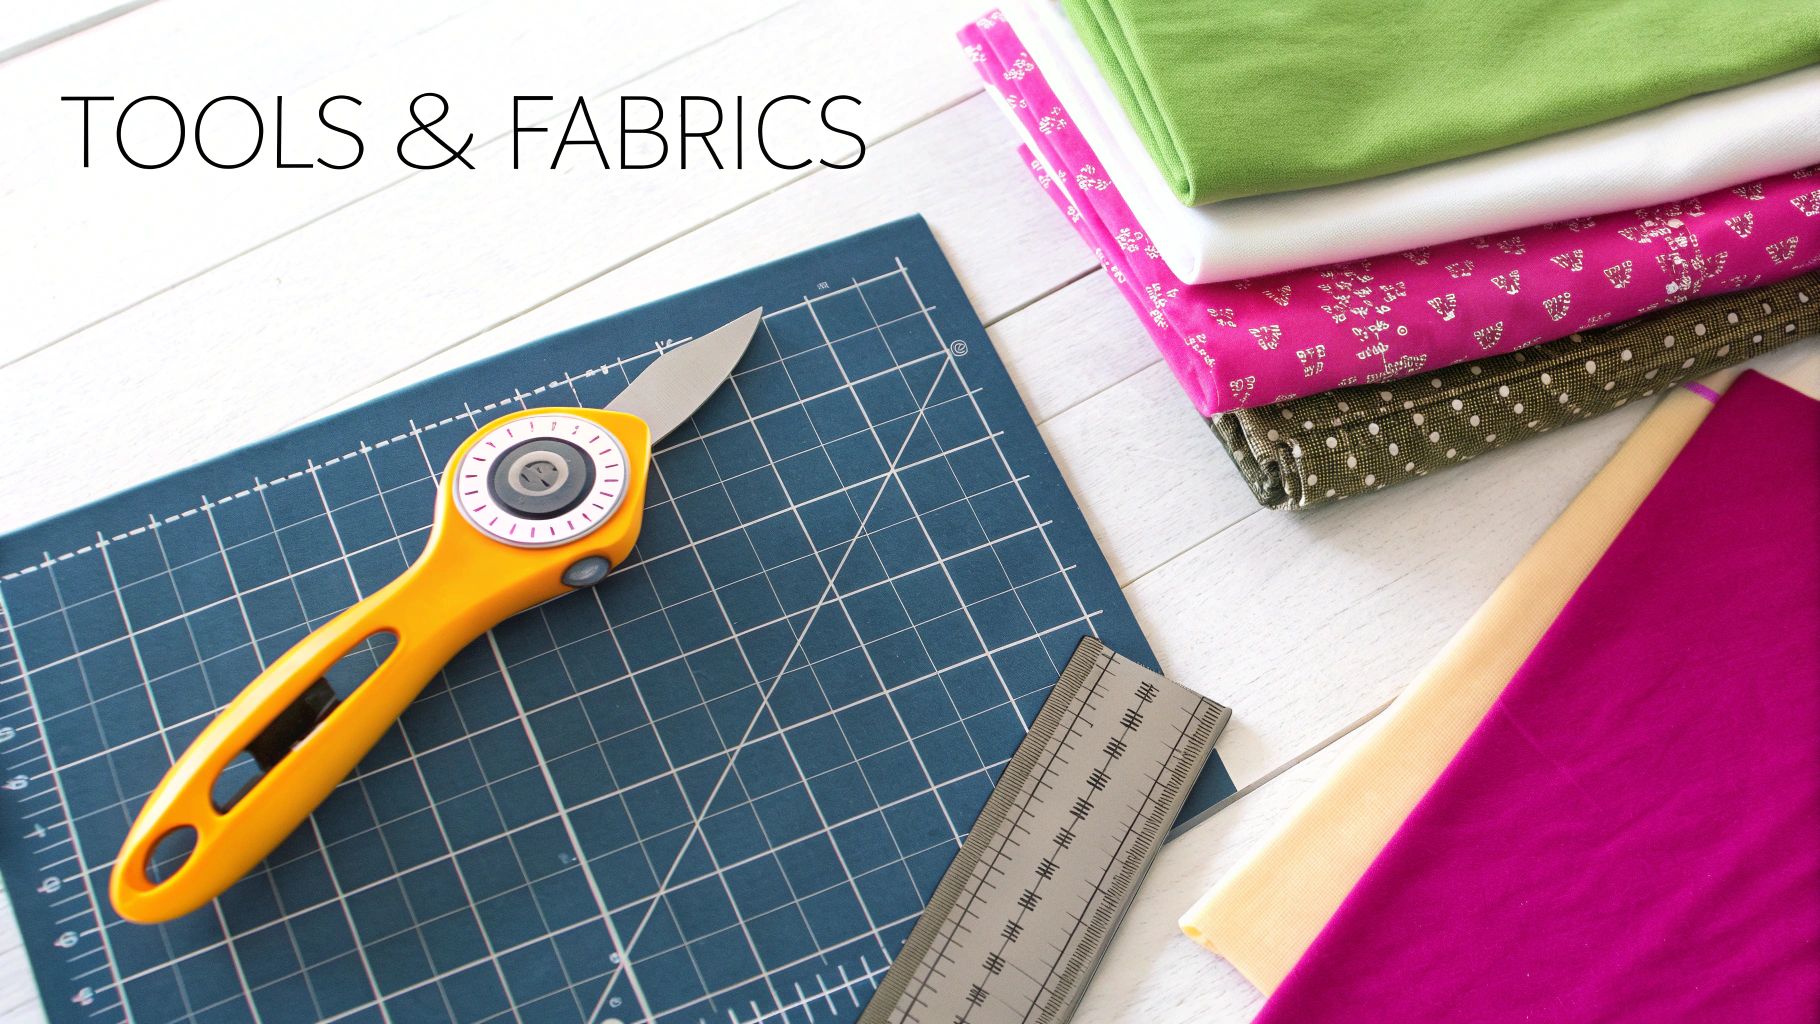
Choosing Your Tools and Fabrics
Before you even think about making that first cut, let's talk about setting yourself up for success. Getting your supplies in order is the secret to a smooth and fun quilting project. Your tools are an investment in your craft. A sharp rotary cutter, for instance, isn't a luxury—it's your best friend for getting those crisp, perfect points that define a beautiful quilt block star.
We've all been there—a block that just won't lie flat. More often than not, the culprit is a dull blade or a wobbly ruler that let the fabric shift just a little. Pairing your cutter with a quality quilting ruler and a good self-healing mat is the dream team that prevents those frustrating mistakes right from the start.
Essential Tools for a Perfect Star Block
Having the right tools on hand makes all the difference. This isn't about having the most expensive gear, but about having reliable equipment that does its job well. Here are the must-haves we recommend for tackling any star block with confidence.
| Tool | Primary Use in Project | Pro-Tip from Linda's |
|---|---|---|
| Rotary Cutter | Making straight, precise cuts through fabric layers. | A fresh blade is non-negotiable! A dull blade drags the fabric and leads to inaccurate pieces. Change it often. |
| Quilting Ruler | Measuring fabric and guiding the rotary cutter. | Look for a ruler with clear markings and a non-slip grip. It's a small feature that saves big headaches. |
| Self-Healing Mat | Protecting your work surface and providing a grid for alignment. | Rotate your mat periodically to distribute wear and tear. This helps it last much longer. |
| Quality Iron | Pressing seams open or to the side for a flat block. | A good steam iron helps set your seams beautifully. Always press, don't "iron" back and forth, to avoid stretching your fabric. |
With these staples in your sewing room, you’re already halfway to a beautiful block! You can shop for all these essential tools at Linda’s to ensure your project starts on the right foot.
Selecting Your Star Fabrics
Now for the fun part—the fabric! The fabric you choose is just as important as your tools. For a star block, you absolutely can't go wrong with high-quality quilting cotton. It behaves beautifully, holding a crisp press and not fraying too much, which is a lifesaver when you're working with all those small pieces and sharp angles.
Your color and print choices are what will make your star sing. The most important thing to remember here is contrast. You need a noticeable difference between the fabrics you use for your star points and the fabric for your background. This is what makes the star design pop and not get lost.
Here's a little trick I love: snap a quick black-and-white photo of your fabric choices with your phone. If they all blur into a similar shade of gray, you don't have enough contrast. You're looking for a clear distinction between light and dark.
Picking a palette is one of the most creative steps. If you feel a bit stuck, don't be afraid to grab a curated fabric bundle from Linda's! They take all the guesswork out of coordination and guarantee a gorgeous result. If you want to dive deeper, you can learn all about selecting the right materials in our guide to the best quilting fabric for your projects.
Cutting Your Fabric with Precision
Let’s be honest—the secret to a gorgeous star block happens long before you sit down at your sewing machine. It all starts at the cutting mat. Every single one of those perfect points and beautifully aligned seams is a direct result of how accurately you cut your fabric.
Think of it like building a house. If your foundation isn't square, nothing else will line up right. Your rotary cutter and ruler are your best friends here, so let's make sure we're using them right.
Before a single cut is made, give your fabric a good press with a hot, dry iron. You want to get rid of every last wrinkle and fold. Even a tiny crease can warp your measurements, leaving you with a piece that’s just a little too small—which, as we all know, can cause some major headaches when it’s time to piece everything together. Taking a minute to prep your fabric is a step you just can't skip if you want that professional finish.
Breaking Down the Star Block
A classic star block might look complex, but it's really just a clever combination of simple geometric shapes. Once you understand the basic parts, the whole cutting process feels so much less intimidating.
Most traditional star blocks boil down to three key components:
- The Center Square: This is the heart of your design, the single piece of fabric that anchors everything in the middle.
- The Star Points: These are what give the block its "star" shape, radiating out from the center. Usually, these are made from simple units like Half-Square Triangles (HSTs) or Flying Geese.
- The Background Corners: These are just simple squares that tuck into the four corners, framing your beautiful star and making the whole block perfectly square.
Mastering these fundamental cutting skills is probably the most important step in all of quilting. When your pieces are cut precisely, they just fit together like a dream, turning a potentially frustrating task into a truly joyful one.
Avoiding Common Cutting Mistakes
Even those of us who have been quilting for years can make a slip-up now and then. One of the biggest culprits? Fabric that shifts around while you're cutting. To stop this from happening, make sure you're applying firm, even pressure on your ruler. For an even better grip, you can find some great product ideas in our guide on quilting ruler templates.
It also really helps to stand up when you cut. This gives you much better leverage and a clear bird's-eye view over your ruler.
Another classic mistake is simply misreading the ruler. It happens to the best of us! Just get in the habit of double-checking your measurement before the blade ever touches the fabric.
For quilters who want to save time and guarantee absolute consistency, especially when making a lot of blocks, specialized dies like the Accuquilt Go Hunter Star Die can be a game-changer. With these simple techniques and the right tools from Linda’s, you'll be on your way to cutting perfect pieces every single time.
Assembling Your Quilt Block Star
Alright, you’ve got your fabric pieces cut and ready to go. Now for the rewarding part—bringing it all together at the sewing machine! This is where we’ll turn those individual pieces into a beautiful quilt block star. Following these educational steps will help you get those crisp, satisfying points every quilter loves. It’s simpler than you think.
First up are the star points. These are usually formed with simple units like Half-Square Triangles. As you start sewing, the most important thing to remember is your seam allowance. A consistent, precise 1/4 inch seam allowance is your best friend here. Honestly, it's the biggest factor in making sure everything lines up perfectly later on.
This handy graphic gives you a great visual of how a classic star block comes together from its basic components.
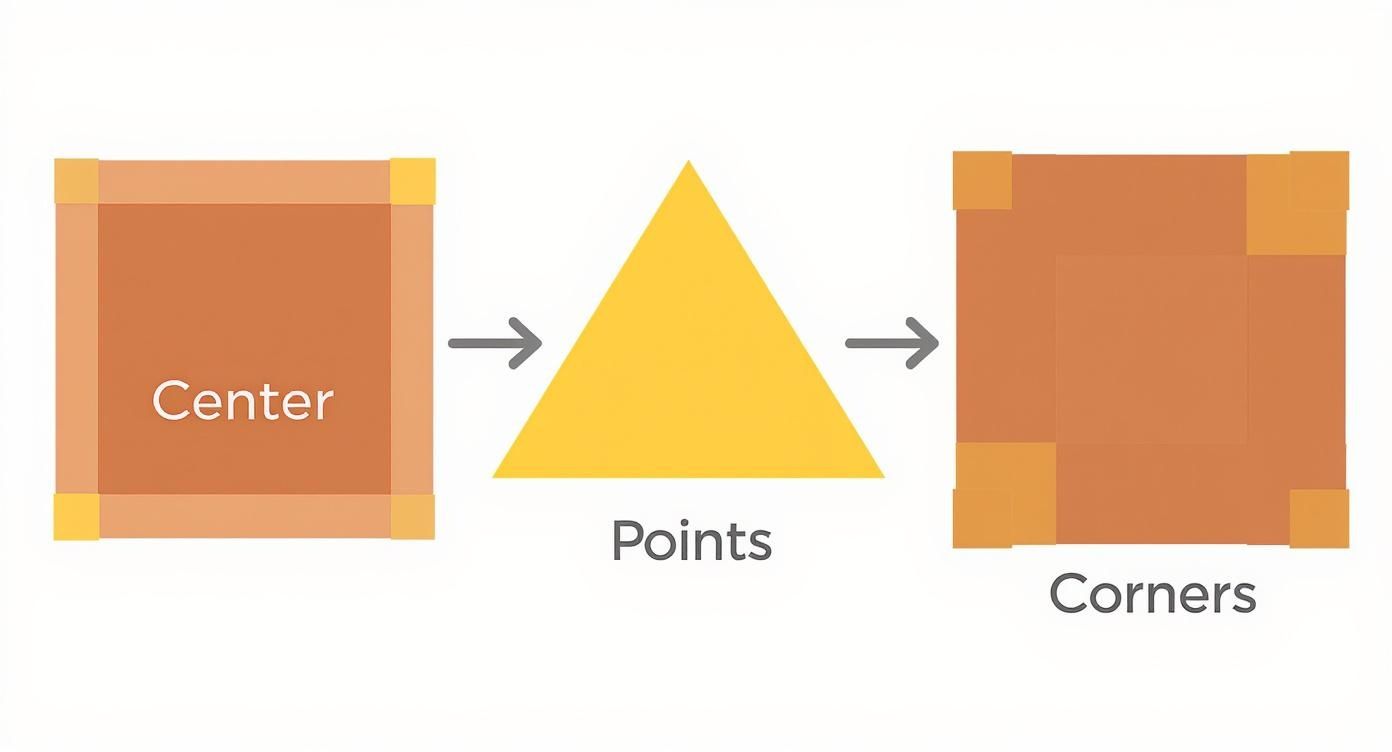
As you can see, you build the block from the center out. It's a logical process that helps ensure each part is perfectly square before you add the next.
Mastering the Art of Pressing
How you press your seams is just as critical as how you sew them. For star blocks, we want to reduce bulk wherever possible so the block lies nice and flat. My go-to rule is to press your seams toward the darker fabric. This simple trick keeps darker threads or fabric from peeking through your lighter pieces.
When you finish sewing a star point unit, give it a good press. But be careful not to drag your iron across the fabric—that’s a surefire way to stretch those bias edges out of shape. Always use a "lift and press" motion. Just lift the iron, move it, and press down to set the seam without any distortion.
Here’s a little secret for perfectly matched points: it's all about 'nesting seams'. This just means you press the seams of adjacent rows in opposite directions. When you put them right sides together, the seams will lock into place like they were made for each other, giving you a flawless intersection every time.
This technique is a lifesaver, especially for iconic designs like the Lone Star quilt. That pattern is famous for its eight-pointed star, where sharp 45-degree angles are absolutely essential for its classic look. Quilters have been perfecting this timeless design for generations. If you're curious, you can learn more about the history of star quilts at Vintage Kit Quilts.
Building Your Block Row by Row
Once your units are pieced and pressed, it’s time to assemble the block row by row. I always lay out all my pieces on my cutting mat first. It helps to see the whole design before you start sewing.
- Start by sewing the pieces for the top row together, pressing your seams just like you planned.
- Do the same thing for the middle and bottom rows.
- Finally, join the three rows. This is where you'll really appreciate those nested seams!
Taking it one row at a time is the best way to keep everything square and flat. For more practice with these foundational skills, take a look at our tutorial on a basic quilting pattern.
After you've joined the rows, give your block one last, gentle press. And there you have it—a stunning quilt block star ready for your next project! Of course, you can find all the thread and notions you need to finish up right here at Linda's.
Creative Ways to Use Your Star Block
Once you've gotten the hang of piecing a star block, a whole universe of creative projects starts to open up. This classic block is way too wonderful to be reserved just for full-sized quilts. Think of it as a beautiful, customizable unit you can pop into countless smaller projects to add that perfect handmade touch to your home.
For instance, a single, perfectly pieced star block makes a stunning centerpiece for an elegant throw pillow. You could also sew a few blocks together in a row to create a gorgeous table runner for your dining room.
If you're looking for a quick and satisfying finish, turning a block into a mini quilt or a decorative wall hanging is a fantastic option. In fact, these are some of the easiest quilt patterns to complete when you're short on time but itching to create something beautiful.
From Small Blocks to Big Ideas
Of course, your finished star blocks can absolutely be part of a larger masterpiece, like a cozy Navy Linen Quilt. Mixing your more detailed star blocks with simpler, solid squares is a tried-and-true method for creating a truly striking design.
Beyond home decor, a sturdy star block makes a fantastic focal point on a tote bag or as the front pocket of an apron. I love using these smaller projects to burn through my scrap bin and practice my points without the commitment of a huge quilt.
The star motif also carries deep meaning. Star quilts hold profound cultural significance in Plains Indian communities, where the morning star design represents a sacred connection to the cosmos and ancestral knowledge. Discover more about this rich artistic tradition on dianesnativeamericanstarquilts.net.
When you’re ready to finish any of these amazing projects, Linda’s has all the batting, backing, and thread you’ll need to put the final touches on your masterpiece.
Solving Star Block Mysteries
Let's dive into a few of the head-scratchers that can pop up when you're piecing a star block. Getting these little details right can make all the difference between a block you love and one that makes you want to pull your hair out.
Help! Why Are My Star Points Getting Chopped Off?
This is, without a doubt, the most common frustration I hear about. The culprit is almost always an inaccurate seam allowance. When you're dealing with points, you absolutely must have a precise 1/4-inch seam. If you don't have a special 1/4-inch quilting foot for your machine, now is the time to get one from Linda's. It's a total game-changer.
Your iron plays a big role here, too. When you press the seam joining your background square to your star point triangle, don't just mash it flat. That can distort the very tip of the point. Instead, gently press the seam allowance toward the darker fabric. This keeps the point perfectly sharp, so when you go to sew the next piece on, your needle lands right next to the point, not on top of it.
What's the Right Way to Press Seams for a Star Block?
For star blocks, pressing your seams to one side is your best bet. While you can press seams open, pressing them to the side (usually toward the darker fabric) has a couple of big advantages:
- It cuts down on bulk where all those seams meet.
- It lets you "nest" your seams, which is the key to getting those points to line up perfectly.
When it's time to join your rows, just make sure you press the seams in one row going left, and the seams in the next row going right. They'll lock together like puzzle pieces. And a friendly reminder: always lift and press your iron. Dragging it across your block is a surefire way to stretch everything out of shape.
The goal of pressing is to guide your fabric into place, not force it. A gentle hand with a hot iron is all you need to get seams to lay flat and points to line up perfectly.
How Do I Pick Colors So My Star Really Pops?
It all comes down to one word: contrast. For your star to truly stand out and not look muddy, there has to be a strong difference in value between your star point fabric and your background fabric.
Here's a trick I use all the time: pull out your phone and take a black-and-white picture of your fabric choices laid out next to each other. If they all blur into a similar shade of gray, you don't have enough contrast. You're looking for a clear separation between light and dark—that's what makes a star block shine. Ready to find the perfect contrasting fabrics? Explore the beautiful collections at Linda's.
Ready to tackle your next star block project with confidence? From vibrant fat quarter bundles to the sharpest rotary cutters and precision rulers, Linda's Electric Quilters has everything you need to bring your vision to life. Find all your essential supplies at https://lindas.com


