Figuring out how to calculate fabric yardage is pretty straightforward once you get the hang of it. You just measure your project's length and width in inches, visualize how your pieces will fit on the fabric, and then divide the total length you need by 36 to get your final number in yards. This little bit of math upfront is the key to preventing costly mistakes and making sure your project starts on the right foot with the perfect materials from Lindas.
Your Foundation for Flawless Sewing Projects
I’ve learned over the years that the secret to a great sewing project isn't just about steady hands and a good machine—it all starts with having the right amount of material. Guessing is a recipe for disaster. You either end up with a pile of expensive scraps or the gut-wrenching feeling of running out of fabric mid-project.
Mastering a few basic concepts is what separates a frustrating experience from a joyful one, and that confidence starts with understanding yardage.
Fabric is sold by the yard, which is a standard unit of measure across the industry. One yard is always 36 inches (or about 0.9144 meters). This consistency is a lifesaver, ensuring that whether you're buying from us at Lindas or a shop across the country, a yard is a yard.
Key Factors in Your Calculation
Before you even think about pulling out the calculator, there are a few things you need to consider. These variables can dramatically change how much fabric you'll actually need.
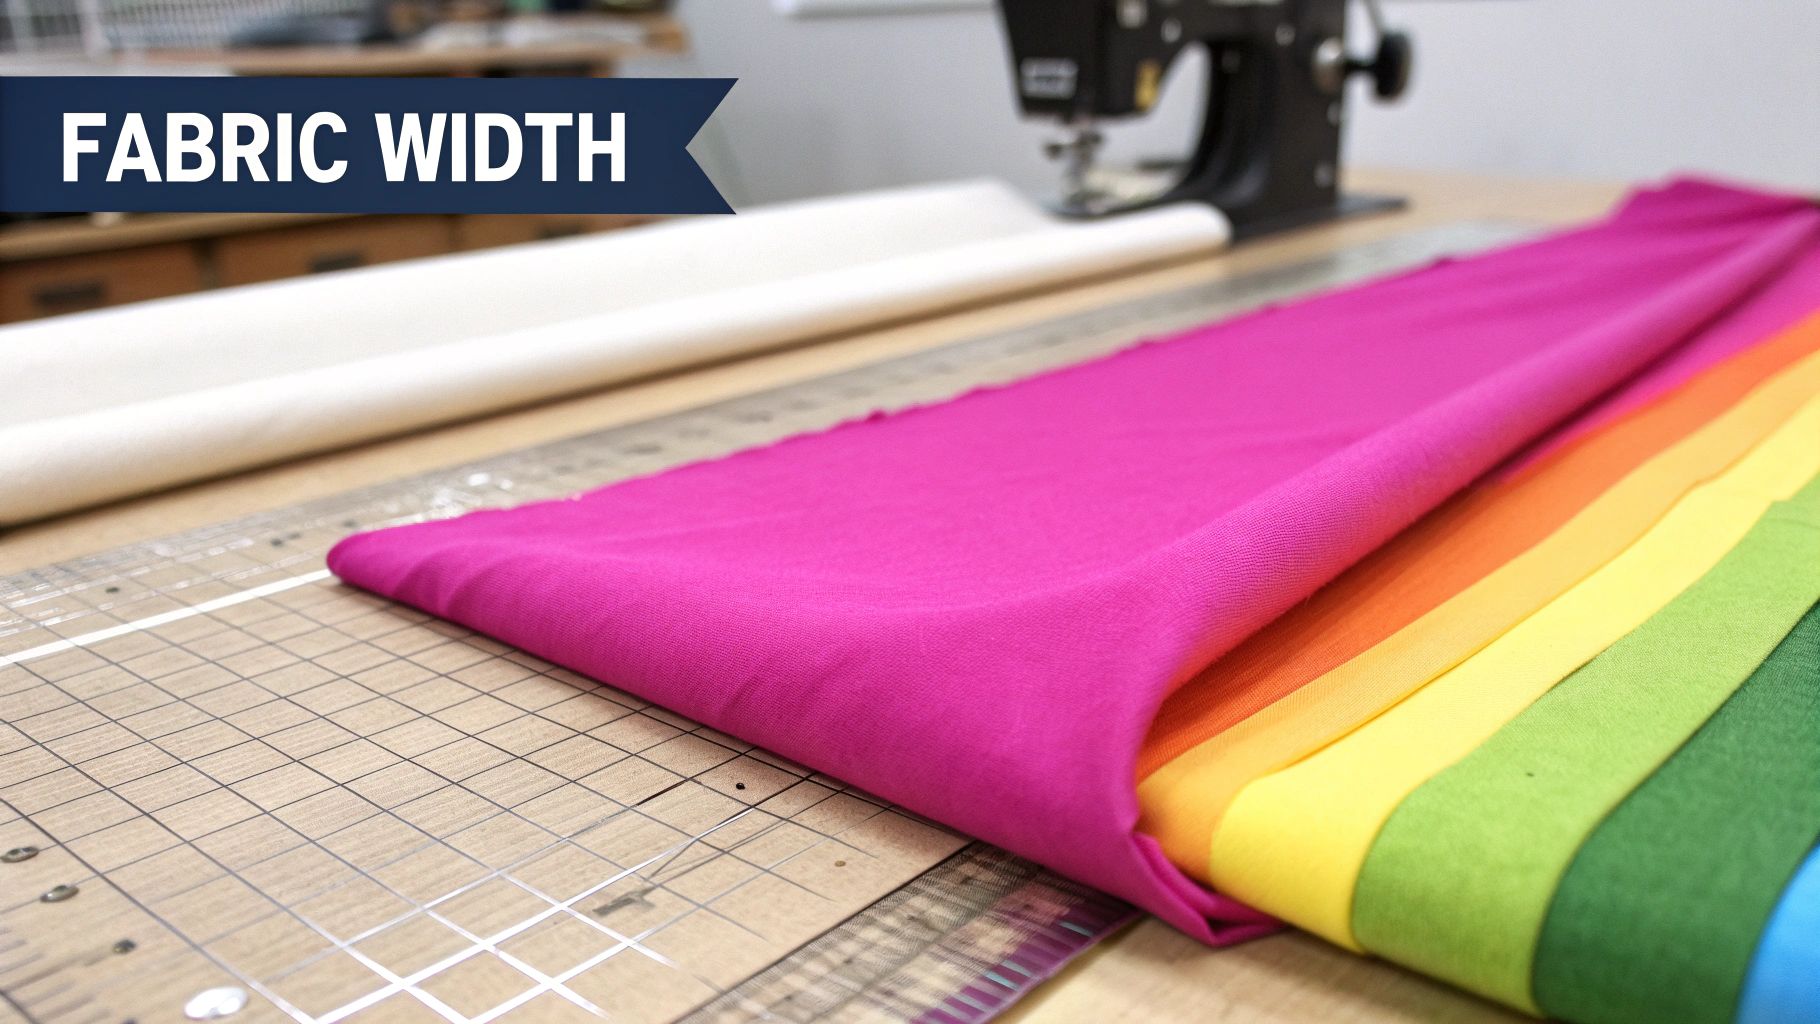
- Fabric Width: Bolts of fabric come in different widths. Quilting cottons are usually 44/45 inches wide, while you’ll see apparel and home decor fabrics in the 54-60 inch range. A wider fabric often means you can fit more pieces side-by-side, so you might need fewer yards overall.
- Pattern Repeats: If you’ve fallen in love with a bold floral or a geometric print, you’ll need extra fabric. Why? To make sure the pattern matches up perfectly at the seams. It's a pro touch that makes all the difference, but you have to account for it in your purchase. The bigger the pattern repeat, the more extra fabric you should grab.
- Fabric Nap: Ever worked with velvet, corduroy, or faux fur? These fabrics have a "nap," which means the fibers run in a specific direction. For a uniform look, all your pattern pieces have to be cut facing the same way. This almost always requires more fabric than a non-napped material.
At its core, knowing how to calculate fabric yardage is about planning. It’s the difference between a project that flows smoothly and one that hits frustrating roadblocks. A few minutes of measuring saves hours of stress later.
It also helps to know your materials before you start. Understanding the difference between organic cotton vs bamboo fabrics, for example, can influence everything from your yardage calculation to how you care for the finished piece.
Having this knowledge in your back pocket means that when you walk into Lindas, you’re not just browsing—you’re on a mission. You'll have the exact numbers you need, ready to find that perfect print and start your project with total confidence. That prep work makes the whole creative process so much more fun.
Calculating Yardage for Garment Sewing
Nothing beats the thrill of sewing your own clothes, and that creative journey always starts with getting the right amount of fabric. Sure, the suggestions on a pattern envelope are a good place to begin, but learning to calculate the yardage yourself? That’s where you gain real control. It’s the skill that lets you truly customize patterns, switch between different fabric widths, and walk into the fabric store with total confidence.
Forget the pattern’s generic advice for a moment. The real secret is to measure your actual pattern pieces. I like to think of it as a game of Tetris. You’ve got all your pieces—bodice, sleeves, collar, facings—and your goal is to fit them onto a length of fabric with as little waste as possible.
The first thing you need to know is the width of the fabric you want to buy. Once you have that measurement, you can literally lay your paper pattern pieces out on the floor or a big table. Mark out the fabric's width with some masking tape to give yourself a boundary. This hands-on layout is, without a doubt, the most accurate way to see exactly how much length you’re going to need.
Planning for Prints and Special Fabrics
Let's be honest, not all fabrics play by the same rules. Some, like directional prints, need a little extra thought. These fabrics have a definite "up" and "down," and for a polished, professional look, every single pattern piece has to be cut facing the same way. This almost always means you can’t nest them as tightly, which translates to needing more fabric.
The same goes for matching plaids or stripes at the seams—a detail that can make or break a garment. You’ll need to budget for extra yardage to shift pieces up or down until those lines match up perfectly.
A good rule of thumb I’ve learned over the years is to add at least one extra pattern repeat's length for every couple of yards you need. This little bit of insurance gives you the wiggle room to get that seamless, store-bought look.
And we can't forget about shrinkage! Natural fibers like cotton, linen, and rayon are notorious for shrinking up in the wash. Always, always buy a little extra—I find 10% is a safe buffer—and pre-wash your fabric before you even think about cutting. Trust me, this one step will save you from the heartache of finishing a beautiful garment only to find it's a size too small.
The visual below breaks down the basic steps for turning your pattern layout measurements into the final yardage you'll buy.
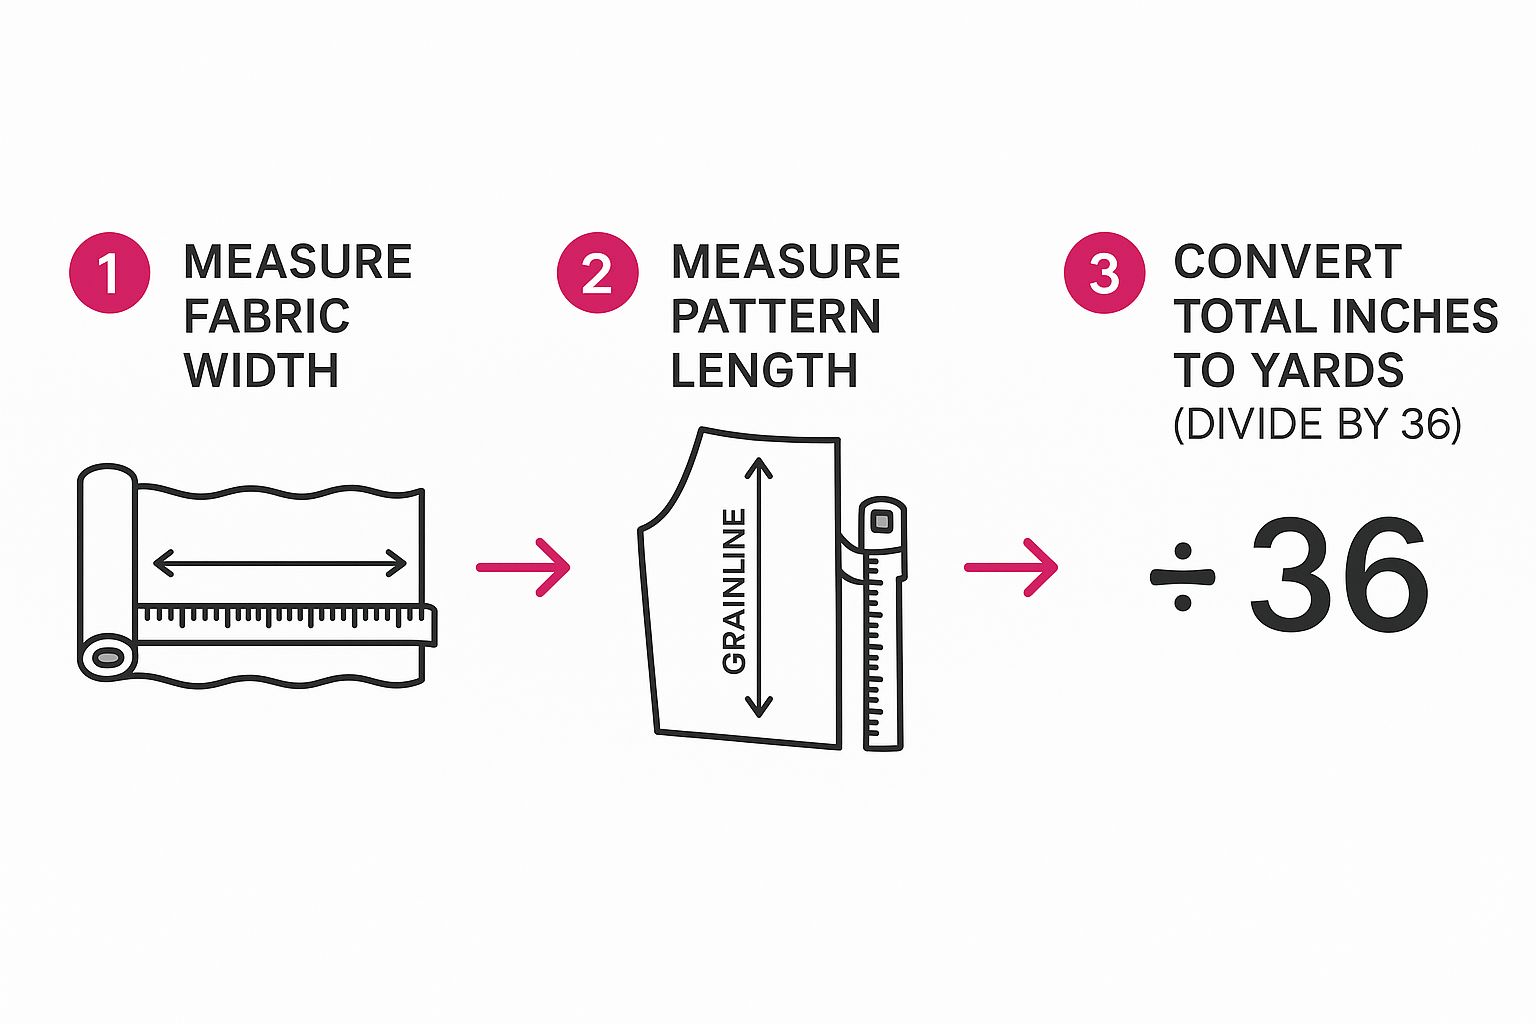
This process—laying it out, measuring, and then converting—takes all the guesswork out of the equation. You'll buy the right amount, every single time.
Real-World Garment Examples
The style of a garment has a huge impact on how much fabric it eats up. A flowy A-line skirt with its wide hem is going to need a lot more material than a sleek, straight pencil skirt. A classic button-up shirt has a surprising number of small pieces—cuffs, collars, plackets—that all have to be squeezed in.
As a general guideline from my experience:
- A standard adult dress can take anywhere from 2 to 5 yards, depending entirely on its style and length.
- A pair of pants usually requires 2 to 3 yards.
- More complex projects like jackets can easily demand 2.5 to 4 yards or more.
You can find more insights about yardage in the textile industry to get a better feel for these estimates.
By taking the time to measure your specific pattern pieces, you're creating a custom calculation just for your project. This little bit of prep means you'll walk into Lindas feeling excited and ready to find the perfect fabrics to bring your vision to life.
Mastering Yardage for Quilting Projects
Quilting is an art of precision, and that dedication starts long before you ever sit down at your sewing machine. It all begins with a bit of unique quilter's math, the kind that turns a simple stack of fabric into a breathtaking masterpiece. The trick is to break the calculation down into smaller, more manageable parts.
Instead of getting overwhelmed by the project as a whole, I always think of it as individual components, each with its own fabric needs. A quilt is so much more than just the top; it's a layered creation, and each layer needs to be calculated on its own.
Deconstructing Your Quilt for Accurate Yardage
From the central blocks to the final binding, every single piece of your quilt plays a role in your final shopping list. When you’re in the planning stage, it’s best to break your design down into these key areas:
- The Quilt Top: This is the star of the show! It includes all the pieced blocks and patchwork that create your quilt's design.
- Sashing and Cornerstones: Think of these as the framework. They are the strips of fabric separating your blocks and the little squares that join them, adding crucial structure and a bit of visual breathing room.
- Borders: Most quilts have at least one border to frame the design, but you might even have several borders of different widths.
- Backing Fabric: This is the single large piece of fabric that makes up the entire back of your quilt.
- Binding: And finally, the binding! These are the strips that neatly encase the raw edges, giving your quilt a durable and polished finish.
By figuring out the yardage for each part separately and then just adding them all up, you create a perfect, comprehensive shopping list. This method is my go-to for making sure I don't forget a crucial component and have enough of every fabric to bring my vision to life.
The Essential Quilter's Math
Knowing how many pieces you can slice out of a yard of fabric is a fundamental skill every quilter needs. Most quilting cotton comes 42-44 inches wide. After you pre-wash it and trim off those selvages, it's always safest to work with a usable width of 40 inches.
Let's walk through a super common example. Say your pattern calls for a bunch of 5-inch squares. You can cut eight 5-inch squares across that 40-inch width of fabric (that's 40 ÷ 5 = 8). Now, since a yard is 36 inches long, you can get seven full 5-inch strips along its length (36 ÷ 5 = 7.2, so you round down to 7).
So, from just one yard of fabric, you can get: 8 squares per strip x 7 strips = 56 squares.
This simple bit of math is your absolute best friend when you're planning any patchwork project.
One of the most common mistakes I see new quilters make is forgetting to account for the quilt backing. You absolutely must buy extra! Your backing needs to be at least 4-6 inches larger than your quilt top on all four sides. This overage is critical for securing the quilt on a longarm machine or for smoothing it out for home machine quilting.
With these calculations sorted, you're ready for the best part—choosing your materials! Heading to Lindas with a clear, detailed list in hand lets you relax and focus on finding the perfect coordinating fabrics and threads to bring your next quilting masterpiece to life.
Yardage Calculations for Home Decor and Upholstery
When you step into the world of home decor projects, the way you think about fabric yardage has to shift. Making curtains or reupholstering a chair isn't like cutting out a dress pattern. These are bigger, bolder projects, and they come with their own set of rules—especially when you’re dealing with things like curtain fullness, matching patterns across a sofa, or trying not to waste a single inch of that gorgeous (and pricey) decorator fabric.
You're moving from fitting small, curved pattern pieces onto fabric to covering large, mostly rectangular surfaces. It becomes less about nesting intricate shapes and more about getting the height, width, and visual flow just right.
Of course, before you can even start calculating yardage for curtains, you have to get your window measurements right. Knowing how to measure a window for curtains perfectly is the absolute first step. Get this wrong, and all your fabric math will be off, leaving you with curtains that just don't hang right.
Calculating Curtain Fabric
Figuring out curtain fabric comes down to three things: the finished length, the finished width, and how "full" you want them to look. Fullness is just a fancy word for how much gather or pleating the fabric has. A fuller curtain gives you that plush, traditional vibe.
- Length: Measure from where you plan to hang the curtain rod all the way down to where you want the curtain to end (the sill, the floor, or even pooling on the floor). Then, add a generous 8-10 inches to that number. This extra bit is for creating a nice, substantial top header and bottom hem.
- Width & Fullness: Measure the full width of your window, including the frame. For a classic, standard fullness, you'll want to multiply this measurement by 2 to 2.5. If you’re using a sheer fabric or want a really luxurious, gathered look, you might even multiply the width by 3.
Let’s run through an example. Say you have a 40-inch wide window and you're dreaming of floor-length curtains that are 84 inches long. For that standard fullness, you'd need a total fabric width of 80 inches (40 x 2). If the fabric you fell in love with is 54 inches wide, you’ll need two separate panels (or "widths") of fabric to cover the window properly.
From there, you just calculate the length needed for each panel (84" long + 10" for hems = 94") and multiply that by the number of panels you need. Easy peasy.
Tackling Basic Upholstery
Upholstery can feel a bit scary, I know, but the math behind it is actually pretty simple. The trick is to stop looking at the piece of furniture as a whole and start breaking it down into individual parts. Think of it as a collection of smaller projects: the seat, the inside back, the outside back, the arms, and any cushions.
Measure the length and width of each of these sections at their widest points. Always add a few extra inches all around for your seam allowances and for wrapping the fabric around corners and edges.
Here’s a pro tip that has saved me from fabric-buying regret more times than I can count: draw a simple diagram. I sketch out the width of my fabric (usually 54 inches for upholstery material) on a piece of paper and then figure out the best way to arrange all my furniture pieces on it. This little visual map is a game-changer for cutting down on waste.
Now, if you're working with a fabric that has a big, repeating pattern, you absolutely have to plan for pattern matching. This isn't optional if you want a professional-looking finish. It often means buying an extra 15-20% of fabric, but it's worth it. That extra material gives you the wiggle room to make sure the pattern flows perfectly from the back of a chair right down to the seat cushion.
Estimated Yardage for Common Home Decor Projects
To give you a head start, here is a quick reference guide to help you budget and plan for some popular home sewing projects before you visit Lindas to find that perfect fabric.
| Project Type | Fabric Width (45") | Fabric Width (54") |
|---|---|---|
| Dining Chair (Seat Only) | 1 yard | 0.75 yards |
| Armchair (No Skirt) | 8-10 yards | 6-8 yards |
| Small Loveseat | 12-14 yards | 10-12 yards |
| Standard Sofa (7-foot) | 16-20 yards | 12-18 yards |
Remember, these numbers are just a helpful starting point. Every piece of furniture is different, so always measure your specific item for the most accurate figures. Taking that little bit of extra time to plan ensures your investment in beautiful, high-quality fabric is used wisely and results in a stunning piece you'll be proud of for years to come.
Avoiding Common Fabric Calculation Mistakes
We’ve all been there. You’re excited, you’ve done the math, and then… oops. Even seasoned sewists can make a simple miscalculation that sends a project sideways. Getting your fabric yardage right is more than just plugging numbers into a calculator; it’s about knowing the little secrets that can save you from a major headache.
Let's start with the classic blunder: forgetting about shrinkage. This is a lesson most of us learn the hard way! Those gorgeous natural fibers we all adore—especially quilting cottons and linens—have a tendency to shrink up a bit after their first trip through the washer and dryer.
If you skip the pre-wash or don't account for this, you could end up with a finished garment that’s suddenly a size too small or quilt blocks that refuse to line up. My rule of thumb? Always add 10% extra to your final yardage for these types of fabrics. Think of it as cheap insurance for your project.
The Challenge of Repeats and Direction
Now, here’s where you can really elevate your sewing game: handling patterns. When you're working with a fabric that has a distinct print, you have to factor in the pattern repeat—that’s the distance before the design starts all over again. Getting those motifs to line up perfectly for a seamless, professional look requires a little extra fabric.
You'll need to think about both:
- Vertical Repeats: The distance the pattern runs down the length of the fabric.
- Horizontal Repeats: The distance the pattern runs across the fabric's width.
Ignoring the repeat, particularly a large one, means you’ll either have jarring, mismatched seams or you'll be making an emergency trip back to the fabric store.
It helps to think of fabric with a repeat like wallpaper. You wouldn't just slap it on the wall without matching the pattern at the seams. The same logic applies here, and it always means buying a bit more fabric to get it right.
Lastly, never, ever forget to check for directional fabrics. We're talking about anything with a "nap" like velvet or corduroy, or even a cotton print with a scenic design that only goes one way. To get a consistent look in color and texture, every single pattern piece has to be cut facing the same direction.
This simple constraint means you can't get clever with nesting your pattern pieces to save fabric. You'll almost always need more yardage than you would for a non-directional print. It's a small detail, but it makes all the difference in a polished, finished piece.
Keeping these potential traps in mind will help you adjust your numbers before you even start cutting. It’s that little bit of foresight that ensures when you find that perfect bolt at Lindas, you’ll walk away with exactly what you need to bring your vision to life.
Common Fabric Yardage Questions Answered
Even after you’ve run all the numbers, a few tricky questions always seem to pop up. We’ve all been there—standing in the fabric store, bolt in hand, wondering if we’ve really thought of everything.
Let’s tackle some of the most common yardage dilemmas I hear about. Getting these details right is the difference between a project that flows smoothly and one that sends you back to the store mid-stitch.
How Much Extra Fabric Should I Buy for Shrinkage?
This is a big one, especially when you're working with natural fibers. For materials like cotton, linen, and rayon, my go-to rule is to add about 10% extra fabric just for shrinkage. These fabrics love to tighten up in that first wash, sometimes more than you'd expect.
So, if your project calls for three yards, grabbing an extra 1/3 yard is a cheap insurance policy against a finished garment that's suddenly too small.
And I can't say this enough: always, always pre-wash your fabric! Toss it in the washer and dryer exactly how you plan to care for the final piece. This gets all that shrinking out of the way before you ever make your first cut.
What Is the Best Way to Account for a Large Pattern Repeat?
Matching a bold, large-scale pattern is one of those details that can make your handmade item look truly professional. But to do it right, you absolutely need more fabric than the pattern calls for.
My trick is to buy at least one full pattern repeat for every yard or two you need. This gives you enough slack to slide your pattern pieces around and get that perfect, seamless match across the seams.
For instance, if you fall in love with a fabric that has an 18-inch vertical repeat and your project requires four yards, I’d strongly suggest buying an extra 1/2 to 1 yard. That little bit of extra fabric is your best friend when you’re trying to make sure those floral motifs line up flawlessly.
"The pattern envelope is a great starting point, but it's often generous and doesn't account for your specific body measurements or adjustments. For the most accurate amount, measure your actual pattern pieces and create a layout plan based on the width of the fabric you intend to use."
Honestly, this hands-on approach is the secret to nailing your fabric amounts every single time. The numbers on the envelope are just a guide. Laying out your own pattern pieces on a grid that matches your fabric’s width is the only way to know exactly what you'll need.
With your fabric calculations locked in, it's time for the fun part—bringing your vision to life! At Linda's Electric Quilters, we're here to help you find the perfect materials, from vibrant prints to essential notions.
Dive into our collection of over 30,000 products and find everything you need for your next masterpiece at https://lindas.com.


