
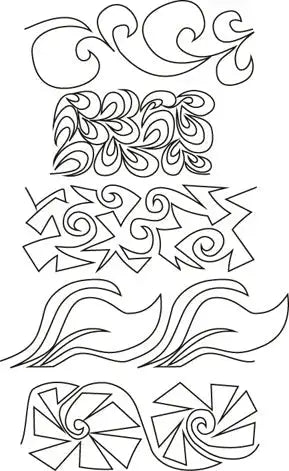
702 Roll 2: Five 4-Inch Pantograph Patterns for Smaller Machines and Borders
The 702 Roll 2 Pantograph by Linda V. Taylor is a paper pantograph roll made for the machines many quilters actually use. Unlike pantographs designed only for large longarms, this roll in the 700 series was exclusively designed for mid-arm, short-arm and domestic machines. It measures 96 inches long, and each pattern on the roll is 4 inches wide.
What the Design Is
A paper pantograph is a printed, continuous-line pattern worked from behind the machine. You lay the paper on the pantograph table, follow the printed line with a laser light or a stylus, and the needle reproduces that path on the quilt. Because the line is continuous, you can stitch a full pass without stopping to tie off between motifs.
What sets Roll 2 apart is variety. Five different patterns come on each roll, rather than a single design repeated for the whole length. That gives you options from one roll, without buying five separate rolls.
What Quilts It Suits
The narrow 4-inch width suits quilts where a wide, deep row would not fit the quilting area of a smaller machine. It is a practical choice for lap quilts, baby quilts, table runners and everyday quilts finished on a mid-arm, short-arm or domestic setup, where each pass needs to stay manageable.
It is also, as the 700 series is known for, wonderful for borders. A 4-inch continuous pattern can run along a border strip, giving the edge of the quilt a finished, stitched texture that ties in with the body. Used across the whole top, the same width builds up an even all-over texture row by row.
Row-Height Choice: Working With a 4-Inch Row
With this roll, row height is already decided for you: 4 inches. That is the point of the design. Instead of choosing between a 10-inch and a 12-inch version, you plan around a compact row that fits a smaller throat and a smaller quilting area.
Plan how many passes your quilt will need before you start, and keep the spacing consistent from row to row. Even 4-inch rows read as one smooth texture, while drift or gaps will show in the all-over effect.
How to Use It on Your Machine
Unroll the paper smoothly on the pantograph table and secure it so it cannot shift during a pass. At 96 inches long, the roll covers most quilts in a single pass. Position your laser or stylus over the start of the printed line, check that the pointer tracks the line accurately, and make a short dry run without stitching to confirm where the row will begin and end.
Stitch at a steady, even speed, watching the pointer and the printed line. A consistent pace keeps the continuous line smooth. When a pass is finished, advance the quilt by one row height, re-align the pointer with the pattern, and check the new row against the row above before stitching again. That brief alignment check is what keeps successive rows parallel and evenly spaced.
Need the pattern to be longer than 96 inches? Find where the pattern repeats, mark that point on your pattern shield, and shift the pattern down to make it meet up. This allows you to extend the pattern to accommodate larger quilts.
Tips for a Clean Finish
Start with a light reference mark for your first row so the pattern begins square. Check alignment again after the first advance, when a small drift is still easy to correct. Keep the paper flat, keep your starting points consistent at the edges, and step back after a few rows to confirm the texture looks even across the quilt.
For borders, test the 4-inch pattern against your border width first and centre it in the strip before committing to a full run.
Shop the 702 Roll 2 Pantograph by Linda V. Taylor at Linda's Electric Quilters.


