
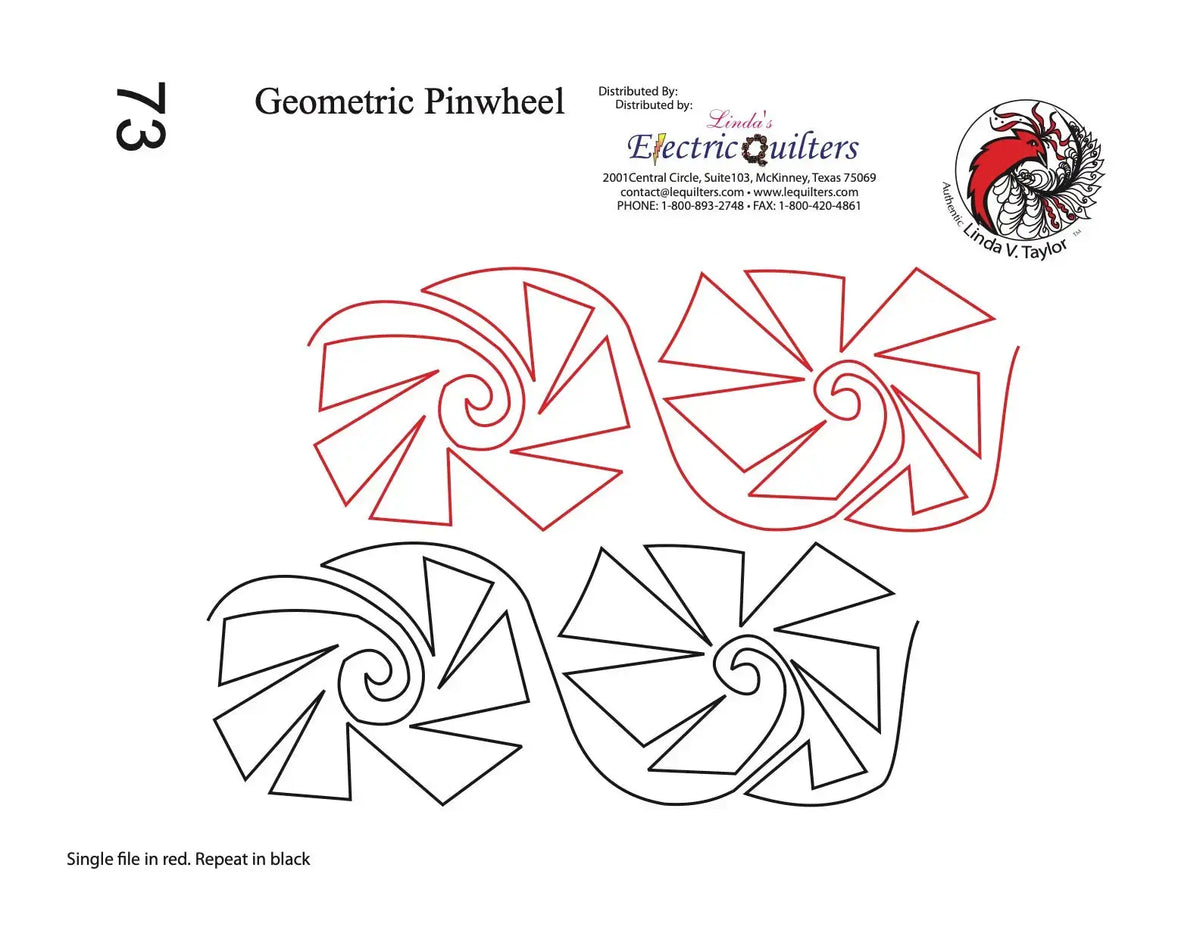
Geometric Pinwheel: Sharp Angles and Spinning Motion in an All-Over Pantograph
The 073 Geometric Pinwheel Pantograph by Linda V. Taylor is a continuous-line paper pantograph that brings crisp, spinning geometry to your frame. It measures 121 inches long and comes in two row heights — 8 inches and 14 inches — so you can choose a tighter repeat or a bold, open scale for the same pinwheel design.
What the Design Is
A paper pantograph is a printed, continuous-line pattern used from the back of the quilting frame. You lay the paper flat on the pantograph table, follow the printed line with a laser light or a stylus, and the needle reproduces that path on the quilt top. Because the line never breaks, you can stitch a full pass in one smooth run, then advance the quilt and stitch the next row.
Geometric Pinwheel is built around the classic pinwheel motif — angled blades turning around a center point. Worked into a continuous row, those pinwheels create movement across the quilt, with straight edges and sharp points that read clearly from across the room. It is a structured, modern-leaning alternative to swirls and meanders.
What Quilts It Suits
This design is a natural partner for quilts that play with geometry: pinwheel blocks, half-square triangle quilts, modern quilts, and tops built from bold solids or high-contrast prints. The stitched pinwheels echo the piecing without copying any single block exactly.
It also works when you want quilting that adds energy to a simpler top. On plain or low-volume backgrounds, the angled lines become the feature. On busy prints, choose the larger row height so the shapes stay readable. It suits throws, twin quilts, and bed quilts where you want even, all-over coverage with a crisp, contemporary feel, and it is a strong choice for kids' and masculine quilts where florals and feathers do not fit.
Row-Height Choice: 8 Inches or 14 Inches?
The 8-inch row gives denser quilting and a smaller pinwheel repeat. Choose it for smaller quilts and throws, and for closer, more even texture.
The 14-inch row opens the design right up. Each pinwheel stitches larger and bolder, each pass covers more ground, and the finished quilt stays softer with more drape. Choose it for larger bed quilts, wide solid areas, and faster coverage.
Whichever size you pick, plan first: divide the quilt's length by your row height to estimate passes needed, and check how the first and last rows land at the edges.
How to Use It on a Longarm
Unroll the paper smoothly on the pantograph table and secure it so it cannot shift mid-pass. Position your laser or stylus, check that the pointer tracks the printed line accurately, and do a short dry run without stitching to confirm the row starts and ends where you expect — especially at the points, where accuracy shows.
Stitch at a steady, even speed. Geometric designs reward consistency: keep your pace even on long straight runs and slow slightly as you turn each point so corners stay sharp rather than rounded. When a pass is finished, advance the quilt by exactly one row height, re-align your pointer with the start of the next row, and check spacing before you stitch. Consistent advancing keeps the rows evenly spaced from top to bottom.
Need the pattern to be longer than 121 inches? Find where the pattern repeats, mark that point on your pattern shield, and shift the pattern down to make it meet up. That lets you extend the pattern to accommodate larger quilts.
Tips for a Clean Finish
Step back after the first row and check scale and spacing — catching a drift after one row is far easier than after five. Keep thread close to the background for texture first, or use a gentle contrast when you want the pinwheels to stand out. If a point looks soft, slow down on the turn; crisp points are the whole character of this design.
Shop the 073 Geometric Pinwheel Pantograph by Linda V. Taylor at Linda's Electric Quilters.


