

Table of Contents
- What Quilt Basting Is and Why You Need It
- How to Set Up a Longarm Quilting Machine for Basting
- How to Load a Quilt on a Longarm
- Longarm Quilt Basting Stitch Length and Spacing
- How to Prevent Puckers When Basting a Quilt
- Machine Basting Methods: Thread, Spray, and Pin Options
- Common Mistakes to Avoid When Basting on a Longarm
- Frequently Asked Questions
Last Updated: October 18, 2026
What Quilt Basting Is and Why You Need It
Quilt basting is the process of temporarily holding the three layers of your quilt together before you stitch the final quilting design. These three layers, the quilt top, batting, and backing, need to stay aligned and flat while you work.
Think of basting as the glue that holds everything in place. It's temporary. You'll remove these stitches later, but they do essential work upfront. Many quilters skip this step or rush through it, and that's where problems start. Wrinkles in the backing, puckers in the batting, and uneven tension all trace back to poor basting.
Understanding how to baste a quilt on a longarm is essential, as basting takes on extra importance with these machines. The quilt moves through the frame as you stitch. If the layers aren't secured evenly, the backing will bunch up, the top will shift, and your quilting lines won't be straight.
At Linda's Electric Quilters, we offer resources to help quilters master this step. It's not complicated, but it does require attention to detail and the right approach for your machine.
How to Set Up a Longarm Quilting Machine for Basting
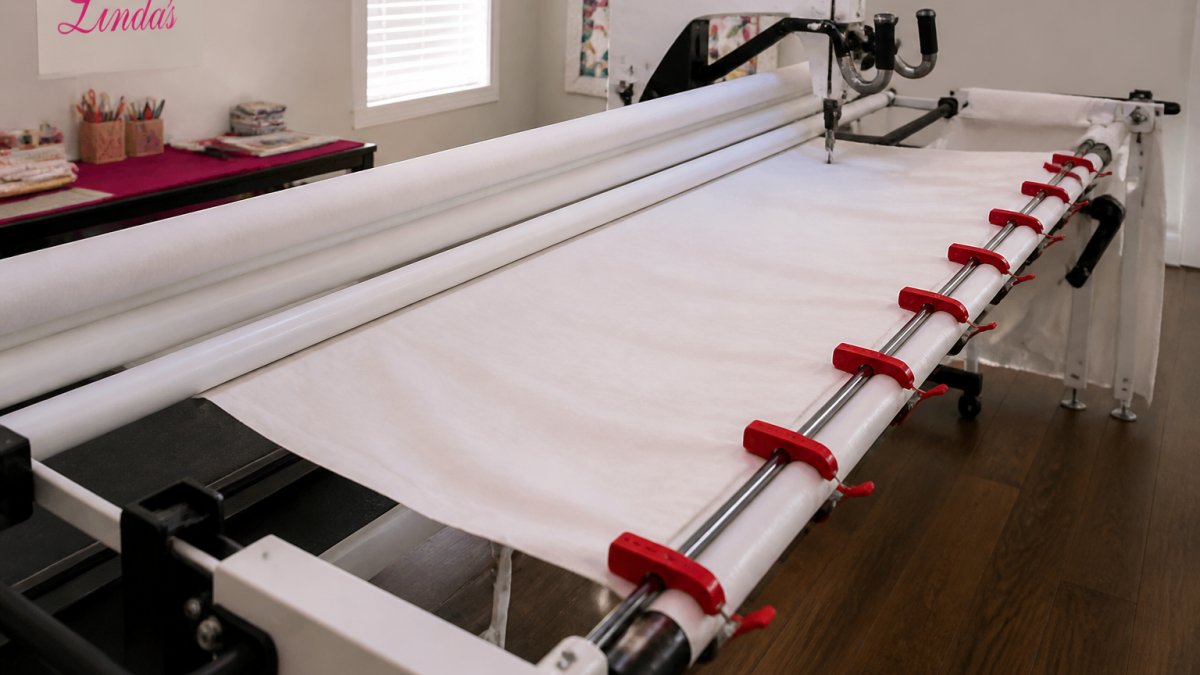
Before you load your quilt, your machine needs to be ready. This means installing leaders, attaching clamps, and checking that everything moves smoothly.
Install Leaders and Secure the Backing
Leaders are the fabric strips attached to the rollers at the top and bottom of your longarm frame. Your backing fabric wraps around these leaders first, before you add the quilt top and batting.
Here's the process:
- Measure your backing fabric so it's at least 8 inches wider than your quilt top on all sides
- Wrap the top edge of your backing around the top leader and secure it with pins or clips
- Do the same at the bottom with the lower leader
- Make sure the backing is straight and wrinkle-free before you tighten anything
- Roll the backing onto the leaders until it's taut but not stretched
The backing needs to be evenly tight across the entire width. If one side is loose and the other is tight, you'll get uneven tension problems later. Take your time here. This foundation determines everything that comes next.
Attach Clamps to Maintain Even Tension
This is where most quilters make their biggest mistake. They use one small clamp on each side, thinking that's enough. It's not.
A single clamp creates a pressure point. The fabric pulls tight at that one spot while the rest of the side stays loose. That uneven tension causes wavy edges and tucks on the back of your quilt. You need clamps that hold the entire width evenly.
Red-E-Edge Snapper Clamps are designed for this exact purpose. These lightweight clamps snap shut easily and hold your backing fabric with consistent tension across the full length of your quilt's side. Available in 12-inch, 16-inch, and 19-inch sizes, they distribute pressure evenly so you get no wavy borders and no tucks.

Here's how to use them:
- Place clamps every 12-18 inches along both sides of your quilt
- Make sure each clamp holds the backing fabric firmly but not so tight that it distorts the fabric
- Check that the tension feels the same across the entire side
- Adjust any clamps that feel loose or uneven
The goal is even tension from top to bottom. If you're using Linda's Electric Quilters' Red-E-Edge Snapper Clamps, you'll notice the difference immediately. Less time fussing with tension means more time actually quilting.
How to Load a Quilt on a Longarm
Loading your quilt correctly determines whether it stays flat or develops problems during quilting. This step connects your machine setup to your actual basting work.
Prepare Your Quilt Layers
Before anything touches the frame, make sure your three layers are ready.
Your quilt top should be pressed and free of wrinkles. Any creases in the top will show up in your finished quilt. Your batting should be cut to the same size as your quilt top, or slightly larger. Your backing should already be attached to the leaders, as we covered above.
Now comes the critical part: layer alignment.
- Place your batting on top of the backing, smoothing it out from the center toward the edges
- Lay your quilt top on the batting, again smoothing from center outward
- Make sure all three layers are smooth and wrinkle-free
- Check that the quilt top is centered over the batting and backing
Don't rush this. A few extra minutes of smoothing now prevents hours of frustration later.
Roll and Secure the Sandwich
Your "quilt sandwich", the three layers stacked together, now needs to be rolled onto the top roller of your frame.
- Roll the quilt sandwich onto the top roller, keeping it straight and even
- Make sure the backing, batting, and top stay aligned as you roll
- Secure the quilt top to the top leader with pins or clips, spacing them about 6 inches apart
- The quilt top should be taut but not stretched
- Check one more time that everything is smooth and aligned
Once the sandwich is secured, your machine is ready for basting. The layers should feel stable. If you can move them easily or if you see wrinkles, stop and fix them now. It's faster than dealing with problems mid-basting.
Longarm Quilt Basting Stitch Length and Spacing
Now you're ready to actually baste. The machine does the work, but you need to understand the settings.
Most longarm machines have a basting mode with specific stitch lengths. According to Free Motion Project's technical guide on basting stitches, when you set your machine to "small baste," the needle creates a stitch every 1/2 to 3/4 inch. This spacing holds the layers together without being so close that the stitches are hard to remove later.
Here's what to do:
- Set your machine to small baste or the equivalent on your model
- Start at one corner of your quilt
- Baste around the entire perimeter, about 1 inch in from the edge
- Then baste interior rows, spacing them about 3-4 inches apart
- Use long, even passes across the width of the quilt
The perimeter basting is crucial. This holds the outer edges steady while you work on the interior. Interior basting prevents the batting from shifting as you quilt the actual design later.
Don't skip the interior passes just because they take time. A quilt basted only around the edges will develop puckers and wrinkles in the middle as soon as you start quilting the design.
How to Prevent Puckers When Basting a Quilt
Puckers are wrinkles in the batting or backing that appear during quilting. They're caused by uneven tension, poor basting, or layers that weren't smooth to begin with.
Red E Edge Snapper Clamp 16in →
Prevention is simpler than fixing puckers after they form.
Start with smooth layers. Press your quilt top. Smooth your batting from the center outward. Make sure your backing is evenly taut on the leaders. Wrinkles at the start multiply as you work.
Use even tension on all clamps. Check your clamps before you baste and again before you quilt.
Baste with consistent spacing. Don't skip interior rows. Don't make basting passes too far apart. Consistent spacing every 3-4 inches holds the batting steady.
Advance the quilt smoothly. As you move through your quilting, advance the quilt evenly. Jerky movements or uneven advancement can shift the layers and cause wrinkles.
Check tension as you go. Stop every few minutes and look at the back of your quilt. If you see wrinkles forming, stop and adjust your clamps or backing tension before continuing.
Most puckers come from one of these issues. Fix them early, and your quilt will be smooth and professional.
Machine Basting Methods: Thread, Spray, and Pin Options
Learning how to baste a quilt on a longarm gives you three main options: thread basting, spray basting, and pin basting. Each has trade-offs.
Thread basting is what we've been discussing. Your machine creates temporary stitches that hold the layers together. This is the most common method for longarm machines because it's reliable and doesn't require additional products.
Spray basting uses temporary adhesive spray to glue the layers together. You spray the batting, press the quilt top onto it, then spray again between the batting and backing. This is fast and creates a very secure bond.
Pin basting uses safety pins spaced every 4-6 inches across the quilt. This is simple and requires no special equipment beyond pins. The downside is that pins are slow to place and remove, and they can snag threads if you're not careful.
For longarm machines, thread basting is the standard. It works with your machine's capabilities and gives you the control you need. Handi Quilter's basting guidance acknowledges that pins can work as an alternative, but thread basting remains the most practical for machine quilting.
Common Mistakes to Avoid When Basting on a Longarm
Even experienced quilters make basting mistakes. Knowing what to avoid saves you time and frustration.
Mistake 1: Using only one clamp per side. We've mentioned this, but it's worth repeating. One clamp creates uneven tension.
Mistake 2: Basting only around the perimeter. The interior of your quilt needs basting too.
Mistake 3: Rushing the layer preparation. Smooth your layers carefully before you load them. Wrinkles at the start compound as you work.
Mistake 4: Not checking tension before you start. Spend two minutes verifying that your backing is evenly taut and your clamps are secure.
Mistake 5: Using stitch lengths that are too long. If your basting stitches are too far apart, the layers can shift between stitches.
Mistake 6: Skipping interior basting because you think the perimeter is enough. It's not.
Mistake 7: Not removing basting stitches after quilting. Basting stitches are temporary. Remove them once your quilting design is complete.
Basting a quilt on a longarm doesn't have to be stressful. The key is understanding why each step matters and taking time to do it right.
At Linda's Electric Quilters, we stock everything you need to baste successfully. Our Red-E-Edge Snapper Clamps are engineered to maintain even tension across the full width of your quilt, eliminating wavy edges and tucks. We also offer premium batting in rolls, packages, and by-the-yard options, so you can choose exactly what you need for your project.
Frequently Asked Questions
What stitch length should you use to baste a quilt on a longarm?
Set your longarm machine to the small baste setting, which produces stitches spaced 1/2 to 3/4 inch apart. This spacing holds layers securely without creating permanent marks. Space your basting lines about 3 to 4 inches apart across the quilt interior, and add a perimeter line near the edges. Adjust based on your quilt size and batting weight, heavier batting may need closer spacing to prevent shifting during quilting.
How do you keep quilt layers from shifting while basting on a longarm?
Use Red-E-Edge clamps on both sides of your quilt to maintain even tension across the backing and top. Uneven tension from a single clamp causes wavy edges and tucks on the back. Advance the quilt smoothly and consistently as you stitch, and avoid jerky movements. Keep the top and backing equally taut without over-stretching. Thread basting with temporary stitches every 3-4 inches prevents layers from bunching as you quilt.
Can you use a longarm to baste a quilt for hand quilting?
Yes. Many hand quilters use longarm machines for basting because it's faster and more consistent than hand-basting the entire quilt sandwich. Machine basting with temporary stitches holds layers securely while you hand-quilt. You'll remove the basting stitches after hand quilting is complete. This hybrid approach saves time on preparation while preserving the tactile control hand quilters prefer during the actual quilting process.
How much extra backing and batting do you need for longarm basting?
Add at least 8 to 10 inches of extra backing fabric beyond your quilt top dimensions on all sides. This excess allows you to secure the backing to the leaders and clamps without pulling the quilt edges. Batting should extend slightly beyond the backing to prevent shifting. After basting and quilting, you'll trim the excess backing and batting to the finished quilt size. Measure your quilt top first, then calculate backing and batting accordingly.


