
Hey everyone. Today we're making a twin bed quilt from layer cake squares and narrow sashing, and you'll learn how a simple grid of big squares becomes a full 70 by 90 inch quilt.
The short version: trim 48 squares, frame them with 1-inch finished sashing and cornerstones, add a wide border, and the quilt finishes at 70 by 90 inches. It suits a confident beginner ready for a first bed-size quilt.
The finished quilt, up front
Finished size: 70 by 90 inches, twin size. Squares finish 9 inches, sashing finishes 1 inch, and the border finishes 5½ inches. Seam allowances are ¼ inch throughout. Layout is 6 squares across by 8 rows down.
Why this version?
Big squares show off big prints. A layer cake brings coordinated prints at 10 inches, ready to sort. Narrow sashing separates each print so nothing blurs together. The wide border frames the grid and brings the quilt to its full twin size.
What you need
| Material or tool | What you need | Required or optional |
|---|---|---|
| Two layer cakes (42 squares each, 10 in.) | 48 squares used | Required |
| Solid yardage for sashing and border | 3½ yd total: 1 yd for sashing, 2½ yd for borders | Required |
| Backing | 2¾ yd of 108-in. wideback, or 5½ yd standard-width, pieced | Required |
| Batting | One piece about 76 × 96 in. | Required |
| Binding fabric | ¾ yd; cut nine 2½-in. strips (needs 40 in. usable width) | Required |
| Thread | 50-weight cotton for piecing and quilting | Required |
| Rotary cutter, mat, long ruler, pins, iron | Trimming, cutting, pressing | Required |
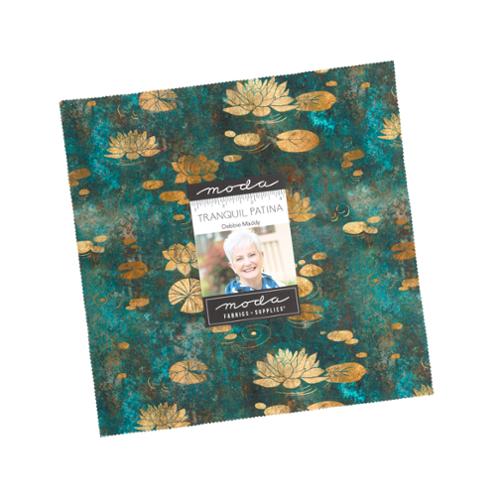
This project features the Tranquil Patina Layer Cake — a 42-piece pack of 10-inch cotton squares by Moda. For the solid, a warm stone neutral keeps prints calm — see Etchings Stone Bella Solids.
Cutting list
From the packs: choose 48 squares and trim each to 9½ inches square. From the 2½-yard border cut: cut lengthwise — two strips 6 × 79½ inches, then two strips 6 × 70½ inches. From the 1-yard sashing cut, at least 40 inches of usable width: cut 21 strips at 1½ inches across the width; subcut each into four 9½-inch pieces — 84 pieces, and you need 82. Cut one 1½-inch cornerstone from each strip end — 21 in all. Cut one more 1½-inch strip and subcut 14 more cornerstones. That makes your 35. Longest pieces first.
How to sew the quilt top
- Open both packs and sort every square into lights, mediums, and darks. Choose 48, then lay out 8 rows of 6.
- Trim each chosen square to 9½ inches. Warning: measure from the body of the square, not the pinked tips — tips add false size.
- Cut the solids in the order above: borders from the long cut, sashing strips from the short cut, cornerstones from the ends and one extra strip.
- Build a block row: alternate squares and sashing pieces — 6 squares, 5 sashing pieces. Sew with a ¼-inch seam. Make 8 rows. Press toward the sashing.
- Build a sashing row: alternate sashing pieces and cornerstones — 6 pieces, 5 cornerstones. Make 7 rows. Press toward the sashing pieces.
- Join the rows, alternating block and sashing rows, starting and ending with a block row. Pin at every cornerstone — warning: unpinned intersections slide.
- Measure the center. It should read 59½ × 79½ inches unfinished. Fix a wavy row now, not after the border.
- Sew the long borders to the sides and press out. Then add the top and bottom borders and press out again.
- Layer backing (wrong side up), batting, and top (right side up). Smooth from the center out and baste.
- Stitch in the ditch along the sashing, or try a simple diagonal grid. Completely up to you.
- Trim the sandwich square, join the nine binding strips, and bind the edges. Just like that — a twin quilt.
How does the precut math work?
A layer cake square is 10 inches. Trimmed to 9½ and sewn on all four sides, it finishes at 9 inches — a ¼-inch seam comes off each side. Sashing cut at 1½ inches finishes at 1 inch. Now add a row: 6 squares at 9 inches make 54, plus 5 sashing strips at 1 inch make 59, plus two borders at 5½ inches make 70. Down the quilt: 8 squares make 72, plus 7 sashing rows make 79, plus the borders make 90.
Yield matters at this size. One pack holds 42 squares, and this quilt needs 48, so one pack cannot do it. Two packs give you 84 squares. You sew 48 and hold 36 back: spares, plus a matching pillow sham later. Sort by value before you sew, chain piece your rows to keep order, and press toward the sashing so intersections nest. Cutting economy counts too: borders come off the solid first — they are the longest pieces.
Troubleshooting
| Symptom | Likely cause | Fix |
|---|---|---|
| Rows do not line up at cornerstones | Seams crept, or intersections went unpinned | Check your ¼-inch seam on scrap; pin every intersection next row |
| Center measures big or small | Trim size drifted from 9½ in. | Re-measure squares; trim borders to your true center size |
| Border ripples along one side | Border was stretched to fit | Measure the quilt through its center, cut to that number, and ease, never pull |
Questions folks ask
Can I skip the trimming step?
You can, but squares vary a little and the grid shows it. Trimming to one size keeps sashing lines straight.
What if I only have one layer cake?
Make a smaller grid — 5 across by 6 down uses 30 squares — and widen the border.
Does the backing have to be wideback?
No. Standard-width cotton works pieced with a seam, pressed open. A wideback simply skips that seam — see Natural Bella Solids Wideback.
Can I use a print for the sashing?
Yes, if it reads as one calm color. A busy sashing print will fight every square it touches.
Care and easy adaptations
Care follows the components: read the care guidance for your batting and your fabrics, and follow the gentlest of them for the finished quilt. For adaptations, change the palette, not the math: all dark squares with light sashing reads bold and modern, while low-volume squares read soft and quiet. And hear me: it doesn't have to be perfect. You're your own worst critic. Take your time — it's not a race. You can do this, y'all — one straight seam at a time.
Shop the Tranquil Patina Layer Cake at Linda's Electric Quilters.
Thanks for sewing along. We'll see you next time. Bye.


