
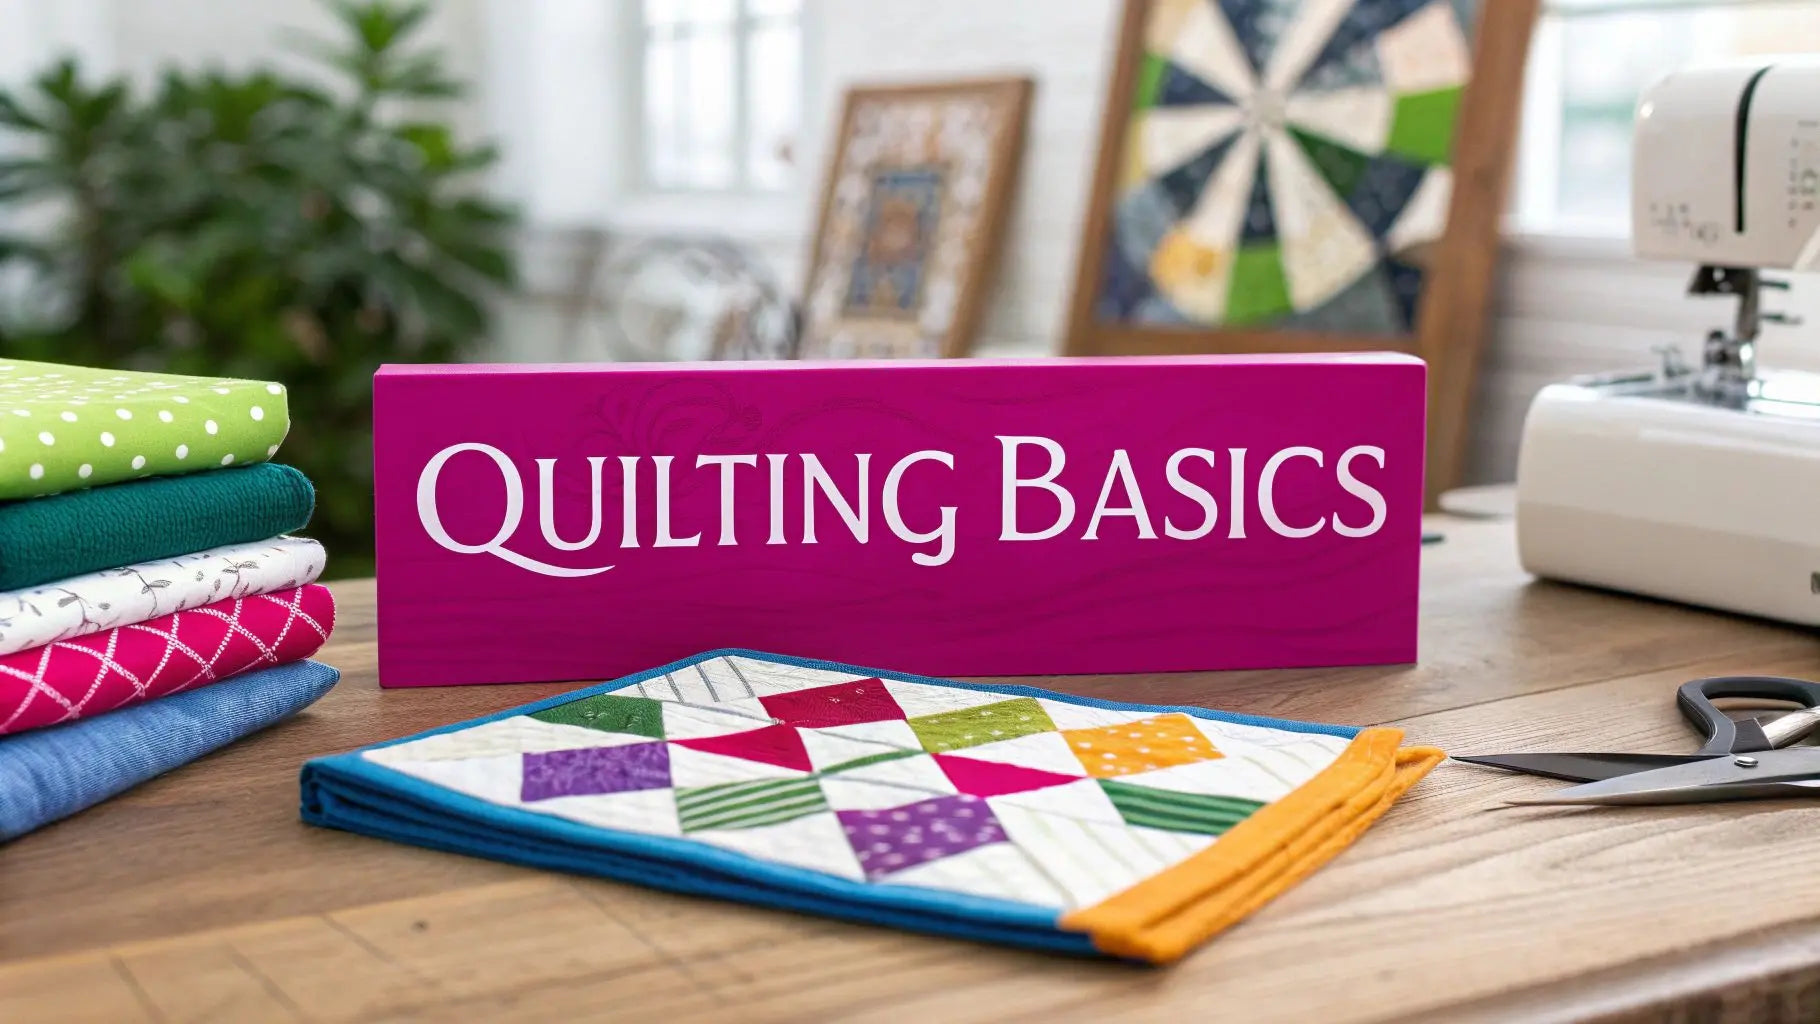
Welcome to the vibrant world of quilting! Starting a new craft can feel like navigating a maze of new terms, tools, and techniques, but at the heart of every breathtaking quilt lies a collection of simple, foundational blocks. This guide is your roadmap to the most essential basic quilting patterns that form the backbone of countless designs, from traditional heirlooms to modern masterpieces. We'll demystify these classic blocks, showing you not just what they are, but how you can use them to create something truly special.
This listicle dives directly into seven foundational patterns every quilter should know, including the Nine-Patch, Log Cabin, and Flying Geese. We'll break down the construction of each one, offering practical tips and design ideas to spark your creativity. Whether you are making your first stitch or simply looking to perfect your fundamentals, mastering these patterns is the most important step toward creating beautiful, heirloom-quality quilts with confidence.
At Linda's Electric Quilters, we believe everyone can be a quilter. We're here to provide the inspiration, and once you’ve chosen a pattern, we have the high-quality longarm machines, fabrics, and notions you need to finish your project perfectly. Let's get started on your creative journey.
1. Nine-Patch
The Nine-Patch is a cornerstone of quilting and one of the most fundamental basic quilting patterns available. Its simple construction makes it an ideal starting point for beginners, yet its versatility allows it to be a recurring feature in the work of even the most advanced quilters. The block consists of nine equal-sized squares arranged in a 3x3 grid, creating a small checkerboard effect.
This foundational pattern is celebrated for its ability to teach essential quilting skills, such as cutting accurately, maintaining a consistent 1/4-inch seam allowance, and pressing seams correctly. By alternating light and dark fabrics, you can create a dynamic visual rhythm that forms the basis for countless complex-looking quilt designs.
Why Use the Nine-Patch Pattern?
The beauty of the Nine-Patch lies in its adaptability. It is a fantastic pattern for using up small fabric scraps, allowing you to create a "scrap-buster" quilt full of memory and charm. Alternatively, using a curated selection of fabrics, such as bold solids found in traditional Amish quilts or high-contrast prints in modern designs, can produce a striking and cohesive aesthetic. This block is a perfect building block, often combined with solid squares to create larger, more intricate patterns like the Irish Chain.
To give you a clearer picture of this foundational block, the following infographic summarizes its core components.
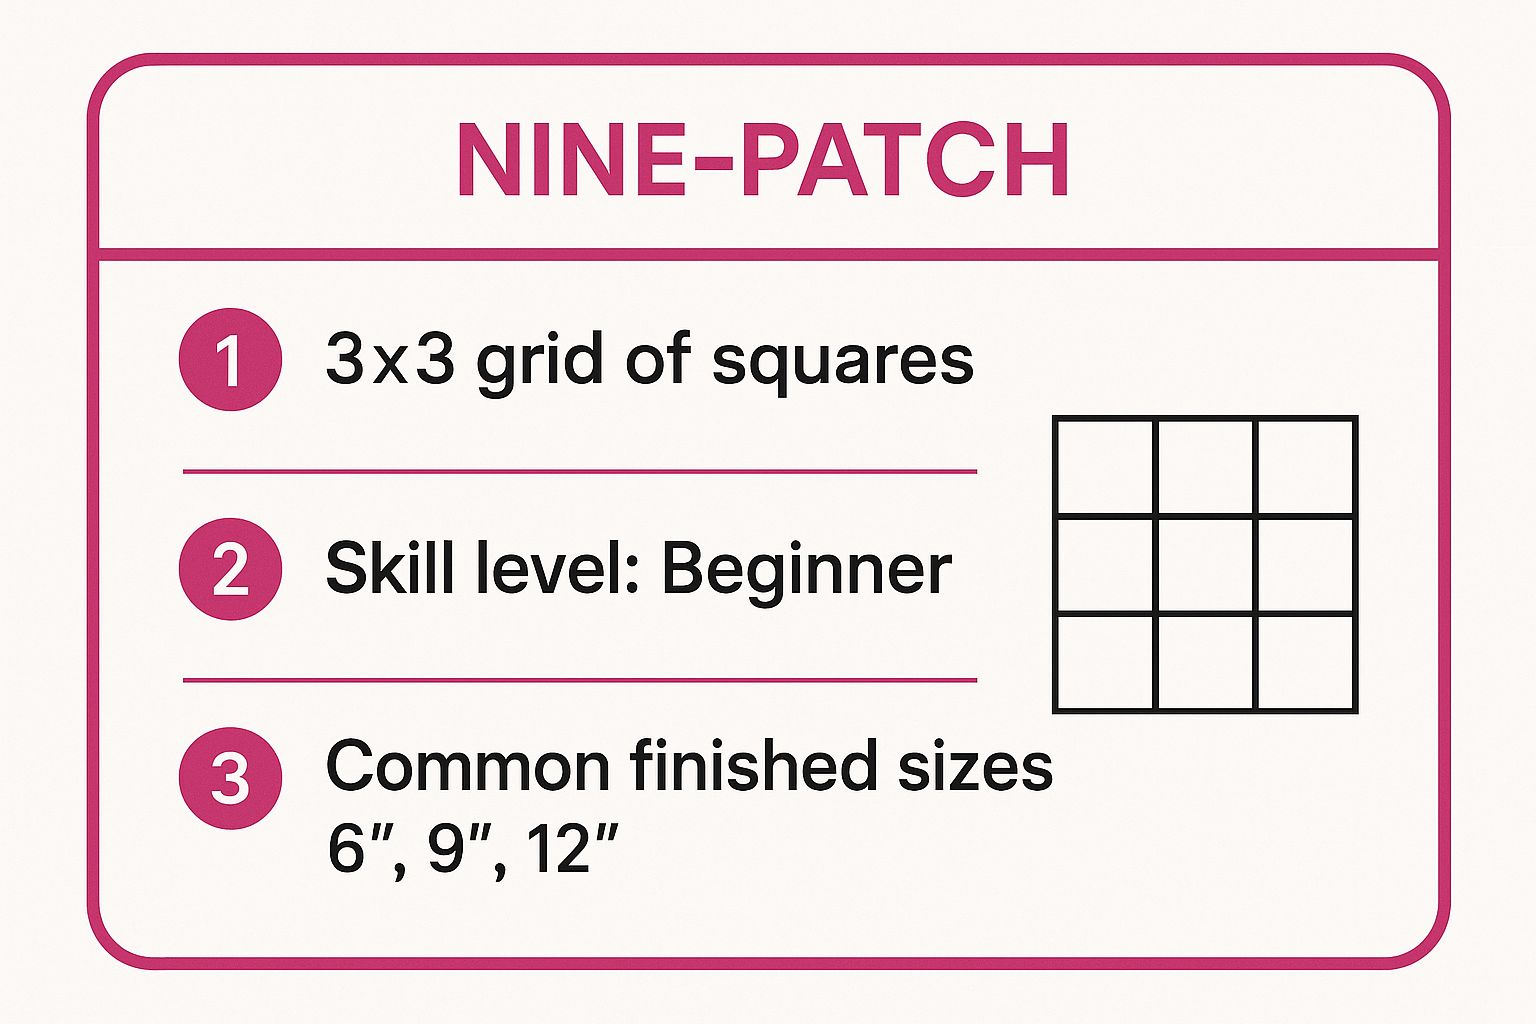
As the reference shows, the Nine-Patch is a beginner-friendly pattern based on a simple 3x3 grid, making it an accessible and rewarding first project.
Actionable Tips for a Perfect Nine-Patch
To ensure your Nine-Patch blocks are a success, focus on precision and efficiency.
- Embrace Strip Piecing: For faster construction, sew long strips of fabric together first and then cross-cut them into 3-square segments. This saves time and improves accuracy.
- Press Seams Thoughtfully: Press your seams toward the darker fabric to prevent colors from showing through on the lighter squares. When joining rows, "nest" your seams by pressing them in opposite directions for perfectly aligned corners.
- Vary Your Layout: Don’t be afraid to experiment. Try placing a unique "fussy cut" square in the center for a focal point or arrange your light and dark fabrics asymmetrically for a modern twist.
Mastering this block builds a strong foundation. For a comprehensive guide to getting started, check out our post about the essentials of quilting on Lindas.com. Once you have your beautiful blocks assembled, visit Linda's for premium batting and backing fabrics to complete your project.
2. Log Cabin
The Log Cabin is a deeply symbolic and visually striking design, making it one of the most cherished basic quilting patterns in quilting history. The block is constructed around a central square, which traditionally represents the hearth or chimney of a home. Fabric strips, or "logs," are then added sequentially around this center, spiraling outwards. Typically, two adjacent sides of the block are made with light-colored fabrics and the other two sides with dark fabrics.
This contrast between light and dark is what gives the Log Cabin its incredible design potential. When multiple blocks are arranged together, they create stunning secondary patterns that ripple across the quilt top, symbolizing themes of light and shadow, warmth, and community. Its straightforward construction, which involves sewing only straight seams, makes it highly accessible for quilters of all skill levels.
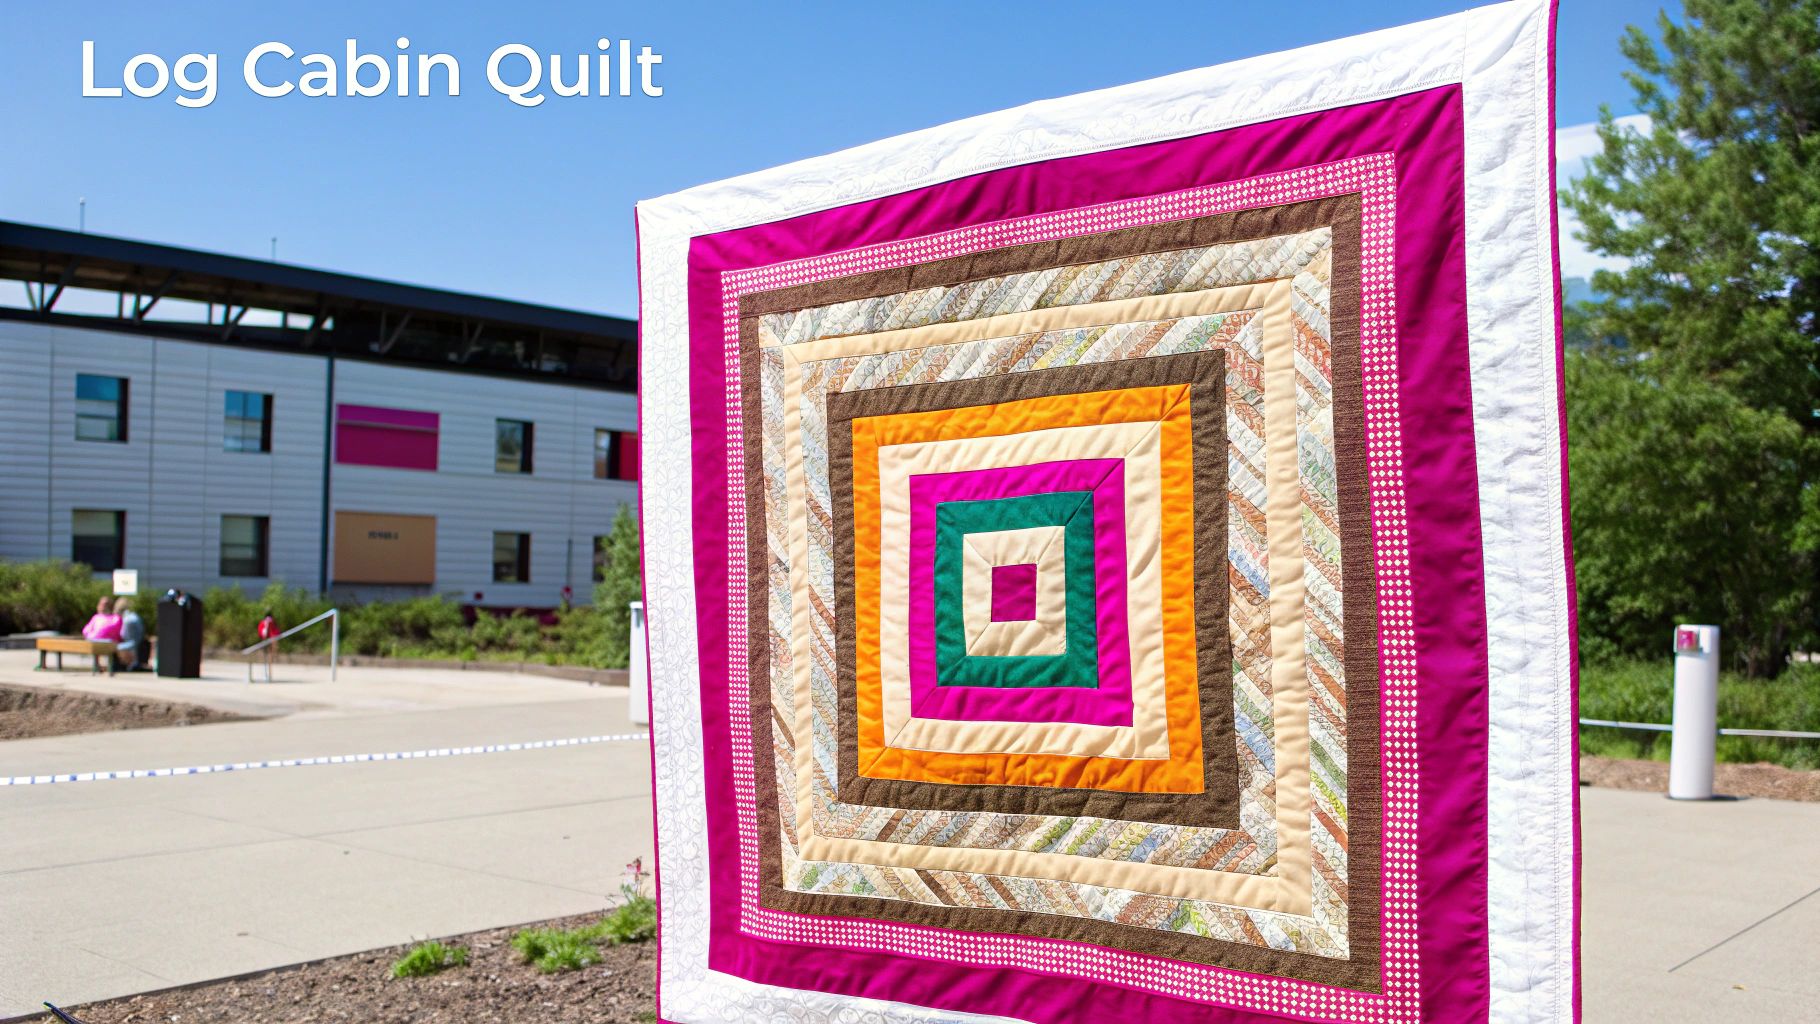
As shown, the Log Cabin block is a versatile, beginner-friendly pattern built on sequential strips, offering endless possibilities for creative arrangements.
Why Use the Log Cabin Pattern?
The Log Cabin's power lies in its ability to create complex visual effects from a simple block. By rotating and arranging the blocks, you can form a variety of well-known layouts. For example, the "Barn Raising" arrangement creates a series of concentric diamonds, while the "Straight Furrows" layout produces strong diagonal lines. The "Courthouse Steps" variation, where logs are added to opposite sides in pairs, creates a more balanced, geometric look. This pattern is perfect for exploring color theory and fabric placement.
Modern quilters have embraced the Log Cabin, using vibrant batiks, bold solids, or contemporary prints to give it a fresh feel. Whether you're aiming for a traditional, cozy aesthetic or a sharp, graphic design, the Log Cabin block provides the framework to achieve it.
Actionable Tips for a Perfect Log Cabin
Precision in cutting and piecing is key to a beautiful Log Cabin block.
- Use a Rotary Cutter: For perfectly straight and uniform "logs," a rotary cutter, ruler, and mat are essential tools. This ensures all your strips are the same width.
- Press Seams Away from the Center: As you add each log, press the seam allowance outward, away from the central square. This distributes the bulk evenly and helps the block lay flat.
- Plan with a Design Wall: Before sewing your blocks together, arrange them on a design wall or a large, flat surface. This allows you to visualize and perfect your final quilt layout.
- Cut Strips Slightly Longer: Cut your fabric strips a little longer than you need. You can sew the strip on and then trim it to the exact size of the block, ensuring a perfectly square finish.
Mastering this block will unlock a world of design possibilities. Once your Log Cabin top is complete, explore the wide selection of high-quality batting and backing fabrics at Linda's to find the perfect materials to finish your masterpiece.
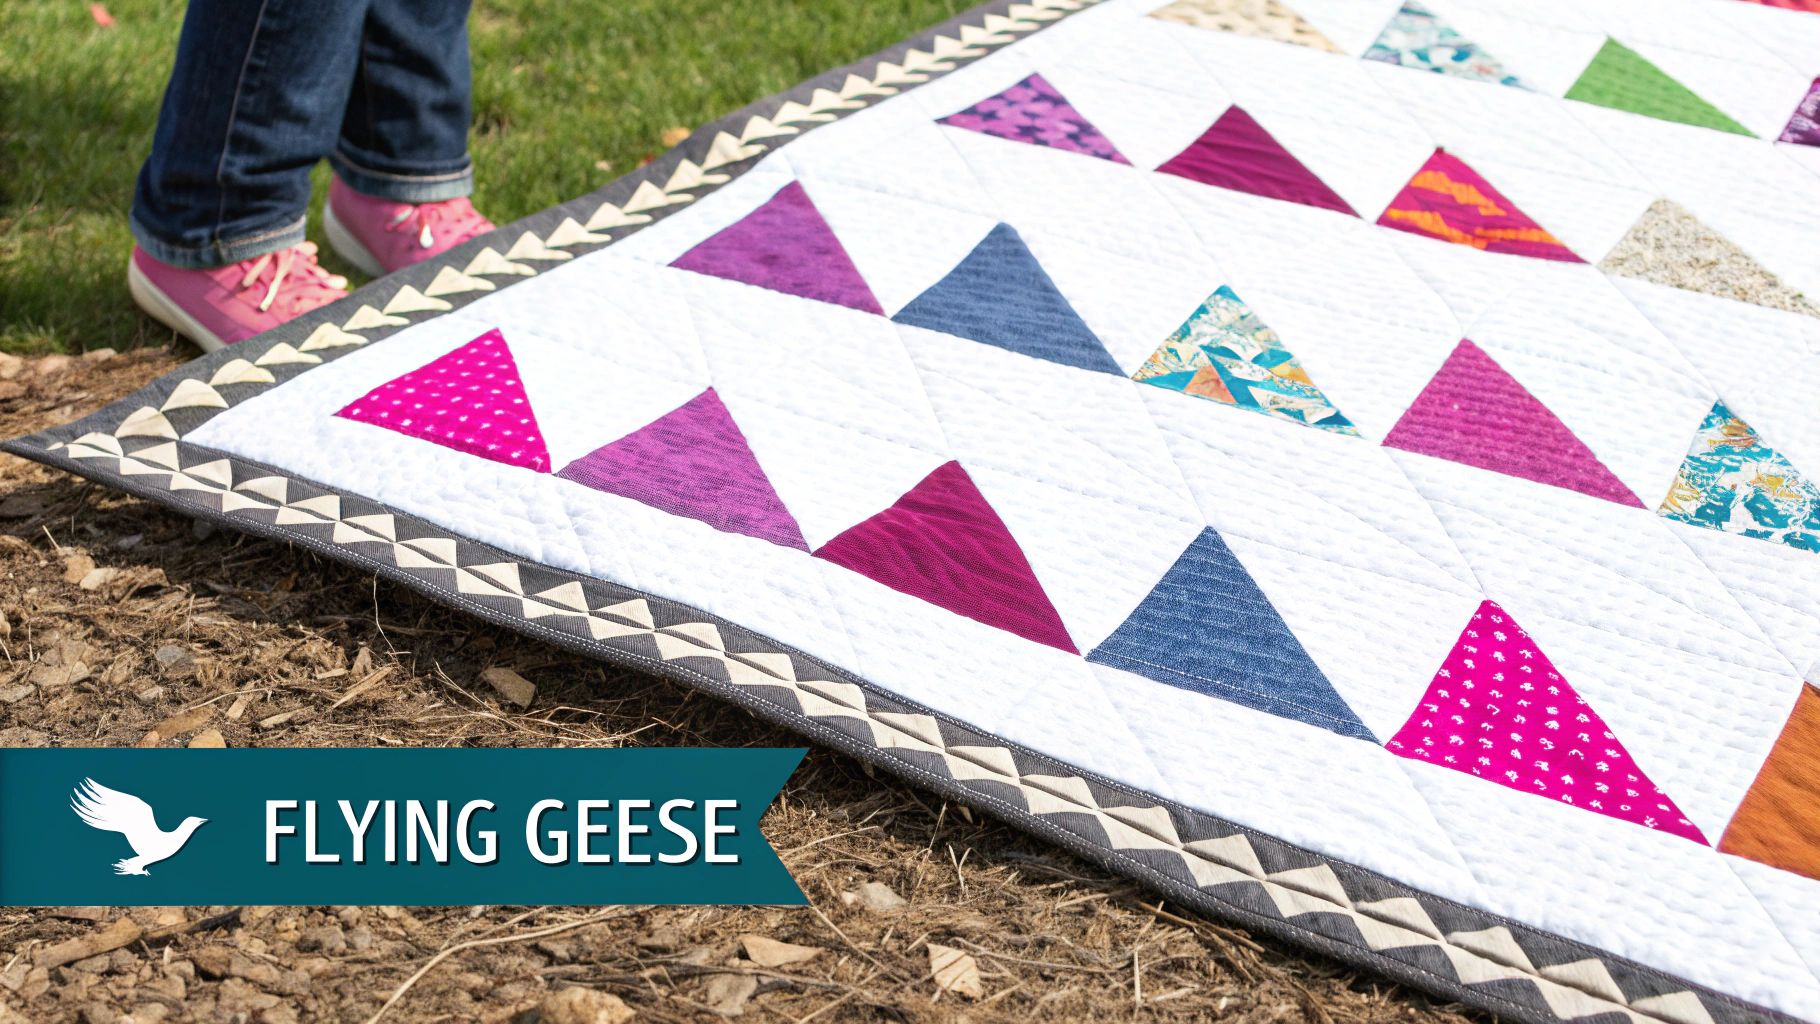
3. Flying Geese
The Flying Geese unit is one of the most dynamic and iconic basic quilting patterns, recognized by its distinct rectangular shape composed of a large center triangle (the "goose") and two smaller corner triangles (the "sky"). This design creates a powerful sense of direction and movement, making it a favorite for everything from intricate block centers to stunning, flowing borders.
This classic pattern teaches quilters about working with triangles and achieving sharp, precise points, which are crucial skills for more advanced piecing. Its versatility allows it to stand alone, forming zig-zags and diamond shapes, or to be integrated into more complex blocks like the Sawtooth Star.
Why Use the Flying Geese Pattern?
The strength of the Flying Geese pattern is its ability to add energy and flow to any quilt. You can use it to create captivating migration-themed quilts, frame a sampler quilt with a beautiful border, or arrange units with gradient fabrics for a modern ombre effect. Its directional nature is perfect for leading the eye across the quilt top.
Whether you're making a traditional quilt with scrappy geese or a minimalist design with solid colors, this block offers endless creative possibilities. Modern quilters often play with the scale of Flying Geese, creating oversized units for a bold graphic impact. The pattern is a true workhorse, capable of adding complexity and visual interest in a structured, geometric way.
Actionable Tips for Perfect Flying Geese
Achieving crisp points on your Flying Geese units is key to their success. Here are a few tips to ensure they look sharp and professional.
- Try the Four-at-a-Time Method: Also known as the "no-waste" method, this technique allows you to create four identical units simultaneously, which saves fabric and time while ensuring consistency.
- Starch Your Fabric: Before cutting, apply a spray starch and press your fabric. This gives the material more stability, which is especially helpful when working with bias edges on triangles and prevents stretching.
- Trim for Accuracy: After sewing, always use a specialty ruler to trim your Flying Geese units to their exact unfinished size. This step, often called "squaring up," guarantees your blocks will fit together perfectly in the final quilt top.
Mastering Flying Geese unlocks a new level of design potential. To complete your beautifully pieced top, explore the wide selection of premium quilt backings and batting available at Linda's to give your project a professional finish.
4. Half Square Triangle (HST)
The Half Square Triangle, or HST, is arguably one of the most versatile units in quilting and a key component in a vast number of basic quilting patterns. An HST is a square block made from two equal right-angle triangles sewn together along their longest side. This simple diagonal division of color or pattern opens up a world of design possibilities.
This fundamental block is a gateway to creating intricate-looking geometric designs, stars, and dynamic movement in your quilts. It teaches quilters the importance of precision, especially when dealing with bias edges, and introduces efficient block construction methods that can be applied to more complex patterns later on.
Why Use the Half Square Triangle (HST) Pattern?
The power of the Half Square Triangle lies in its incredible adaptability. By arranging just four HST blocks, you can create a classic Pinwheel. Combine them with squares, and you can form iconic patterns like the Ohio Star or Friendship Star. HSTs are perfect for creating everything from traditional sawtooth borders to modern, minimalist designs featuring a cascade of graduated colors.
They are an excellent way to showcase fabric collections, create high-contrast designs, or build complex secondary patterns that emerge as the blocks come together. The seemingly simple HST is a true workhorse, capable of producing stunning and complex visuals from a very straightforward construction process.
Actionable Tips for a Perfect Half Square Triangle
To ensure your HST blocks are crisp and accurate, focus on precision from cutting to pressing.
- Master the Math: To make two HSTs at once, place two squares right sides together. The standard formula is to add 7/8 of an inch to your desired finished block size before cutting. For example, for a 3-inch finished HST, cut two 3 7/8-inch squares.
- Embrace Batch-Making: For efficiency, use the "eight-at-a-time" method. This technique allows you to create eight identical HSTs from just two larger squares of fabric, saving significant time.
- Handle with Care: The long edge of the triangle is a bias edge, meaning it's stretchy and can distort easily. Handle your cut triangles gently and avoid pulling or stretching them as you sew.
- Square Up Every Block: Trimming or "squaring up" each HST block to its precise unfinished size is the most critical step for sharp points and a flat quilt top. A quality rotary cutter is essential for this task. Find the best rotary cutters for quilting at Lindas.com to ensure clean, accurate cuts every time.
Once you have a stack of perfect HSTs, you'll be ready to assemble your beautiful quilt top. Be sure to visit Linda's for the premium batting and backing you'll need to turn your masterpiece into a cozy, finished quilt.
5. Rail Fence
The Rail Fence is one of the most accessible basic quilting patterns, celebrated for its simplicity and the stunning visual effects it can produce. The pattern gets its name from its resemblance to a classic split-rail fence. Each block is constructed by sewing together several long rectangular strips of fabric, making it an excellent choice for quilters new to the craft.
This design is a masterclass in how simple elements can create complex-looking results. By merely rotating the direction of the striped blocks, quilters can achieve a wide array of secondary patterns, such as zig-zags, diamonds, or intricate woven designs. It's a fantastic way to learn about the impact of color value, contrast, and block orientation.
Why Use the Rail Fence Pattern?
The beauty of the Rail Fence pattern lies in its incredible efficiency and versatility. It is perfectly suited for using pre-cut fabric strips like Jelly Rolls (2.5-inch strips), which saves significant cutting time and ensures uniformity. This makes it an ideal pattern for a quick and satisfying project, such as a baby quilt or a cozy lap throw.
Furthermore, the Rail Fence is a brilliant "scrap-buster" design. You can gather leftover strips from other projects to create a vibrant, memory-filled quilt with zero waste. The pattern works equally well with a planned color palette, allowing you to create a sophisticated modern quilt with an ombre or gradient effect using solid fabrics.
Actionable Tips for a Perfect Rail Fence
To make your Rail Fence quilt a standout success, focus on speed and smart color placement.
- Utilize Strip Piecing: Sew long sets of fabric strips together first before cross-cutting them into blocks. This method, often called "strip piecing," is significantly faster and more accurate than cutting and sewing individual small rectangles.
- Plan Your Layout: Before sewing your blocks together, arrange them on a design wall or the floor. Experiment with rotating the blocks to see different patterns emerge. This planning stage is crucial for achieving your desired final look.
- Alternate Seam Pressing: When sewing the blocks into rows, press the seams in opposite directions for each row. This will allow the seams to "nest" together snugly, resulting in perfectly matched points and a flat, professional-looking quilt top.
Mastering this straightforward pattern opens up a world of design possibilities. Once your Rail Fence top is complete, explore the premium selection of high-quality batting and beautiful backing fabrics at Linda's to give your project the perfect finish.
6. Dresden Plate
The Dresden Plate is a classic appliqué design and one of the most visually stunning basic quilting patterns. It gets its name from the elaborately decorated porcelain plates made in Dresden, Germany. The pattern features a series of wedge-shaped "blades" or "petals" arranged in a circle to form a plate, with a solid circle covering the raw edges in the center.
This pattern introduces quilters to the art of appliqué, curved piecing, and precise template work. While it may look complex, the construction is a repetitive process of creating individual blades and then joining them together. The result is a dimensional, floral-like block that adds a touch of vintage elegance to any quilt.
Why Use the Dresden Plate Pattern?
The beauty of the Dresden Plate lies in its decorative potential and versatility. It is an excellent pattern for showcasing a specific fabric collection or using up scraps to create a vibrant, scrappy look. The blades can be made with pointed, rounded, or straight ends, each offering a different stylistic feel.
This block is perfect for creating focal points on quilts, pillows, and table runners. Traditional designs often feature pastel fabrics reminiscent of 1930s quilts, while modern interpretations might use bold batiks or high-contrast solids for a more graphic impact. It's a fantastic way to practice appliqué skills that are transferable to many other quilting projects.
To help you visualize how this charming block comes together, this video provides a step-by-step tutorial.
As the video demonstrates, creating a Dresden Plate is a manageable process that yields a beautiful and impressive result.
Actionable Tips for a Perfect Dresden Plate
Achieving a clean, circular shape requires attention to detail. These tips will help you create flawless Dresden Plates.
- Use Accurate Templates: Create precise templates for your blades using freezer paper or specialty acrylic rulers. This ensures all your blades are identical, which is crucial for a flat, symmetrical plate.
- Press Curves Carefully: When creating the outer edge of each blade, press the seam allowance carefully over your template to achieve a smooth, crisp curve or point. A stiletto or turning tool can be very helpful here.
- Baste Before Stitching: Before you start your final stitching, baste the completed plate and center circle onto your background fabric. This prevents any shifting and ensures perfect placement.
- Mark Your Center: Use a fabric marker to mark the center placement on your background square. This will help you align the Dresden Plate perfectly before you begin appliquéing it in place.
Mastering the Dresden Plate adds a valuable appliqué technique to your quilting skill set. Before you begin, explore our guide on the essential quilting supplies for beginners on Lindas.com to ensure you have the best tools. Once your beautiful blocks are ready, stop by Linda's to find the perfect sashing and border fabrics to frame your work.
7. Irish Chain
The Irish Chain is one of the most beloved basic quilting patterns, renowned for creating an elegant, interconnected design that flows across the quilt top. This classic pattern achieves its woven, chain-like effect by strategically alternating two different types of blocks: a pieced block (often a Nine-Patch or a Five-Patch) and a plain, solid-colored "setting" block. The pieced blocks form the "links" of the chain, creating beautiful diagonal lines.
This pattern is a fantastic next step for quilters who have mastered simpler blocks. It teaches the importance of block placement and how simple components can form a complex and stunning secondary pattern. Variations like the Single, Double, and Triple Irish Chain offer increasing levels of intricacy, allowing the design to be adapted from simple and classic to visually elaborate.
Why Use the Irish Chain Pattern?
The Irish Chain is celebrated for its timeless appeal and graphic impact. Its structured grid creates a sense of order and rhythm, making it a perfect choice for both traditional and modern quilts. The large, plain setting squares offer a wonderful opportunity to showcase intricate quilting stitches, a beautiful fabric print, or custom embroidery, making the quilt truly your own.
This pattern has a rich history, often seen in antique red and white quilts from the 1800s or classic blue and white colonial-style designs. Modern quilters have embraced it with contemporary color palettes and bold solids, proving its enduring versatility. It's an excellent choice for a two-color quilt, creating a crisp and high-contrast aesthetic.
Actionable Tips for a Perfect Irish Chain
Precision and planning are key to making your chains connect flawlessly.
- Plan on a Design Wall: Before sewing your rows together, lay out all your blocks on a design wall or a large floor space. This allows you to check the flow of your diagonal chains and ensure no blocks are out of place.
- Press Seams Consistently: To ensure your blocks align perfectly, press the seams of your pieced blocks in one direction and the seams of your plain blocks in the opposite direction. This will allow the seams to "nest" together for sharp points.
- Highlight the "Negative Space": The plain blocks are just as important as the pieced ones. Consider how your quilting design will enhance these areas. A beautiful feather motif or simple cross-hatching can turn these blocks into a stunning feature.
The Irish Chain is a rewarding project that produces a visually impressive result from simple components. To finish your beautiful quilt top, explore the wide selection of premium backing fabrics and high-quality batting available at Lindas.com.
Basic Quilting Patterns Comparison Guide
| Pattern | 🔄 Implementation Complexity | ⚡ Resource Requirements | 📊 Expected Outcomes | 💡 Ideal Use Cases | ⭐ Key Advantages |
|---|---|---|---|---|---|
| Nine-Patch | Low - simple 3x3 grid, minimal cutting | Low - just two contrasting fabrics | Basic, versatile block, good foundation | Beginners, scrap fabric use | Beginner-friendly, fast blocks, versatile layouts |
| Log Cabin | Moderate - strip piecing, foundation paper piecing option | Moderate to high - fabric intensive | Dramatic secondary patterns, rich symbolism | Intermediate quilters, scrap usage | Visual impact, accurate foundation piecing |
| Flying Geese | Moderate - precise triangle piecing, bias edges | Moderate - careful fabric handling | Dynamic directional movement, versatile uses | Borders, sashing, dynamic designs | Movement effect, quick-piecing methods |
| Half Square Triangle (HST) | Moderate - multiple quick methods, precision needed | Moderate - high volume if many units | Strong geometric designs, building block base | Many traditional and modern quilts | Fundamental unit, quick mass production |
| Rail Fence | Low - simple strip piecing, minimal accuracy | Low - uses strip sets or jelly rolls | Secondary patterns via rotation, efficient | Beginners, showcasing fabric strips | Fast, minimal waste, efficient strip usage |
| Dresden Plate | High - curved piecing, appliqué required | Moderate to high - templates and embellishments | Elegant, decorative circular blocks | Advanced quilters, special fabric showcasing | Combines techniques, highly decorative |
| Irish Chain | Moderate to high - piecing + planning for chain alignment | Moderate to high - significant fabric | Strong graphic chain effect, rhythmic patterns | Intermediate to advanced quilting | Impressive visual impact, mix of plain and pieced |
From Patterns to Projects: Your Next Steps
You've just journeyed through seven foundational quilting blocks, from the classic grid of the Nine-Patch to the dynamic movement of Flying Geese. Each one is more than just a pattern; it's a building block of quilting history and a stepping stone in your creative development. We've explored how the simple geometry of a Half-Square Triangle can create complex secondary designs and how the structured layers of a Log Cabin can tell a story with color and value.
The true magic happens when you move from understanding these basic quilting patterns to actually using them. The skills you've practiced, such as maintaining a consistent quarter-inch seam, mastering precise cutting, and pressing your blocks correctly, are the very techniques that separate a good quilt from a great one. These seven patterns are your training ground, designed to build muscle memory and confidence.
Turning Knowledge into Tangible Art
The next step is to choose one of these patterns and make it your own. Don't feel pressured to start with a king-sized quilt. The beauty of these blocks is their scalability and versatility.
- Start Small: A set of Rail Fence placemats, a Log Cabin table runner, or a Nine-Patch baby quilt are all fantastic weekend projects. They provide a quick, satisfying finish that builds momentum for larger undertakings.
- Experiment with Color: Before cutting into your precious fabric, sketch out your design. Use colored pencils or a digital app to play with color placement. See how a single Irish Chain block changes dramatically when you swap light and dark fabrics.
- Combine and Conquer: Who says you have to stick to just one pattern? Try creating a sampler quilt that features one of each of the seven blocks you've learned about. This is an excellent way to practice different techniques while creating a truly unique and personal piece.
Mastering these designs is about more than just sewing fabric together; it's about learning the language of quilting. The Dresden Plate teaches you about appliqué and curved piecing, while Flying Geese perfects your precision with points. Each block adds a new tool to your creative toolkit, empowering you to tackle more intricate designs or even begin drafting your own patterns in the future. The foundational skills embedded within these basic quilting patterns will serve you throughout your entire quilting journey.
Remember, every heirloom quilt started as a collection of simple shapes. Your first Nine-Patch block is the first step toward a lifetime of creativity, comfort, and connection. Embrace the process, celebrate your progress, and let these timeless patterns be the canvas for your unique artistic voice.
Ready to transform these patterns into your next masterpiece? At Linda's Electric Quilters, we provide the high-quality fabrics, threads, and notions you need to ensure your project is a success from the very first stitch. Explore our curated selection and find everything you need to bring your quilting vision to life at Linda's Electric Quilters.


