Ready to dive into the wonderful world of quilting? Fantastic! This guide is your starting point for a craft that’s incredibly rewarding and a ton of fun. Getting started is easier than you think—it all boils down to gathering the right tools, picking a simple pattern, and choosing fabric that brings your vision to life. This educational tutorial will walk you through every step to ensure your first project is a success.
Your Quilting Journey Starts Here
Taking that first step into quilting is an exciting moment, and you're definitely not alone. The quilting community is buzzing, and it’s growing every day. In fact, recent stats show that 18% of quilters are new to the craft, which means there's a huge wave of beginners starting out, just like you. This just goes to show that anyone can learn to quilt, and having the right gear from the beginning is the key to making something you’ll be proud of for years.
The Non-Negotiable Tools for Success
Before you even think about cutting into that beautiful fabric, let's get your sewing space set up. While it’s easy to get overwhelmed by all the gadgets out there, you only need a few core items to get going. Think of these as the foundation of your new favorite hobby.
Getting your toolkit right from the start makes a world of difference. It's the difference between frustration and a fun, successful first project. Here’s a quick look at the absolute essentials you can find at Linda's to finish your project.
Your Essential Beginner Quilting Toolkit
| Tool | Primary Function | Beginner's Tip |
|---|---|---|
| Rotary Cutter & Self-Healing Mat | Precise, straight fabric cutting. | This combo is a game-changer. A 45mm rotary cutter is the perfect size to start with. It lets you cut multiple layers at once, cleanly and accurately. |
| Quilting Rulers | Measuring and guiding cuts. | A clear acrylic ruler, like a 6" x 24", is your best friend. It helps you get those perfect strips and squares needed for your quilt blocks to line up. |
| High-Quality Cotton Fabric | The core material for your quilt. | Stick with 100% quilting cotton for your first few projects. It’s stable, easy to work with, and the color and print options are endless. |
These three items are truly the bedrock of your quilting setup. Don't skimp here—good tools will serve you well for a long, long time.
The real secret to a beautiful quilt isn't about mastering complicated techniques right away. It's all about consistency. If you can focus on accurate cutting and a precise seam allowance, you're already halfway there. It all starts with having the right tools on day one.
Building Your Starter Kit
Once you have the must-haves, a few other items will make your quilting life a whole lot smoother. A good steam iron is non-negotiable for pressing your seams flat—this is what gives your quilt that crisp, professional look.
You'll also want to grab some quality thread. A 50wt cotton thread in a neutral color like gray or cream is a fantastic, versatile choice to start with. And of course, you'll need straight pins or quilting clips to hold your fabric pieces together while you sew. They’re like an extra set of hands!
As you get more comfortable, you might even think about tools for fabric care. For instance, you could read up on finding the Best Fabric Shaver to give older fabrics new life or to keep your finished quilts looking pristine.
Ready to start gathering your supplies? Pop over to Linda's to find everything you need, from gorgeous fabrics to the essential tools that will kickstart your quilting adventure and help you finish your project.
Preparing and Cutting Fabric with Precision
Any seasoned quilter will tell you that the real magic of a beautiful quilt happens long before you sit down at your sewing machine. It all starts with the prep work—getting your fabric ready and making super-accurate cuts. This is the foundation for everything that comes after, ensuring your seams line up and your blocks look sharp.
This little infographic gives you a great visual of how a smooth quilting workflow should look.
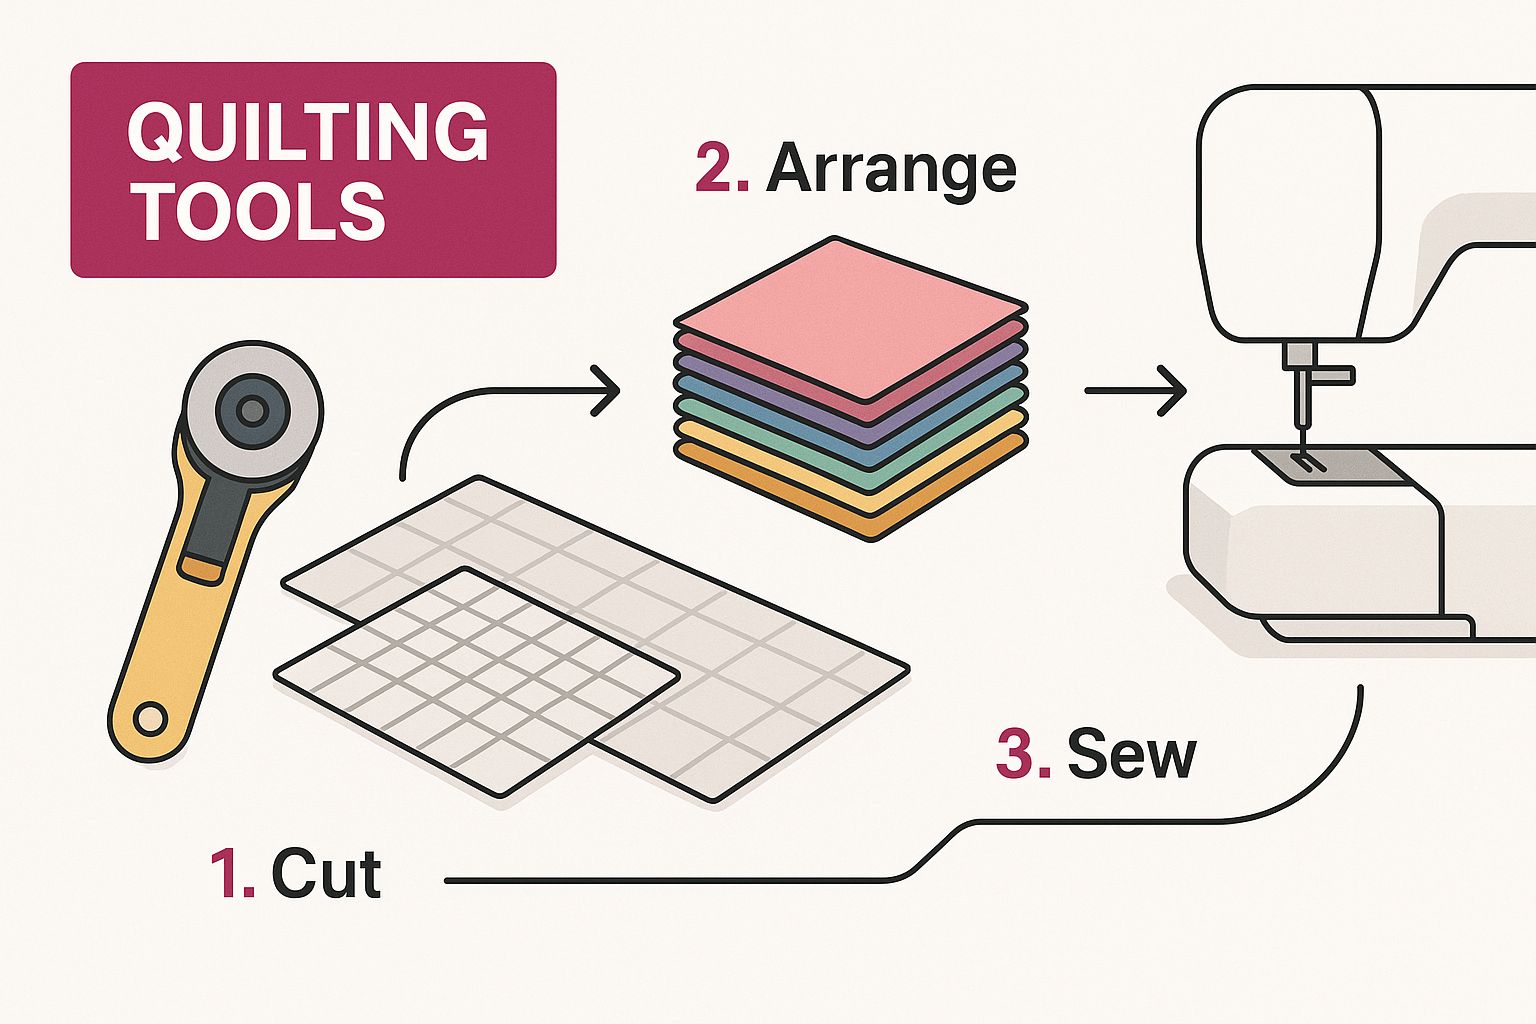
As you can see, getting your tools and fabric organized is key. A little setup turns that big pile of fabric into a neat stack of perfectly cut quilt pieces, ready for sewing.
The Great Pre-Wash Debate
Ask a room full of quilters whether you should pre-wash your fabric, and you’re bound to start a lively conversation. But for a beginner, my advice is simple: always pre-wash your fabric. Seriously, just do it.
Taking this one extra step will save you from two major headaches down the road. First, it pre-shrinks the material, which means your finished quilt won't get all warped and puckered after you wash it for the first time. Second, it gets rid of any excess dye that could bleed onto your lighter fabrics. This is a lifesaver when you're working with bold, vibrant colors.
Just toss your fabric in for a quick cycle, give it a good press with a hot iron, and you’ll have a crisp, stable foundation that’s so much easier to cut accurately.
Achieving a Perfectly Square Edge
Okay, before you can start cutting your strips and squares, you need a perfectly straight edge to measure from. We call this "squaring up" your fabric, and it's a non-negotiable skill if you want your quilt pieces to fit together properly.
Start by folding your ironed fabric in half, matching up the selvage edges (those are the tightly woven edges on the sides). Lay it down on your self-healing mat with the folded edge closest to you. Now, grab your quilting ruler and line up one of its horizontal lines perfectly with that fold.
Let any messy, uneven fabric hang off the side. Then, using your rotary cutter, zip right up that edge of the ruler to trim it off. Boom—you've just created a perfect 90-degree angle. This clean, straight line is now your starting point for every other cut you make.
Accurate cutting isn't really about talent; it's about building good habits. Squaring up your fabric is the first—and most important—habit to lock in. A straight starting line guarantees every single piece you cut will be the right size.
Mastering Your Rotary Cutter and Ruler
With your fabric squared up and ready to go, it’s time to cut the pieces for your quilt. Precision is everything here. It’s what makes your blocks come together without any fuss. And a quick tip: always, always use a sharp blade in your rotary cutter. It makes a world of difference.
Let's say you're cutting strips:
- Line up your ruler: Place your quilting ruler on the fabric, aligning the measurement you need (like the 2.5-inch mark) with the perfectly straight edge you just cut.
- Hold it down: Plant your non-cutting hand firmly on the ruler to keep it from slipping. Keep those fingertips tucked away from the edge!
- Cut with confidence: Press the blade of your rotary cutter against the ruler's edge and push away from your body in one smooth, fluid motion.
Using this method ensures that every strip is the exact same width from top to bottom. It might feel a little awkward at first, but after a bit of practice, you'll be cutting like a pro.
If you're in the market for a new rotary blade or a high-quality ruler, you should check out the awesome selection over at Linda's. Their amazing products are exactly what you need to finish your project with precision.
Mastering the Perfect Quarter-Inch Seam
Alright, you've done the hard prep work. Your fabric is cut and ready to go. Now for the fun part—watching those individual pieces come together to create your quilt top!
But before we get carried away, we need to talk about the single most important skill in quilting: the quarter-inch seam.
It sounds almost ridiculously simple, doesn't it? But trust me, that precise 1/4" seam is the secret sauce that makes all your points match and your blocks lie flat. If you're off by even a hair, that tiny error gets magnified across every piece you add, and suddenly your quilt block is a completely different size than you intended. Getting this right from the start is non-negotiable.
This is especially true when you're working with high-quality quilting cotton. There's a reason quilters love it so much—in fact, cotton fabrics represent about 42.7% of the textile market share, according to Business Research Insights. Its stability and crispness are legendary, and a perfect seam allowance makes it behave exactly the way it's supposed to.
Setting Up Your Machine for Success
A few minutes of setup before you even touch the pedal will save you a world of headaches. Your main goal here is to create a foolproof guide for your fabric.
The easiest way to do this is with a special quarter-inch foot. Many machines come with one, and it's a lifesaver. It has a little metal guide on the right side, so all you have to do is keep the raw edge of your fabric snuggled up against it as you sew. Simple and incredibly effective.
No quarter-inch foot? No problem at all. You can rig one up yourself in about 30 seconds.
- Grab a quilting ruler and slide it under your presser foot.
- Hand-crank your needle down until it lines up perfectly with the 1/4" mark on the ruler.
- Stick a few layers of painter's tape or even a stack of sticky notes right up against the edge of the ruler. You're creating a little "wall" for your fabric.
- Pull the ruler out, and voilà! You've got a custom seam guide.
The Magic of Chain Piecing
Once you're feeling good about your seam allowance, it's time to introduce you to a technique that will change your life: chain piecing. This is how experienced quilters fly through their projects, and it saves a ton of time and thread.
Instead of sewing a pair of squares, snipping the thread, and starting over, you just feed the next pair right behind the first one without stopping. You'll end up with what looks like a long string of fabric bunting. Once you're done, you can snip the little threads connecting each pair. It’s that easy.
Chain piecing isn't just about speed. It helps you get into a smooth, steady rhythm, which is fantastic for improving your consistency and accuracy. It becomes muscle memory.
To Press Open or to The Side
After sewing, pressing your seams is what gives your work that crisp, professional finish. It’s just as important as the sewing itself. You'll hear quilters debate two main methods: pressing seams open or pressing them to one side.
For beginners, I always recommend pressing seams to one side. The standard practice is to press toward the darker fabric so it doesn’t peek through the lighter one. This creates a tiny ridge that lets you "nest" your seams together when joining blocks, which is a massive help for getting your corners and points to line up perfectly.
Pressing seams open makes for a very flat block, but it can put more stress on your stitches over time. For this first quilt, stick to pressing to the side and focus on being consistent. A good iron with plenty of steam, like the ones you'll find at Linda's, will make all the difference in setting those seams and giving your quilt top a beautiful, polished look to finish your project.
Assembling Your Quilt Sandwich
You’ve pieced a gorgeous quilt top! Now comes the magic part—turning those flat pieces of fabric into an actual, huggable quilt. We call this making the "quilt sandwich," and it's just what it sounds like: your quilt top, a fluffy batting middle, and a sturdy backing, all layered together.
Getting this step right is the secret to a quilt that lays flat and looks professional. It's all about layering everything smoothly and securing it so nothing can wiggle around while you're quilting. Think of it as setting the foundation for your final stitches.
Choosing the Perfect Batting
Batting is the soul of your quilt. It's the hidden layer that provides warmth, texture, and weight. The type of batting you pick really changes the whole personality of your finished quilt.
Here are a few of the most common options you'll run into:
- Cotton Batting: This is my go-to for that classic, crinkly, well-loved quilt look that appears after the first wash. It's soft, breathable, and drapes like a dream.
- Polyester Batting: If you want a quilt that’s lightweight but has a lot of puff, polyester is your friend. It gives you a higher "loft" and is super resilient, holding its shape wash after wash.
- Wool & Blends: For incredible warmth without heavy bulk, wool is fantastic. You'll also see blends like 80/20 cotton/poly, which really give you the best of both worlds—cotton's softness with polyester's strength and stability.
If you’re working through this beginner quilting tutorial, I almost always recommend starting with an 80/20 blend. It’s incredibly forgiving and easy to work with. Linda's has a fantastic selection of high-quality battings, and we're always here to help you find the perfect match for your project.
Basting Your Layers Together
Got your batting? Great. It’s time to baste. Basting is just a temporary way to hold your three layers together so you can quilt them without everything shifting into a wrinkly mess. For this, a big, clean floor is your best friend.
Start by laying your backing fabric down, wrong side facing up. Smooth it out until it's perfectly flat. Next, layer your batting on top, and finally, place your pressed quilt top on the very top, right side up.
The real trick to a pucker-free quilt is to smooth everything out from the center. Use your hands or a long ruler to gently push any wrinkles or bubbles out toward the edges. Do this for each layer before you secure a thing.
You've got a few solid methods for holding it all together:
- Safety Pins: Use special curved safety pins designed for quilting. Pin through all three layers every 4-6 inches across the entire quilt. It’s tried, true, and affordable.
- Basting Spray: This is a temporary spray adhesive that works wonders, especially on smaller quilts. It's fast, clean, and holds everything in place beautifully.
- Hand Basting: You can also use a needle and thread to make long, loose stitches that hold the layers. It takes a bit more time but gives you a lot of control.
Once your quilt sandwich is basted and secure, you're ready for the most creative part of the whole process—the actual quilting! You'll find amazing basting sprays and pins at Linda's to help you get this step done right.
Simple Machine Quilting for Beginners
Alright, your quilt sandwich is basted and ready to go. Now for the magic. This is the moment your project officially becomes a quilt. The stitches you're about to add will lock everything together, giving it that wonderful texture and durability that makes a quilt so special.
We're going to keep it simple and elegant. Forget about complicated free-motion stuff for now—you can do amazing things with just your home sewing machine.
The absolute key to making this easy on yourself is a walking foot. Seriously, don't skip this. This little gadget is a game-changer. It has its own set of feed dogs that work with your machine's, grabbing all three layers and pulling them through evenly. This is how you avoid those frustrating puckers and bunches that can happen when the top layer shifts.
Getting Started with Straight-Line Quilting
For your first quilt, straight-line quilting is your best friend. It’s exactly what it sounds like: sewing straight lines across your quilt. The result is clean, modern, and adds a fantastic texture.
Here’s a pro tip: always start quilting from the middle of your quilt and work your way out. This pushes any extra fullness or tiny wrinkles toward the edges instead of trapping them in the center. An easy way to keep your lines perfectly straight is to just follow the seams of your pieced blocks.
Two Beginner-Friendly Quilting Designs
You don't need a huge repertoire of designs to get a stunning finish. These two basic approaches are perfect for building your confidence and are quilting staples for a reason.
- Stitch in the Ditch: This is the ninja of quilting styles—super subtle. You’ll sew your stitches right inside the "ditch" created by your seam lines. When you get it right, the stitches practically disappear from the front, letting your beautiful piecing be the star.
- Echo Quilting: Want to add a bit more visible texture? Try echo quilting. Just sew a line of stitches parallel to your seams, usually about a quarter-inch away. You can even add a few rows of echoes to create a beautiful ripple effect across the fabric.
Look, don't get hung up on perfection with your first project. The goal is even, consistent lines. Trust me, once you wash your quilt, the fabric will get that lovely crinkle, which does a beautiful job of hiding any little wobbles in your stitching.
The satisfaction of this final step is a big part of why so many people are falling in love with quilting. It's a craft that's really having a moment. In fact, the global quilt market hit a value of USD 5.09 billion in 2023 and is still on the rise, thanks to a growing appreciation for handmade goods. You can discover more insights about the expanding quilt market and its trends.
To grab a reliable walking foot and the perfect thread to finish your masterpiece, check out the fantastic selection at Linda's Electric Quilters. We've got all the amazing products you need to nail this beginner quilting tutorial and feel proud of what you've made.
Finishing Your Quilt with a Perfect Binding
You’ve made it to the final step, and it's one of the most satisfying parts of making a quilt: the binding. Think of it as the frame for your artwork. It’s what covers up the raw edges of your quilt sandwich, adding durability and giving it that beautiful, polished look. This last little detail is what officially turns your hard work into a finished masterpiece.
Don’t be intimidated—making your own binding is surprisingly easy and gives you total control over the final look. We'll cut long strips of fabric, join them together, and then press them in half to create one long, double-layered band. This band gets sewn to the front of your quilt first, then neatly wrapped around to the back for a clean, professional edge.
Calculating and Preparing Your Binding Strips
First things first, let's figure out how much fabric you’re going to need. It’s simple math. Just measure the perimeter of your quilt by adding up the lengths of all four sides. Once you have that number, add an extra 10-15 inches. This little bit of extra gives you some wiggle room for joining the ends neatly.
Most quilters, including myself, cut binding strips between 2.25 and 2.5 inches wide. If you're just starting out, a 2.5-inch strip is fantastic because it gives you plenty of fabric to work with when you wrap it around the quilt's edge.
You’ll cut these strips across the width of your fabric (from selvage to selvage). Then, to reduce bulk in the seams, you’ll sew them together end-to-end on a diagonal.
Once you have one long, continuous strip, press it in half lengthwise with the wrong sides together. Voilà! You've got a perfect, custom-made binding ready to go.
The secret to a flat, crisp binding is all in the press. A good steam iron is your best friend here. Taking the time to press the binding strip perfectly in half before you sew it on will make every other step that follows significantly easier.
Attaching the Binding and Creating Mitered Corners
With your binding prepped and ready, it's time to attach it. Start somewhere in the middle of one side of your quilt, leaving about an 8-inch tail of unsewn binding loose. Align the raw edges of your binding strip with the raw edge of your quilt top. Using your walking foot, which is a huge help here, sew the binding down with a 1/4-inch seam allowance.
Sew along the side until you’re about a quarter-inch from the corner, then stop and backstitch. This is where the magic happens for those sharp, mitered corners:
- Take the quilt out from under the needle and fold the binding strip straight up, away from the quilt, which creates a clean 45-degree angle.
- Now, fold the strip straight back down on top of itself, aligning its raw edge with the next side of the quilt you're about to sew. The fold at the top should now be perfectly even with the quilt's edge.
- Hold this little fold in place with a pin or one of Linda’s incredibly handy binding clips.
- Start sewing again right from the top edge of that side, which will lock that corner fold in place.
Just repeat this process for all four corners. When you get back around to where you started, stop sewing about 10 inches away from your starting point, leaving another long tail. This gap lets you join the two ends of the binding together for a seamless finish before you sew that final section down.
The very last touch is to wrap the folded edge of the binding around to the back of the quilt and stitch it down. You can do this by hand with a blind stitch for an invisible finish, or use your machine for a quick and durable result. Using the right tools, like specialty needles and high-quality thread from Linda’s, will make this final step feel smooth and rewarding, giving your quilt that professional touch you've worked so hard for.
Questions We All Had When We Started
As you dive into your first quilt, some questions are bound to pop up. Don't worry, it's completely normal! Every single quilter, including us, started with the same uncertainties. Let's tackle a few of the most common ones so you can keep quilting with confidence.
Getting these fundamentals down early is a game-changer. It helps you build good habits right from the start and avoid some common frustrations down the road.
What Is the Best Fabric for a Beginner?
For your first few projects, make 100% quilting cotton your go-to. Seriously, it's a dream to work with. It behaves beautifully under the needle, presses to a crisp finish, and doesn't fray into a mess. And the best part? The sheer variety of colors and prints is just staggering.
For now, steer clear of anything slippery, stretchy, or shifty. Fabrics like satin, knits, or rayon can be a real headache if you're not used to them. Stick with cotton and you'll have a much more enjoyable experience.
Our Pro Tip: Overwhelmed by fabric choices? Grab a pre-cut bundle from Linda's! A charm pack (5" squares) or a layer cake (10" squares) takes all the color-matching guesswork out of the equation. Plus, all that cutting is done for you!
Why Aren’t My Points Lining Up?
Ah, the classic quilter's conundrum! If your triangle points or block corners are looking a little... abstract, the culprit is almost always one of these three things:
- Cutting Accuracy: Quilting is a game of precision. Even being off by a hair with your rotary cutter can throw an entire block out of whack. A sharp blade and a firm grip on your ruler are non-negotiable.
- Seam Allowance: That scant 1/4" seam is everything. It might not seem like a big deal, but tiny variations add up across a block and can make it impossible for your seams to meet correctly.
- Pressing: How you press your seams matters! Following your pattern's instructions for pressing (usually open or to one side) helps the different pieces "nest" together snugly. This is the secret to getting those super-sharp, professional-looking points.
Do I Really Need to Pre-Wash My Fabric?
This is probably one of the most debated topics in quilting! But for beginners, our advice is a firm yes, pre-wash your quilting cotton. It's a simple step that does three incredibly important things: it pre-shrinks the fabric, gets rid of any excess dye that could bleed, and washes away chemicals from the manufacturing process.
Think of it as cheap insurance for all the hours you're about to put in. Taking the time to pre-wash now can save you from the heartache of a shrunken, distorted, or color-bled quilt later.
Feeling ready to finish your masterpiece? Great! Find an amazing selection of fabrics, threads, and notions to bring your vision to life at Linda's Electric Quilters. Explore everything you need for your next project at https://lindas.com and let's get quilting


