
Welcome to the wonderful world of quilting! It can seem intimidating, with its intricate designs and specialized terminology, but starting is much easier than you think. The secret to a successful first project isn't talent; it’s choosing the right pattern. This guide is designed to be your perfect first step, showcasing 8 of the easiest quilt patterns that deliver stunning, professional-looking results without the stress. We'll walk you through each design, providing the practical, educational details you need to build your confidence and create something beautiful.
Forget complex techniques and confusing instructions. These patterns focus on simple cuts and straight seams, proving you don't need years of experience to make a gorgeous quilt. Quilting is a rewarding journey, and for those who find joy in crafting and design, it's just one of many ways to express yourself; you can also explore various creative arts to further develop your skills. This listicle provides actionable steps for each pattern, ensuring you have a clear roadmap from fabric selection to finished quilt. Ready to turn that beautiful fabric into a cherished keepsake? Let's begin.
1. Square in a Square
The Square in a Square block is a cornerstone of quilting and one of the easiest quilt patterns for beginners to master. It consists of a central square of fabric set on point (rotated 45 degrees) and framed by triangles, which creates a larger, perfectly square block. The beauty of this pattern lies in its simplicity; it requires only basic straight-line sewing and precise cutting, yet it produces a dynamic and visually appealing diamond effect.
and framed by triangles, which creates a larger, perfectly square block. The beauty of this pattern lies in its simplicity; it requires only basic straight-line sewing and precise cutting, yet it produces a dynamic and visually appealing diamond effect.
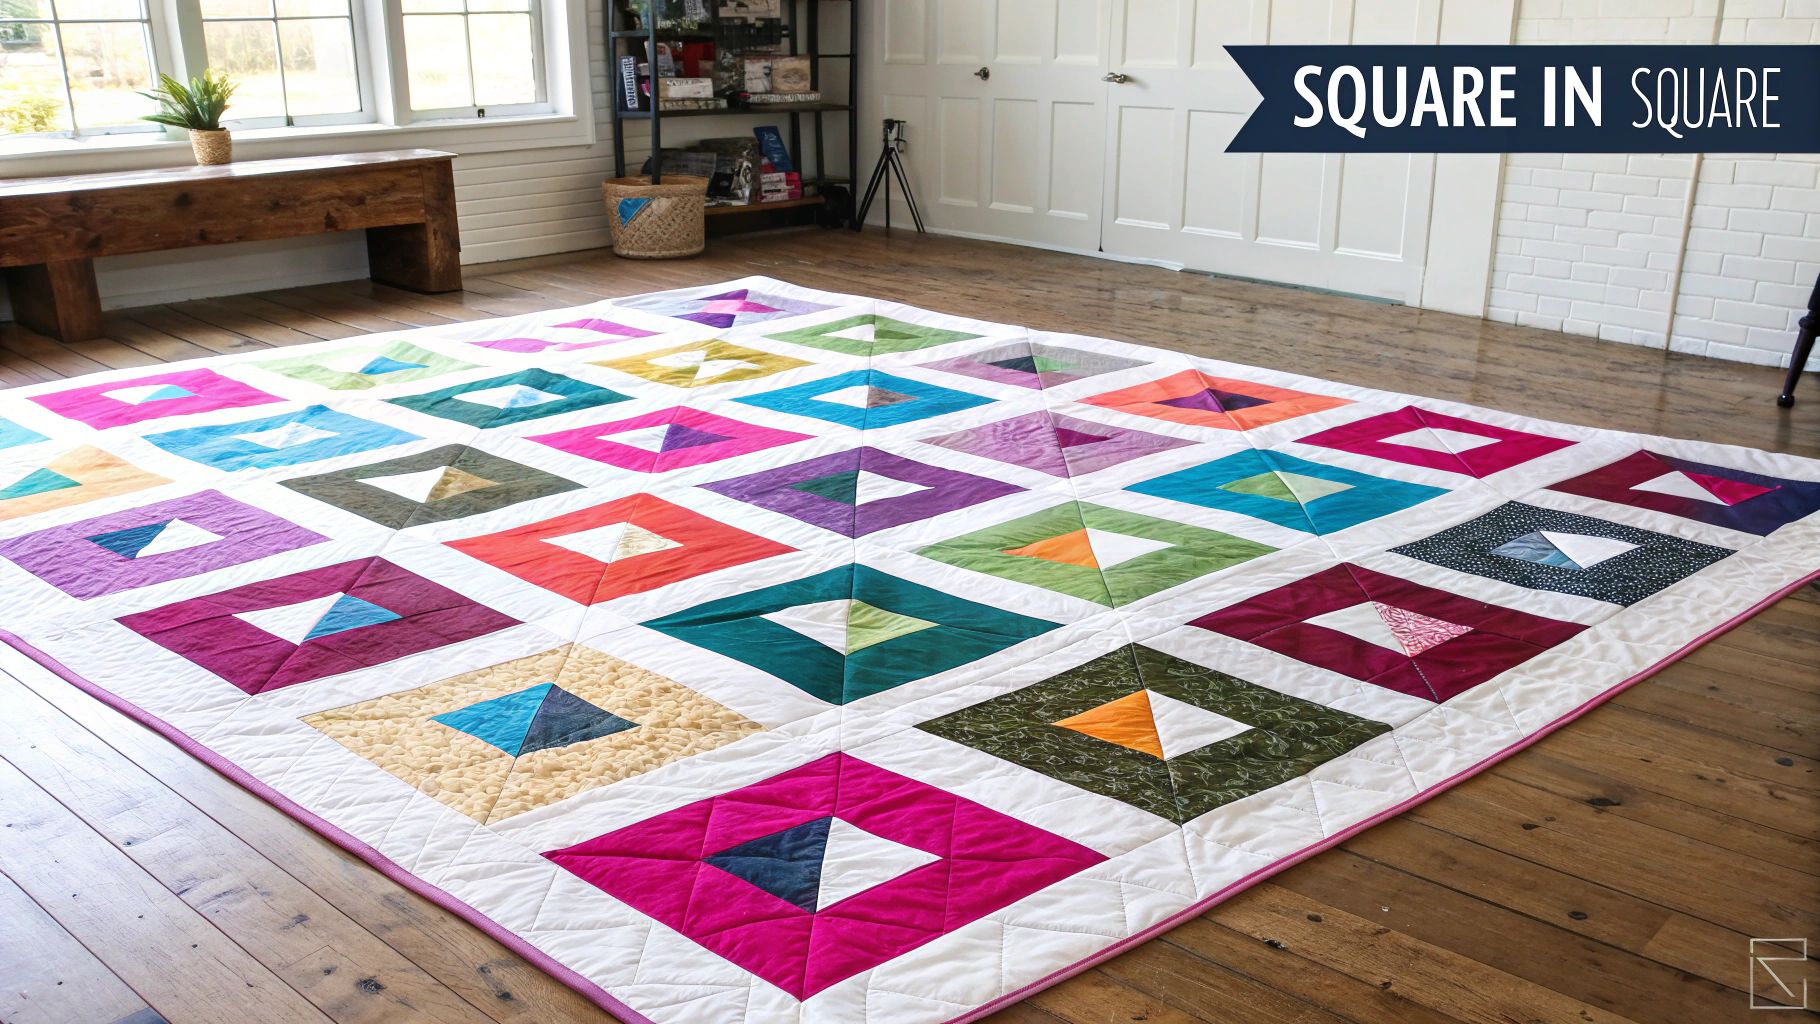
This fundamental block serves as the foundation for many intricate designs but stands beautifully on its own. It's a fantastic way to practice achieving accurate quarter-inch seams and perfect points without feeling overwhelmed. Because of its straightforward construction, it's an ideal choice for a first quilt, a quick baby blanket, or a modern lap quilt.
Why It's Great for Beginners
The Square in a Square pattern is perfect for those new to quilting because it builds essential skills with minimal frustration. You will learn how to accurately cut squares and triangles, piece them together, and press seams for a flat, professional-looking block. The repetitive nature of creating multiple blocks helps build muscle memory and confidence.
Actionable Tips for Success
To ensure your blocks turn out perfectly, follow these practical tips:
- Precise Cutting is Key: Use a high-quality rotary cutter and a square quilting ruler. Accurate initial cuts are crucial for the final block to be the correct size and for all the points to line up.
- Press Seams Open: After attaching the corner triangles, press the seams open or towards the darker fabric. This reduces bulk and helps the block lay flat, making it easier to quilt later.
- Chain Piece for Speed: To save time and thread, sew your blocks in batches. Chain piecing involves sewing the same step on multiple blocks one after another without cutting the thread in between.
- Play with Layout: Before sewing your blocks together into a quilt top, arrange them on a design wall or the floor. Experiment with rotating blocks to see how different orientations create secondary patterns and visual interest.
This pattern is a fantastic starting point, and mastering it opens the door to more complex designs. Just as content creators explore various platforms for sharing their work, quilters can use this block as a versatile base for countless creative projects. Stop by Linda's to find the perfect quilting ruler and a vibrant fabric bundle to start your Square in a Square project today.
2. Rail Fence
The Rail Fence is celebrated as one of the easiest quilt patterns, making it a perfect starting point for anyone new to the craft. The pattern is constructed by sewing simple fabric strips together in parallel lines to form a block. Its genius lies not in the complexity of the block itself, but in the incredible variety of secondary designs created by rotating and arranging these simple blocks.
This pattern is exceptionally versatile and scrap-friendly. By alternating the direction of the blocks, you can create zigzags, diamonds, or staircase effects with minimal effort. This makes the Rail Fence an ideal project for using up leftover fabric strips, working with pre-cut jelly rolls, or creating a quick and stunning quilt for charity. The straightforward construction allows you to focus on color and layout to create a truly unique piece.
Why It's Great for Beginners
The Rail Fence pattern is ideal for beginners because it exclusively uses straight-line sewing and requires no complex piecing or matching of points. It's a fantastic way to master cutting long, straight strips and sewing an accurate quarter-inch seam. The repetitive process of strip piecing helps build confidence and speed, delivering a visually impressive quilt without the stress of intricate techniques.
Actionable Tips for Success
To achieve a beautiful and well-constructed Rail Fence quilt, keep these tips in mind:
- Consistent Strip Widths: For a classic, uniform look, ensure all your strips are cut to the exact same width. A sharp rotary cutter and a reliable quilting ruler from Linda's are your best tools for this.
- Press Strips Carefully: After sewing your strips together to form a "strata," press all the seams in one direction. This will help them nest together nicely when you sew the blocks into rows and reduce bulk.
- Audition Your Layout: The magic of the Rail Fence is in the arrangement. Lay your finished blocks out on a design wall or the floor. Experiment by rotating them vertically and horizontally to see the different patterns emerge before you sew them together.
- Mix It Up: For a more modern or scrappy look, try mixing different strip widths within a single block. This adds texture and visual interest to the simple design.
This pattern is a testament to how simple elements can create stunning results, much like how brands use different influencer gifting platforms to achieve diverse marketing goals. Stop by Linda's to grab a colorful jelly roll and get started on your own effortlessly beautiful Rail Fence quilt today.
3. Charm Pack Quilt
The Charm Pack Quilt is one of the most accessible and easiest quilt patterns available, especially for those just starting their quilting journey. It utilizes "charm packs," which are curated bundles of pre-cut 5-inch fabric squares. Because the cutting is already done for you by the manufacturer, this pattern allows you to dive straight into the fun part: arranging the squares and sewing them together into a simple grid.
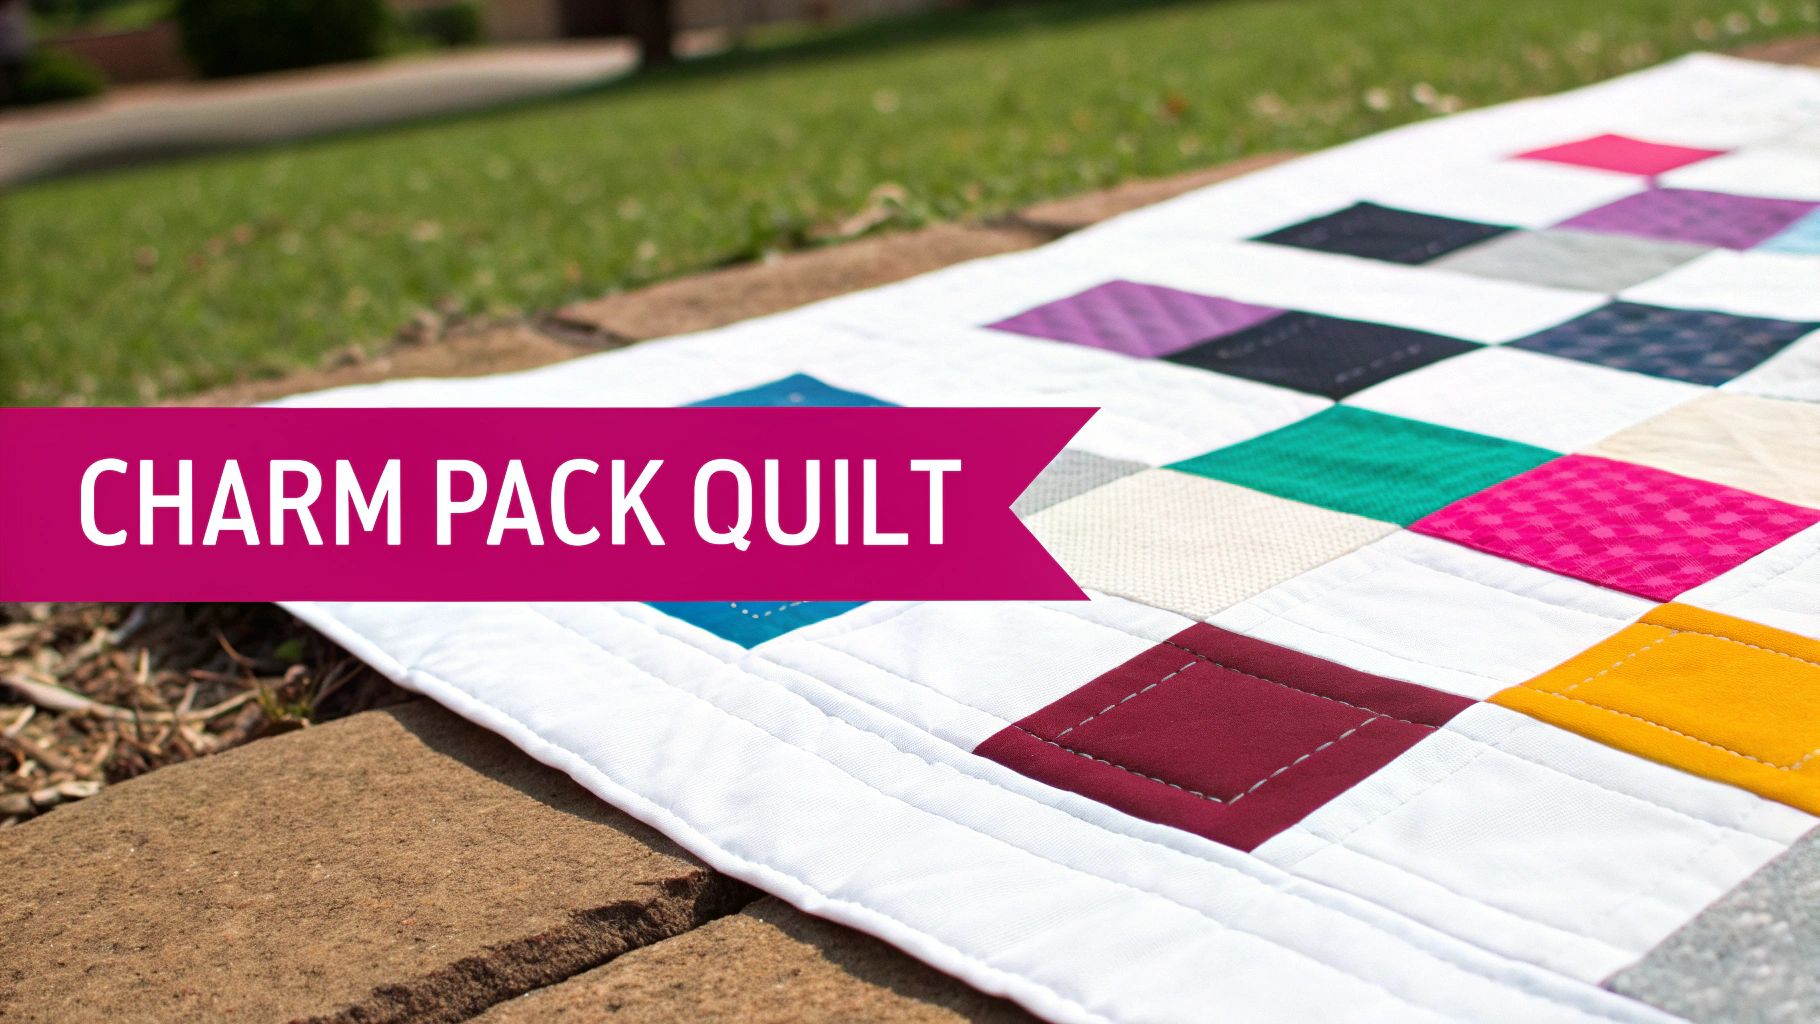
This method removes the most intimidating step for many beginners-precise rotary cutting-and guarantees perfectly sized squares. The result is a beautiful, scrappy-looking quilt that comes together incredibly fast, making it an excellent choice for a weekend project, a quick baby gift, or your very first quilt top. The simplicity of sewing straight seams to join squares builds fundamental skills and confidence.
Why It's Great for Beginners
A Charm Pack Quilt is ideal for newcomers because it minimizes prep work and focuses on the core skill of piecing. You get to work with a professionally coordinated fabric collection, which takes the guesswork out of choosing colors and prints. This pattern is all about building confidence through quick, successful completion, demonstrating that you can create something beautiful without complex techniques.
Actionable Tips for Success
To get the best results from your charm pack project, follow these simple tips:
- Plan Your Layout: Before sewing, arrange all your squares on a design wall or a large floor space. This allows you to check for color balance and ensure you like the final arrangement, avoiding any "oops" moments after you've started sewing.
- Use a Quarter-Inch Foot: Consistency is crucial for a flat quilt top where all corners meet. Using a quarter-inch seam allowance foot on your sewing machine will ensure every seam is uniform.
- Add Sashing for Definition: Consider sewing thin strips of a solid-colored fabric, known as sashing, between your squares. This adds a bit of size and creates a visual frame around each print, making the individual fabrics pop.
- Mix and Match Packs: For a larger quilt or more variety, combine two coordinating charm packs. This doubles your fabric options while maintaining a cohesive look.
This pattern offers a straightforward path to a finished quilt, much like how brands use a structured influencer gifting application form to streamline collaborations. Stop by Linda's to grab a beautiful charm pack and the perfect thread to start your quick and rewarding quilt project today.
4. Nine Patch
The Nine Patch is a quintessential quilter's block and one of the most recognized and easiest quilt patterns available. It is constructed from nine smaller squares of fabric arranged in a three-by-three grid. The magic of the Nine Patch lies in its versatility; by alternating light and dark fabrics, you can create a simple yet striking checkerboard effect that forms the basis for countless traditional and modern quilt designs.
This classic block is a fundamental skill-builder, teaching beginners the importance of accurate cutting, consistent seam allowances, and precise block construction. Whether you're making a traditional "Granny's Nine Patch" with calico prints or a modern version with bold solids, the pattern provides a fantastic canvas for playing with color and fabric. Its simple, repeatable nature makes it perfect for a quick baby quilt or a large, scrappy bedspread.
Why It's Great for Beginners
The Nine Patch is ideal for newcomers because it reinforces the core principles of quilting without complex techniques. You'll master sewing straight seams, joining rows, and pressing, all while creating a beautiful and timeless block. The small size of the individual squares makes it a forgiving pattern, and seeing the blocks come together quickly provides a huge confidence boost.
Actionable Tips for Success
To create flawless Nine Patch blocks, focus on these practical tips:
- Accurate Cutting is Everything: Start with perfectly cut squares. A 2.5-inch pre-cut charm square or strip set (also known as a "Jelly Roll") can be a great time-saver and ensures consistency across all your blocks.
- Chain Piece for Efficiency: Assemble your blocks assembly-line style. Sew the first two squares of each row together for all your blocks, then add the third square to each row, all without cutting the thread between units.
- Nest Your Seams: When joining the rows, press the seams of the top and bottom rows in one direction and the middle row in the opposite direction. This allows the seams to "nest" or lock together, guaranteeing perfectly matched corners.
- Use a Design Wall: Before sewing your blocks into a quilt top, arrange them on a design wall or the floor. This allows you to check for color balance and create a pleasing overall layout.
The Nine Patch is a foundational pattern that offers endless creative possibilities, much like how brands can explore different partnerships through a gifted collaboration application. Stop by Linda's to grab some pre-cut squares and a reliable rotary cutter to get started on your own timeless Nine Patch quilt.
5. Friendship Bread / Disappearing Nine Patch
The Disappearing Nine Patch, also known as the Friendship Bread pattern, is a "quilt-block magic trick" and one of the most exciting and easiest quilt patterns for beginners. It starts with a simple, classic Nine Patch block, which is then strategically cut into four equal quadrants. These new smaller blocks are then rearranged to create a surprisingly intricate and complex-looking design. The beauty of this pattern is its transformative nature; it takes a basic block and turns it into something dynamic and visually stunning with just a few extra cuts.
This pattern is perfect for showcasing a beautiful fabric collection or for using up scraps. Because the final design is so varied, it's forgiving and fun. It's a fantastic way for new quilters to achieve a sophisticated look without tackling complicated piecing techniques, making it ideal for everything from a modern throw to a traditional bed quilt.
Why It's Great for Beginners
The Disappearing Nine Patch is a huge confidence booster. It teaches the importance of accurate piecing in the initial Nine Patch block and then introduces the concept of deconstruction and reconstruction in a simple, controlled way. The "disappearing" effect is a delightful surprise that makes the quilting process feel magical and rewarding, encouraging beginners to keep exploring.
Actionable Tips for Success
To ensure your Disappearing Nine Patch blocks come together beautifully, keep these tips in mind:
- Start with a Perfect Nine Patch: The accuracy of your final block depends entirely on the initial Nine Patch. Use a scant quarter-inch seam and press your seams carefully to ensure your starting block is perfectly square.
- Mark Before You Cut: Before cutting your Nine Patch into four quadrants, use a fabric marker and ruler to draw the cutting lines. This ensures your cuts are precise and centered, which is critical for the final pattern.
- Use a Design Wall: Lay out your rearranged quadrants on a design wall or the floor. This allows you to play with the orientation of each piece and create a balanced and visually appealing final layout before you start sewing them together.
- Press at Every Stage: To maintain accuracy and reduce bulk, press your seams after sewing the initial Nine Patch, after cutting it apart, and after sewing the new quadrants together. A flat block is a happy block.
This pattern is a fantastic way to experiment with color and layout. Just as a content creator might sign up with a creator agency to expand their reach, this pattern helps you expand your quilting skills. Stop by Linda's to grab the perfect rotary cutter and a bundle of fat quarters to start your own magical Disappearing Nine Patch quilt.
6. Jelly Roll Race
The Jelly Roll Race quilt is a thrilling, fast-paced project and easily one of the easiest quilt patterns for anyone seeking near-instant gratification. This pattern utilizes a "jelly roll," which is a curated bundle of pre-cut 2.5-inch fabric strips. The technique is simple: you sew all the strips together end-to-end to create one very long strip, then you fold it in half and sew the long edges together, creating a large tube of fabric. You then cut one end open and repeat the process, creating a quilt top in a surprisingly short amount of time.

Popularized by quilter Bonnie Hunter, this method eliminates the most time-consuming part of quilting: cutting countless individual pieces. Because the strips are pre-cut and coordinated, you get a beautiful, scrappy-looking quilt without the stress of fabric selection. The random arrangement of the strips gives each quilt a unique, improvisational feel, making it a fantastic choice for a quick baby gift, charity quilt, or a vibrant throw for your couch.
Why It's Great for Beginners
The Jelly Roll Race is perfect for beginners because it primarily involves sewing long, straight seams. This builds confidence and helps you master a consistent quarter-inch seam allowance without worrying about matching complex points or intersections. The speed of the project is also highly motivating, as you can see a finished quilt top emerge in just a few hours.
Actionable Tips for Success
To make your Jelly Roll Race a success, keep these tips in mind:
- Consistent Seams are Crucial: Use a quarter-inch sewing foot and guide to keep your seam allowance uniform throughout the entire length of the strip. This is key to ensuring your final quilt top lays flat.
- Press As You Go: After sewing the initial long strip, press all the short seams in one direction. This will make the subsequent steps much smoother and give your quilt a more professional finish.
- Vary Your Strip Order: Before you start sewing, unroll your jelly roll and arrange the strips in a random order. This will prevent blocks of the same color from clumping together and create a more visually balanced look.
- Use High-Contrast Fabrics: A jelly roll with a good mix of light, medium, and dark fabrics will create a more dynamic and visually interesting quilt. The contrast between the strips is what makes the pattern pop.
The Jelly Roll Race is an energizing way to complete a project quickly. To get started on your own high-speed quilt, visit Linda's to explore our wide selection of colorful and inspiring jelly rolls that are perfect for this fun pattern.
7. Brick Pattern / Running Bond
The Brick Pattern, also known as a Running Bond, is one of the easiest quilt patterns available, mimicking the classic, staggered layout of bricks in a wall. The design is created by sewing rectangular fabric pieces in horizontal rows, offsetting each subsequent row by half the width of the rectangle. This simple technique produces a clean, structured, yet dynamic look that is surprisingly sophisticated.
This pattern is exceptionally forgiving and requires only straight cuts and straight seams, making it a perfect first project. It's a fantastic way to showcase a beautiful fabric collection, create a modern solid-colored quilt, or use up a variety of scraps. The beauty of the Brick Pattern is its ability to look complex without any complicated piecing, making it a quick and satisfying sew.
Why It's Great for Beginners
The Brick Pattern is an excellent choice for new quilters because it builds confidence through repetition and simplicity. You'll master cutting identical rectangles and sewing straight seams without the stress of matching intricate points or corners. This pattern allows you to focus purely on the fundamentals of seam allowance and fabric layout, ensuring a beautiful result with minimal frustration.
Actionable Tips for Success
To achieve a professional-looking brick layout, keep these tips in mind:
- Consistent Sizing is Crucial: For a uniform look, ensure all your rectangles are cut to the exact same size. Using a high-quality rotary cutter and ruler from Linda's will make this process fast and accurate.
- Mark Your Offset: For the first block in each staggered row, use a clear plastic ruler and a fabric marker to mark the halfway point. This ensures your offset is perfectly aligned row after row.
- Press Seams in Alternating Directions: Press the seams of one row to the left and the seams of the next row to the right. This will help the seams "nest" together when you join the rows, reducing bulk and creating a flatter quilt top.
- Use a Design Wall: Lay out your rows on a design wall or the floor before sewing them together. This helps you visualize the final pattern, especially if you're creating a scrappy or gradient effect, allowing you to perfect the fabric placement.
This straightforward pattern is a reliable starting point for any new quilter. Stop by Linda's to grab some pre-cut jelly roll strips to make your Brick Pattern quilt even faster and easier to assemble.
8. Simple Four Patch
The Four Patch block is one of the most fundamental and easiest quilt patterns in existence, making it an essential skill for every new quilter. It is created by sewing four equal-sized squares of fabric together into a simple 2x2 grid. Its straightforward construction allows beginners to concentrate on mastering accurate cutting, consistent seam allowances, and the art of fabric and color placement without the complexity of triangles or intricate shapes.
This versatile block is a building block for countless other, more complex quilt designs, but it shines beautifully on its own. A quilt made entirely of Four Patch blocks can range from a traditional scrappy design using calico prints to a bold, modern statement with high-contrast solid fabrics. It is an excellent pattern for a first project, such as a baby quilt or a charming table runner, because it comes together quickly and provides immediate satisfaction.
Why It's Great for Beginners
The Simple Four Patch pattern is ideal for newcomers because it directly teaches the core skills of piecing. You will learn how to align seams perfectly, press them in a way that reduces bulk (often called "nesting seams"), and maintain a consistent quarter-inch seam allowance. The repetition involved in making these simple blocks quickly builds both confidence and precision, setting a solid foundation for your quilting journey.
Actionable Tips for Success
To create beautiful and uniform Four Patch blocks, focus on these practical tips:
- Prioritize Fabric Contrast: For a dynamic and visually interesting quilt, choose fabrics with significant contrast in color or value. Placing a light square next to a dark square makes the pattern pop.
- Nest Your Seams: When sewing the two pairs of squares together, press the seam of one pair to the left and the other to the right. This allows the seams to lock together snugly, resulting in a perfectly aligned center point.
- Use Charm Squares: To save cutting time, start with pre-cut 5-inch squares, also known as charm squares. Linda's offers a wide variety of charm packs that are perfect for a quick and coordinated Four Patch project.
- Chain Piece for Efficiency: Speed up your sewing by chain piecing. Sew the first two squares of multiple blocks together one after another, then repeat for the second set of squares, only cutting the threads after each batch is complete.
Mastering the Four Patch is a significant first step in quilting. Stop by Linda's to grab some charm squares and a reliable rotary cutter, and you'll have everything you need to start this classic and rewarding project today.
Quick Comparison: 8 Easy Quilt Patterns
| Pattern | Complexity 🔄 (implementation) | Resources & Speed ⚡ (requirements/efficiency) | Expected Outcomes 📊 (results/impact) | Ideal Use Cases 💡 | Key Advantages ⭐ |
|---|---|---|---|---|---|
| Square in a Square | 🔄 Low — Beginner | ⚡ Fast; straight cuts, minimal waste | 📊 Bold diamond/optical depth; polished look | 💡 Showcasing prints, charm packs, beginner projects | ⭐ Professional look, forgiving, scalable |
| Rail Fence | 🔄 Very Low — Absolute Beginner | ⚡ Very fast; strip-based, works with jelly rolls | 📊 Strong linear/diagonal effects; can be repetitive | 💡 Stash-busting, pre-cuts, teaching basics | ⭐ Easiest construction, very forgiving |
| Charm Pack Quilt | 🔄 Very Low — Absolute Beginner | ⚡ Very fast; uses pre-cut 5" squares (must buy packs) | 📊 Consistent, tidy grid; limited block-size options | 💡 Quick gifts, group quilting, children’s projects | ⭐ Minimal prep, low waste, beginner-friendly |
| Nine Patch | 🔄 Low — Beginner (requires alignment) | ⚡ Moderate; more seaming/precision | 📊 Classic 3x3 checker effect; creates secondary patterns | 💡 Practicing precision, scrappy quilts, versatile layouts | ⭐ Teaches fundamentals, highly variable |
| Friendship Bread / Disappearing Nine Patch | 🔄 Moderate — Beginner to Intermediate | ⚡ Moderate; cut-and-rearrange steps, design wall helpful | 📊 Dynamic geometric movement; higher visual interest | 💡 Upcycling simple blocks, creative workshops | ⭐ Transforms simple blocks into striking designs |
| Jelly Roll Race | 🔄 Low — Beginner (linear sewing) | ⚡ Extremely fast; uses jelly roll strips, minimal cutting | 📊 High-momentum striped or windmill effects | 💡 Rapid projects, charity quilts, fun classes/competitions | ⭐ Fastest quilt top, minimal tools, confidence-building |
| Brick Pattern / Running Bond | 🔄 Low — Beginner | ⚡ Fast to moderate; rectangular pieces, offset measurement | 📊 Subtle, sophisticated offset layout; works with directionals | 💡 Modern solids, directional fabrics, stash use | ⭐ Simple construction, refined appearance |
| Simple Four Patch | 🔄 Very Low — Absolute Beginner | ⚡ Fast; minimal materials, uses charm squares easily | 📊 Basic 2x2 block; excellent for practice and scalability | 💡 Kids' first quilts, practice blocks, scrap projects | ⭐ Easiest block, highly customizable, quick to sew |
Bring Your Quilt to Life with the Perfect Finishing Touches
You’ve explored a fantastic collection of the easiest quilt patterns, from the straightforward elegance of the Rail Fence to the delightful surprise of the Disappearing Nine Patch. Each pattern, whether it's the classic Nine Patch or the speedy Jelly Roll Race, serves as a perfect gateway into the wonderful world of quilting. They demonstrate that you don’t need years of complex training to create something truly beautiful, warm, and personal. The key takeaway is that simplicity in design is a strength, allowing you to focus on the fundamental skills that build a strong quilting foundation: accurate cutting, consistent seam allowances, and precise pressing.
Mastering these beginner-friendly patterns like the Brick Pattern or the Simple Four Patch does more than just produce a finished quilt. It builds your confidence with every block you complete. It trains your eye to see how simple shapes combine to form intricate secondary patterns. Most importantly, it connects you to a timeless craft, allowing you to create heirlooms and heartfelt gifts that will be cherished for generations. The true value lies not just in the finished product, but in the skills and joy you cultivate along the way.
Your Next Steps to a Finished Masterpiece
With your quilt top assembled, the next phase of your creative journey begins. This is where you transform your pieced fabric into a cozy, durable quilt. This educational section will guide you through the crucial next steps for a professional finish.
- Choose Your Backing: Select a fabric that complements your quilt top in both color and style. Consider using a wide-back fabric to avoid having to piece your backing together, which is a great time-saver for beginners.
- Select the Right Batting: The batting determines the warmth, drape, and texture of your quilt. A cotton or cotton-blend batting is a popular, easy-to-use choice for new quilters, offering a traditional feel and lovely crinkle after washing.
- Baste Your Quilt Sandwich: This involves layering your backing, batting, and quilt top and temporarily securing them together. Pin basting is a common and effective method that prevents the layers from shifting while you quilt.
From Piecing to Quilting
Once your quilt sandwich is basted, it's time to add the quilting stitches that hold everything together and add another layer of texture and design. You can choose to quilt by hand, with your domestic sewing machine using a walking foot for simple straight lines, or even explore free-motion quilting. The quilting design itself can be as simple as "stitching in the ditch" (sewing along the existing seam lines) or echo quilting around your blocks.
Finally, the binding encloses the raw edges, creating a durable and polished frame for your work. Don’t be intimidated by this final step. With a clear tutorial, creating and attaching a binding is a straightforward process that provides an immense sense of accomplishment. Each of these finishing touches is a skill in itself, and completing them solidifies your journey from a beginner to a confident quilter.
Ready to find the perfect materials to complete your project? From high-quality cotton backing to the ideal batting and thread, Linda's Electric Quilters has everything you need to bring your creation to life. Explore our vast selection of over 30,000 products at Linda's Electric Quilters and let our expertise support you from your first stitch to your last.


