

You've just put the final stitch in your quilt. It’s a masterpiece of color, texture, and countless hours of work. Now, it's time to give it the spotlight it deserves. But how to hang quilts properly so they look amazing and stand the test of time? The secret is choosing a method that supports the quilt's weight evenly across the top, avoiding any sagging or stretching that could damage your beautiful work.
From Finished Project to Wall Art
Taking a quilt from your sewing table to the wall is a game-changer. It transforms a cozy blanket into a stunning piece of art that instantly warms up a room and showcases your personality. But before you grab the nearest nail, let's talk strategy. The way you hang your quilt is just as important as the stitches themselves—it's all about protecting those fibers and that intricate piecing you poured your heart into.
Hanging quilts is a tradition that goes way back. For centuries, quilts were not only functional but also prized decorative items. Proper care and display were key to their longevity. Just think about the incredible historical quilts you see in museums—some, like those at the Victoria and Albert Museum, date back to the 14th century! It’s a powerful reminder of why we take the time to hang our own quilts with care. You can dive deeper into the fascinating history of quilting over on Britannica.com.
Exploring Your Options
There’s no single "best" way to hang a quilt. The right method really depends on the quilt itself, your walls, and the look you’re going for. I always tell people to think through a few key things first:
- Quilt Size and Weight: A massive, heavy king-sized quilt needs a seriously robust hanging system, while a small, lightweight wall hanging offers a lot more flexibility.
- Wall Type: What works for drywall won't necessarily work for plaster or brick. You'll need different hardware to get a secure hold.
- Your Personal Style: Are you aiming for a modern, "floating" look? Or do you prefer a more traditional vibe with a decorative rod as part of the display?
- Permanence: Think about whether this is a long-term display or if you plan to rotate your quilts with the seasons. Some methods are much easier to swap out than others.
The number one goal is to provide even, consistent support along the entire top edge of your quilt. This is non-negotiable. Without it, gravity will eventually cause the fabric to stretch and sag, putting stress on the seams and potentially distorting your beautiful work forever.
To get started on the right foot, make sure you have the best supplies. Having high-quality batting, threads, and notions from Linda's will make preparing your quilt for its big debut a breeze.
Quilt Hanging Methods At a Glance
Feeling a bit overwhelmed by the choices? Don't be. This little cheat sheet breaks down the most popular methods to help you quickly see which one might be the perfect fit for your project.
| Method | Best For | Wall Impact | Reversibility |
|---|---|---|---|
| Rod and Sleeve | Large, heavy quilts; traditional look | Low (a few small screw holes) | Easy to remove quilt |
| Hanging Clips | Small to medium quilts; modern, minimalist style | Minimal (small nail/screw holes) | Very easy |
| Velcro | Clean, "floating" look; odd-shaped quilts | Medium (adhesive can affect paint) | Can be tricky to remove |
| French Cleat | Very heavy or large quilts; secure, stable hold | High (requires sturdy wall mounting) | Easy to lift quilt off cleat |
| Lattice/Strips | Renters or frequent rotators; damage-free | Very Low (can be damage-free) | Completely reversible |
| Adhesive Hooks | Very small, lightweight mini-quilts | Low (if using removable strips) | Easy, but limited by weight |
Each of these methods has its place, and we'll dive into the specifics of how to do each one. Think of this table as your starting point for matching your beautiful quilt with its ideal hanging solution.
Choosing the Right Hanging Method for Your Quilt
Figuring out the best way to hang a quilt is a balancing act between making it look great and keeping it safe for years to come. A tiny, modern art quilt has completely different needs than a heavy, king-sized heirloom packed with dense batting. The right choice always comes down to four key factors working together.
Before you grab a hammer, take a moment to really think about the quilt itself and its new home on your wall. A fragile antique, for example, could be permanently damaged by the focused pressure of hanging clips. For something so precious, a gentle, full-support system is a much smarter choice.
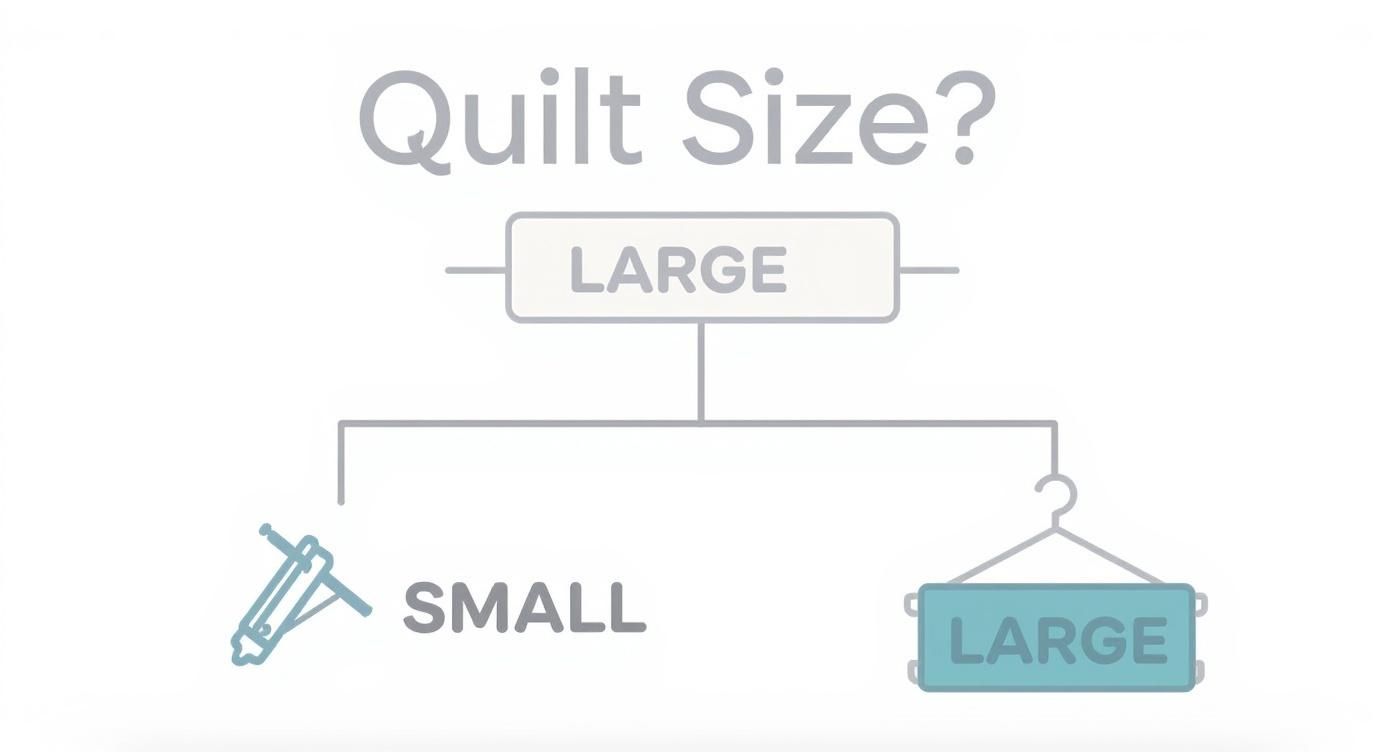
This decision tree gives you a great starting point. As you can see, the quilt’s size is often the first thing to consider, and it immediately helps narrow down your options. Larger quilts almost always point you toward more robust methods, like a rod and sleeve, to prevent gravity from causing sag over time.
Evaluate Your Quilt’s Needs
The first step is always to take a close look at your quilt. Its size and weight are the biggest players here because gravity is a quilt’s worst enemy when on display. A heavier piece absolutely needs a method that spreads its weight evenly across the entire top edge.
- Size: Small quilts (under 30 inches wide) are pretty forgiving. You can often get away with clips or even Velcro. But for large quilts, you need to bring in the big guns—like a sleeve and rod or a French cleat—to prevent distortion.
- Weight: The type of batting and fabric all add up. A densely machine-quilted piece will be surprisingly heavy compared to a lightly hand-stitched one of the same size.
- Fabric Delicacy: Are you working with sturdy modern cottons or delicate vintage silks? Antique or fragile fabrics require a gentle touch. Any method that pierces or stresses the fibers is a no-go, which means clips are generally off the table for these treasures.
A common mistake I see is people underestimating a quilt's weight. Over time, even a medium-weight quilt can cause adhesive strips to fail or create an ugly sag between hanging points. It’s always better to over-engineer your support system than to come home to a quilt on the floor.
Consider Your Wall and Your Style
Your home’s construction also has a say in what’s possible. You have to make sure your hardware can be mounted securely, or you’re just asking for trouble.
- Drywall: This is what most of us have. It's compatible with pretty much every hanging method, but you’ll definitely need to use wall anchors for anything heavy unless you're lucky enough to hit a wall stud.
- Plaster: If you live in an older home, you might have plaster and lath walls. They can be tricky. Plaster is more brittle and loves to crack, so you have to drill very carefully.
- Brick or Concrete: These tough surfaces mean business. You'll need a hammer drill and special masonry anchors to get your hardware installed securely.
Finally, think about the look you’re going for. If you love changing out your quilts with the seasons, a system that makes swapping easy, like magnetic hangers or a French cleat, is perfect. For that clean, gallery-like presentation where the quilt seems to float on the wall, mounting it on a canvas frame is a sophisticated and beautiful option.
No matter which method you land on, starting with the right supplies is key. You can find the perfect high-quality hanging rods and hardware for any project in Linda's extensive collection.
Mastering the Classic Rod and Sleeve Method
If you've ever wondered how museums and galleries get their quilts to hang so perfectly, the secret is almost always the rod and sleeve method. This is the gold standard for a reason. It provides a straight, continuous line of support across the entire top edge of your quilt, which means no sagging, no drooping, and no stress on those precious seams.
For any quilt that's large, heavy, or has special sentimental value, this is hands-down the best way to display it safely. It takes a little bit of sewing, but the professional result and peace of mind are well worth the effort.
You're basically creating a simple fabric tube—the sleeve—that you'll attach to the back of the quilt. A rod then slides right through it and sits on a couple of wall brackets. This setup distributes the quilt's weight evenly, preventing distortion over time.
Creating the Perfect Quilt Sleeve
Getting the sleeve dimensions right is the most important part. If it’s too tight, you’ll get an unsightly pucker along the top of your quilt. Too loose, and it can look a bit sloppy. The goal is a crisp, flat hang.
Here’s how to get it done:
-
Cut Your Fabric: Grab a piece of good-quality quilting cotton. You’ll want to cut a strip that’s 9 inches wide and about 1 inch shorter than the total width of your quilt.
-
Finish the Ends: Take the short ends and press them under by ¼ inch. Press them another ¼ inch to create a clean, double-hemmed edge, and stitch them down.
-
Form the Tube: Now, fold the whole strip in half lengthwise with the wrong sides of the fabric facing each other. You'll end up with a long tube that’s 4.5 inches wide. Give it a good press.
And that’s it! Your sleeve is prepped and ready to be attached.
Pro Tip: For really big or heavy quilts, I always add about an inch of extra fabric depth to the sleeve. This creates a small pleat, or "pocket," of space. It allows the rod to settle in without pulling the top of the quilt forward, ensuring it hangs completely flat against the wall instead of bowing out.
Attaching the Sleeve Securely
With your sleeve made, it’s time to attach it to the quilt. This part requires some careful hand-stitching so that your stitches don't pop through to the front.
Position the sleeve on the back of your quilt, about ½ inch below the top binding. Make sure it's centered and perfectly straight, then pin it securely in place. Grab a strong thread that matches your quilt's backing—you can always find the right shade in Linda’s vast selection of quilting threads—and use a blind stitch or a whipstitch to sew the top and bottom edges of the sleeve to the quilt's backing fabric only.
Choosing and Mounting Your Hardware
The final piece of the puzzle is the hardware. A simple wooden dowel from the hardware store often works great, but a decorative curtain rod can add a nice finishing touch. For a deep dive into picking the perfect rod for your quilt's weight and size, this Ultimate Curtain Rod Size Chart & Guide is a fantastic resource.
Displaying quilts is a tradition with a long and rich history. Quiltmaking exploded in America during the 19th century, and patchwork became so iconic it was even celebrated at the Great Exhibition of 1851. This boom solidified quilts as central pieces of home decor, turning them from simple bedcovers into cherished art. The V&A Museum’s introduction to quilting and patchwork is a wonderful place to explore more of this history.
Exploring Modern and No-Sew Hanging Solutions
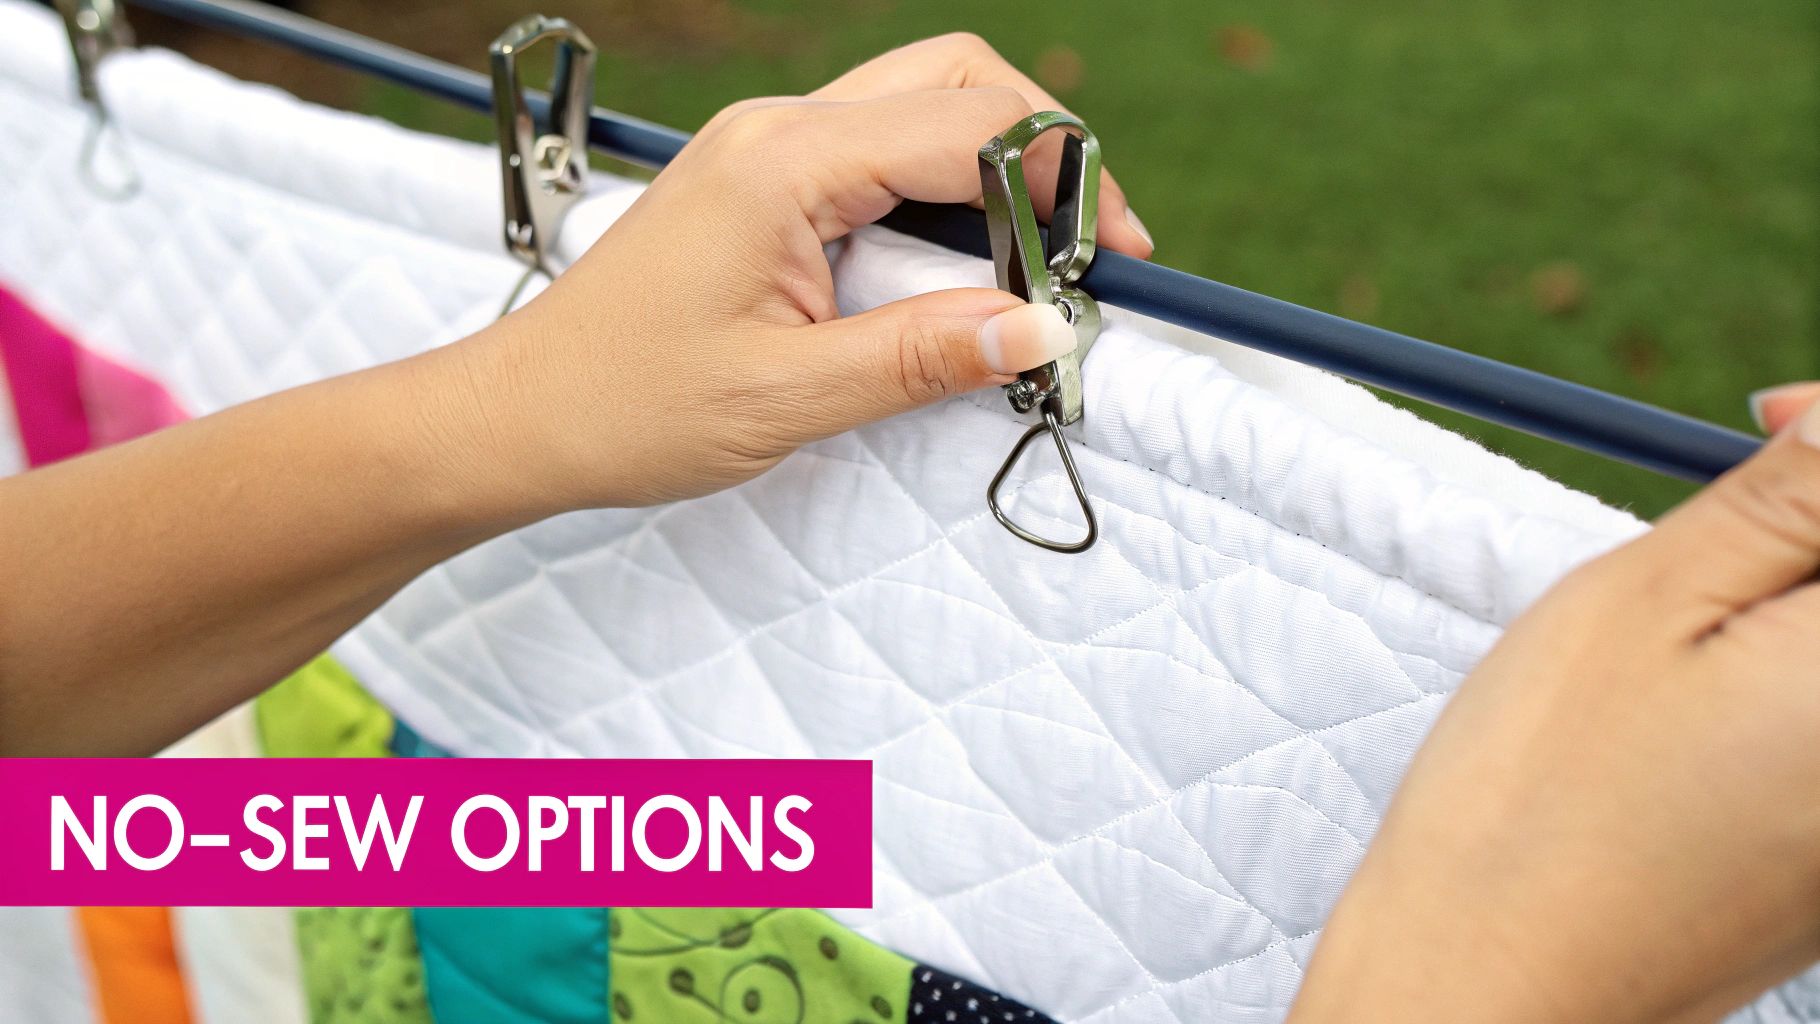
While the rod and sleeve is a time-tested classic, maybe you're not in the mood to break out a needle and thread. I get it. Sometimes you want something faster, less permanent, or just... different. Luckily, we have some fantastic modern options perfect for rotating your displays or matching a specific aesthetic, from rustic to minimalist.
The quilting world is always buzzing with creativity. A 2010 study found over 27 million people were quilting in the US alone, and that vibrant community is constantly finding new ways to show off their art. Quilts have moved from the bed to gallery walls, and you can see how they're celebrated in exhibits by exploring these insights from the Quilt Index.
Using Quilt Clips for Rustic Charm
Quilt clips, sometimes called hangers, are a wonderfully simple and adjustable solution. Think of them as small clamps that gently grip the top of your quilt, which then hang from tiny nails or hooks. They’re perfect for small to medium-sized quilts and give off a charming farmhouse vibe.
- What You'll Need: Quilt clips (wood or metal), a tape measure, a pencil, a level, and small nails or screws.
- A Little Pro Tip: The secret to making this look good is even spacing. Measure the quilt's width and divide it by the number of clips you have plus one. This calculation gives you the perfect spot for each clip, ensuring balanced support. For a 36-inch quilt with three clips, you’d place one at 9 inches, one at 18 inches, and the last at 27 inches. Easy!
The Velcro Method for a Floating Look
If you want a truly seamless, modern presentation, Velcro (or any hook-and-loop tape) is your best friend. This trick makes your quilt look like it’s floating on the wall with zero visible hardware. It creates a clean, gallery-like effect that I absolutely love for contemporary spaces.
This method gives a beautiful, flat finish, but it does require careful alignment. I always recommend grabbing a helper. One person can hold the quilt taut while the other presses it firmly against the wall strip. It's the best way to avoid puckers or bubbles.
Here's how it works: you'll hand-sew the soft (loop) side of a Velcro strip to the back of the quilt, right along the top edge. Then, you attach the rough (hook) side to a thin, lightweight wood slat. Mount that slat to the wall with screws and anchors, and then just press the quilt onto it. The Velcro grabs on tight, providing a strong, even hold across the entire top.
The French Cleat for Heavy-Duty Support
Got a truly massive or heavy art quilt on your hands? Don't stress. The French cleat is a brilliant solution borrowed from the world of woodworking. It uses two interlocking wood pieces, each cut at a 45-degree angle. One piece gets mounted on the wall, and the other is secured to the back of your quilt (usually on a sturdy slat sewn into a wide sleeve).
The quilt then just slides down and locks into place on the wall-mounted cleat. It's an incredibly secure system that provides rock-solid support. While it requires a bit more precision and a few extra tools, it’s one of the most reliable ways to hang a substantial textile masterpiece.
No matter which modern method you go with, you can find the perfect specialty quilt hangers, clips, and high-quality adhesive products to get the job done right at Linda's Electric Quilters.
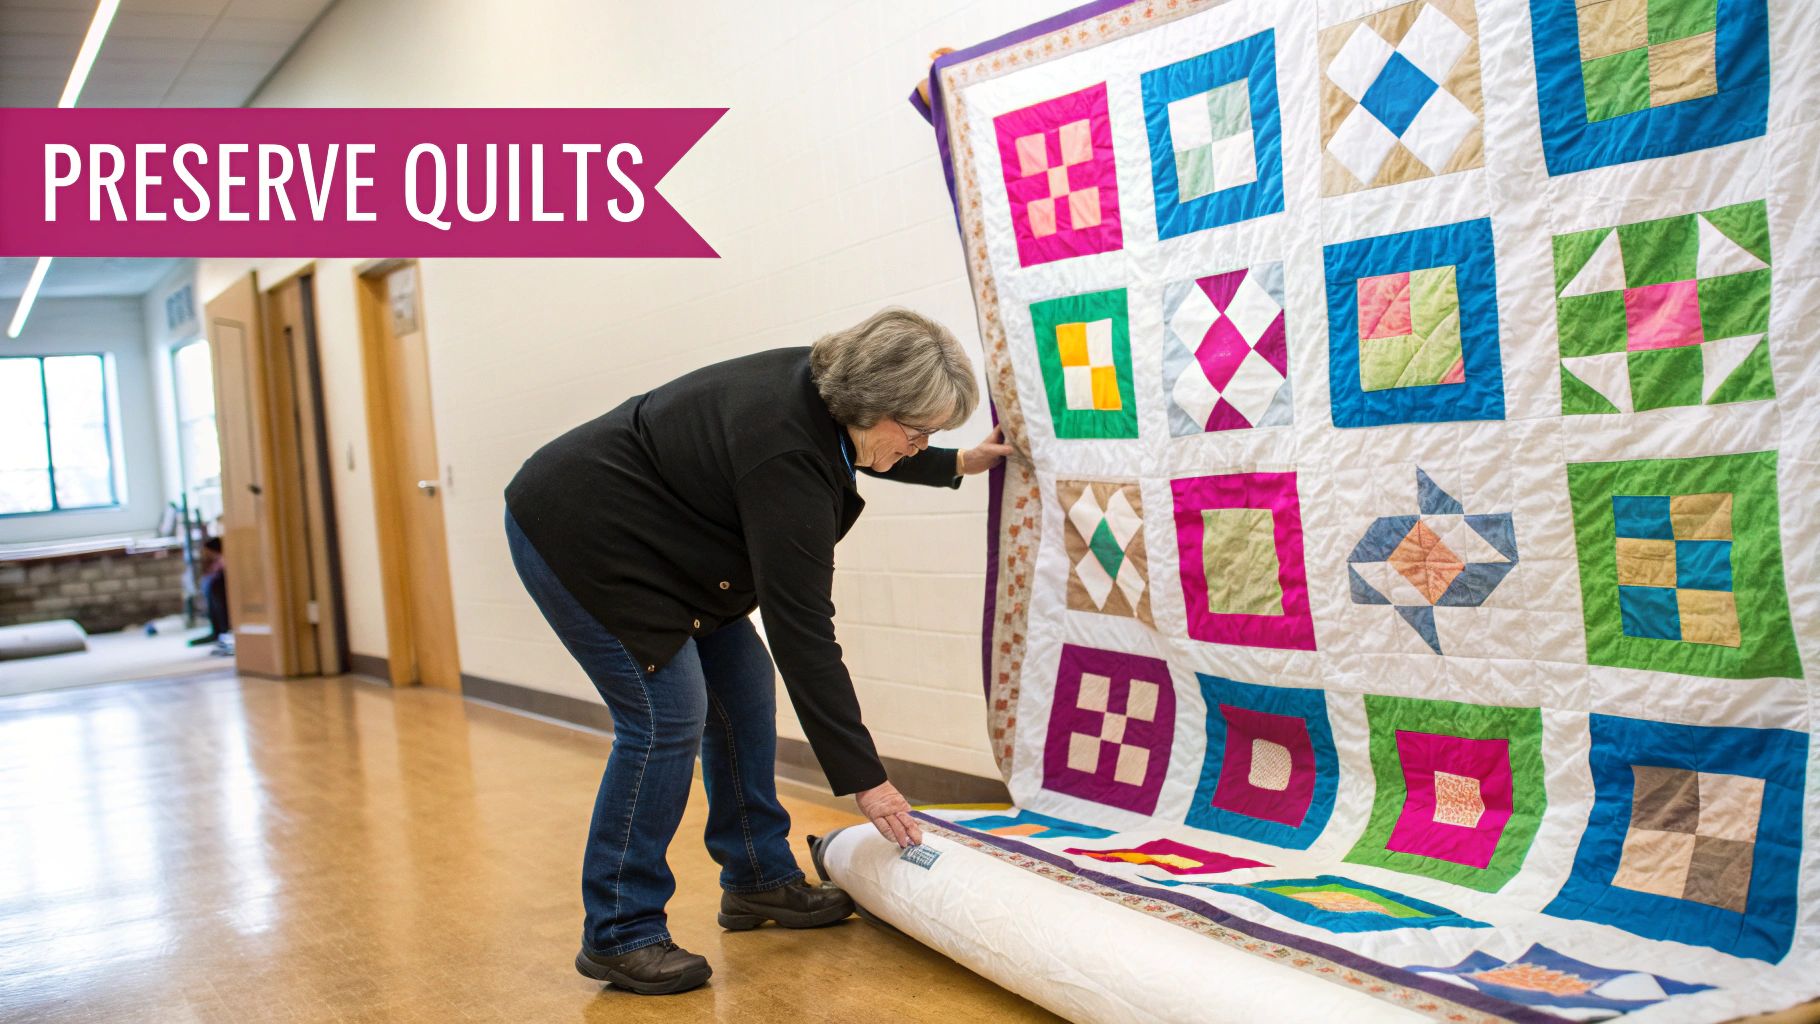
Keeping Your Masterpiece Safe on Display
You’ve poured hours into your quilt, and now it’s a stunning piece of art on your wall. But hanging a quilt means exposing it to the elements, and proper preservation is just as important as the hanging method itself. We’re talking about protecting your textile art from its biggest enemies: sunlight, dust, humidity, and the relentless pull of gravity.
The number one culprit of quilt damage is sunlight. Those ultraviolet (UV) rays are brutal—they’ll fade your vibrant colors and make natural fibers like cotton brittle and weak. It's a slow process, but it's irreversible.
Make sure you choose a wall that never gets direct sunbeams, no matter the time of day. Even reflected light can take its toll over the years, so rotating which quilts you have on display is a smart move.
Battling the Elements
Sunlight isn't the only thing to watch out for. A few other environmental factors can sneak up and cause harm to your quilt. A little bit of consistent care goes a long way.
- Dust and Dirt: A light dusting every month or so is a good habit. I recommend using a low-suction handheld vacuum with a soft brush attachment. The trick is to place a clean piece of nylon screen over the quilt's surface as you vacuum to protect delicate stitching and fabric from getting snagged.
- Humidity: You want to find that "just right" spot for your quilt. High humidity can invite mildew (a quilter's nightmare!), while overly dry air can make the fibers brittle. That means avoiding walls in bathrooms, kitchens, or right next to humidifiers or heating vents.
- Gravity's Never-Ending Pull: Even with the most secure hanging system, gravity is constantly tugging at your quilt's fibers and seams. To fight back, give your quilt a break. I always suggest taking it down for a few months each year to let it rest flat. When you store it, fold it differently than it hung to avoid permanent creases and redistribute the stress. Many of the same principles apply to other valuable fabrics—you can find some great expert tips for preserving delicate textiles that work for quilts, too.
Here's a pro tip I swear by: Let your quilt rest for 3 months for every 9 months it's on display. This simple rotation dramatically extends its life by preventing the fibers along the hanging edge from permanently stretching out.
Just like quilting itself, preservation is an ongoing labor of love. Having the right tools for cleaning and maintenance is key. You can find excellent fabric care products over at Linda's Electric Quilters to make sure you’re fully equipped to protect your beautiful work for years to come.
Common Questions About Hanging Quilts
Even after you've learned the methods, a few questions always seem to pop up. Let's walk through some of the most common ones I hear from fellow quilters. Getting these details right will help you hang your masterpiece with total confidence.
One of the biggest worries, especially if you're renting, is how to get a quilt on the wall without leaving a bunch of holes behind. The good news is, you absolutely can.
For lighter quilts, those high-quality adhesive strips and hooks can be your best friend. Just be sure to check the weight rating before you buy. I've also seen a clever trick using a variation of the Velcro method: attach your hook-and-loop tape to a thin, lightweight wood slat. Then, hang that slat from two removable adhesive hooks. It’s a great way to distribute the weight evenly without a single nail.
Handling Delicate and Antique Quilts
But what about that fragile family heirloom? This is a huge, and very important, question. An antique quilt needs a completely different level of care because its delicate fibers just can't handle the focused stress from modern hanging methods.
Whatever you do, never use clips on an old or fragile quilt. The pressure points can easily snap those aged fibers, causing damage that can't be undone. The only safe way is to provide full, even support across the entire piece.
This usually means carefully hand-stitching the quilt onto a fabric-covered, acid-free board or a prepared artist's canvas. You'll want to use a fine, conservation-grade thread and make tiny, spaced-out stitches in a grid pattern. This gently cradles the quilt in place without putting strain on any single area.
A great rule of thumb for hanging a quilt above furniture like a sofa or headboard is to leave 6 to 8 inches of breathing room between the bottom of the quilt and the top of the furniture. This connects the two pieces visually without making the wall feel crowded.
Finding the Perfect Height
Finally, the question everyone asks: "How high should I hang my quilt?" A fantastic place to start is the standard gallery rule. You want the center point of your quilt to be at average eye level, which is somewhere around 57 to 60 inches from the floor.
Of course, this is just a guideline. Before you even think about marking the wall, grab a friend to help you hold the quilt in position. Step back. Walk around the room. See how it looks from different angles. In the end, your own eye is the best judge for what feels balanced and perfect for your space.
Bringing your project to a beautiful finish starts with the right supplies. Whether you're looking for conservation-grade thread for that priceless heirloom or sturdy hardware for a big modern piece, Linda's Electric Quilters has you covered. Check out our massive selection of quilting supplies and notions at https://lindas.com and get everything you need to display your masterpiece with pride.


