
Ever stare at a perfectly quilted project and just wonder how they got those seams so flat and smooth? No bunching, no puckering, just pure perfection. More often than not, the secret weapon is a simple but incredibly effective tool: the walking foot. This guide will walk you through exactly how to use this tool to elevate your projects from homemade to professional.
This isn't just another presser foot to toss in your sewing box. It’s a complete game-changer, especially when you're wrestling with multiple layers, slippery fabrics, or anything that loves to shift around.
Think of it like adding four-wheel drive to your sewing machine. Your standard presser foot just glides over the top of your fabric, but a walking foot is an active participant in the process. It has its own set of feed dogs that grip the fabric from the top, moving it through the machine at the exact same pace as the machine's feed dogs pull from the bottom. This perfectly synchronized push-and-pull action is your best defense against the dreaded shifting, stretching, and puckering that can turn a great project into a frustrating mess.
Why Every Sewer Should Have a Walking Foot
While the walking foot is practically famous in the quilting world, its usefulness goes way beyond that. It was actually first developed to help sew heavy and slippery materials in the textile and upholstery industries. Its ability to manage multiple layers so effectively was revolutionary. In fact, its impact was so huge that the use of walking foot machines in the upholstery business jumped by over 40% between 1970 and 1990. You can dive deeper into the history of sewing machine advancements to see how these amazing tools came to be.
This dual-feed magic solves a ton of common sewing headaches:
- Quilting: It’s the hero here. It keeps your quilt top, batting, and backing from shifting, giving you those beautifully smooth, professional-looking stitch lines.
- Matching Patterns: Say goodbye to mismatched plaids and stripes! The walking foot prevents the top fabric from creeping forward, so your patterns line up perfectly at the seams.
- Tricky Fabrics: Got some velvet, minky, satin, or even leather you’ve been afraid to touch? The walking foot tames them by feeding them through evenly for a flawless finish.
- Bag Making and Binding: When you’re attaching bulky straps or finishing a quilt with binding, you're dealing with serious thickness. A walking foot plows through those layers like a champ.
Sometimes it's hard to remember when to switch out your presser feet. Here's a quick little cheat sheet to help you decide.
Walking Foot vs. Standard Foot: A Quick Guide
A simple reference to help you decide which presser foot is the right choice for your current sewing project.
| Sewing Task or Fabric Type | Best Foot Choice | Why It's the Right Tool |
|---|---|---|
| General seams on cotton | Standard Foot | Perfect for basic, single-layer sewing with no-slip fabrics. |
| Straight-line quilting | Walking Foot | Prevents the quilt sandwich layers from shifting and puckering. |
| Sewing with velvet or minky | Walking Foot | Grips the slippery top layer to ensure even feeding. |
| Matching plaids or stripes | Walking Foot | Stops the top fabric from creeping, ensuring perfect pattern alignment. |
| Attaching quilt binding | Walking Foot | Manages the bulk of multiple layers and binding tape with ease. |
| Topstitching a single layer | Standard Foot | Provides clear visibility and control for simple topstitching. |
| Sewing with knits or jersey | Walking Foot | Gently feeds the stretchy fabric to prevent it from stretching out. |
Choosing the right foot really does make all the difference between a project you love and one that causes you a headache.
Finding the Right Foot for Your Machine
Now, not all walking feet are made the same. They are usually designed to fit a specific machine "shank height," which is just the distance from the presser foot screw to the needle plate. Most home sewing machines are either low-shank or high-shank. It's super important to get the right one for your model, or it simply won't work correctly.
A question we get all the time is whether a generic foot will work. While you can find them, a walking foot made by your machine's manufacturer (like Bernina, Janome, or Brother) is almost always going to give you the best fit and smoothest performance.
Here at Linda's, we can help you figure out exactly which shank height your machine has and find the perfect walking foot for it. Making a small investment in the right tool is the first step to conquering those tricky fabrics and getting the beautiful results you've been dreaming of. With this secret weapon in your arsenal, you'll be ready to sew anything with confidence.
Installing Your Walking Foot for Success
Getting your walking foot attached correctly is the first, most critical step to achieving those beautifully flat, pucker-free seams we all want. I know it can look a bit intimidating compared to a simple snap-on foot, but the process is actually quite simple once you get the hang of it. Honestly, getting this setup right from the start is non-negotiable if you want to avoid a world of frustration later.
First things first, let's talk safety. Always, always, always turn the power off on your machine before you start swapping out feet or needles. It’s a simple flick of a switch that can save you from a nasty surprise stitch, which is bad for both your machine and your fingers.
Removing Your Old Foot and Ankle
Before the walking foot can go on, the old presser foot and the holder it snaps into (often called the ankle) have to come off. On most machines, there's a little lever or button on the back of the ankle; just press it, and the foot will pop right off.
With the foot gone, look for a small thumbscrew on the side of the main presser bar. This is what holds the ankle in place. Loosen that screw—you might need that little screwdriver that came with your machine—and the whole ankle assembly will slide off. Now you’ve got a clean slate, ready for your walking foot. Just make sure to keep that little thumbscrew somewhere safe!
This diagram really shows the difference a walking foot makes, taking you from frustrating puckers and shifting layers to a perfectly smooth, professional seam.
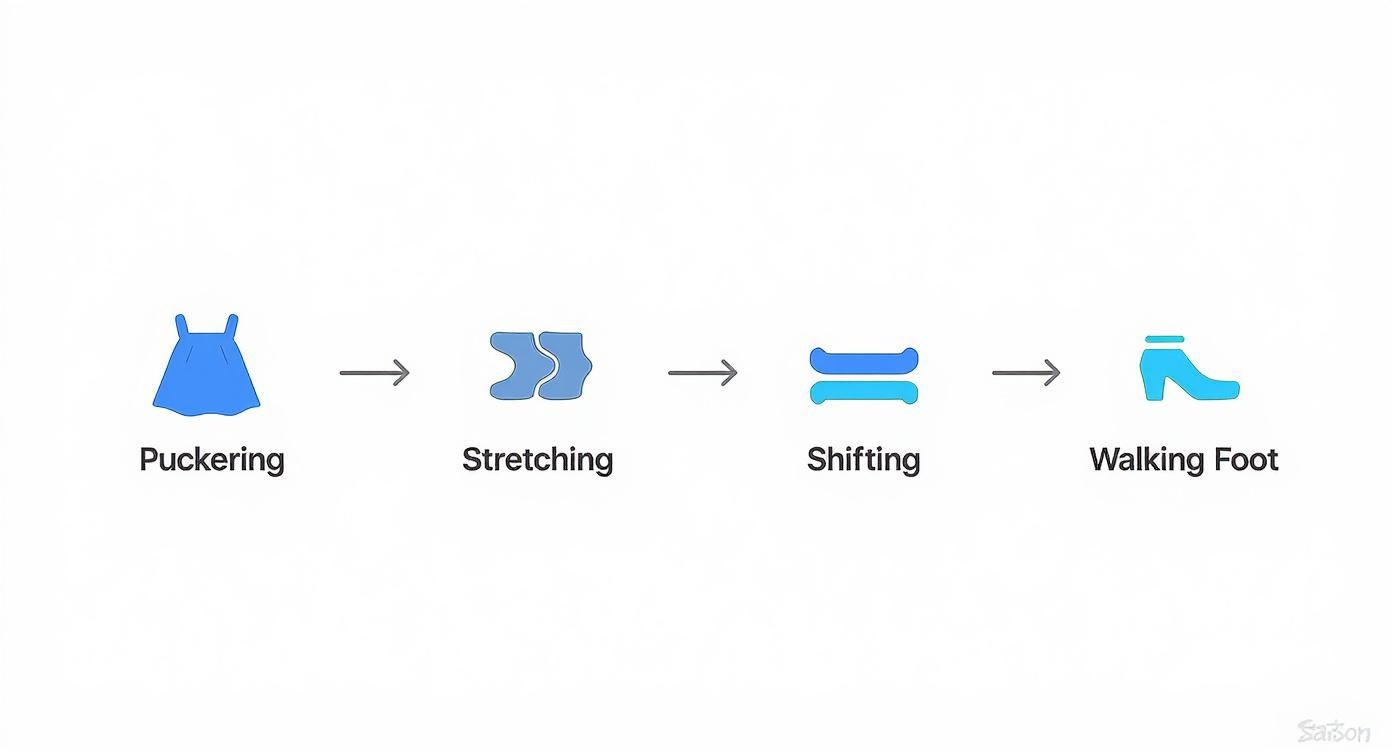
When your fabric starts to misbehave, the walking foot is your go-to solution.
Positioning the Fork and Securing the Foot
Okay, this is the most important part of the whole process and where most people get tripped up. Your walking foot has two points of contact. The first is a C-shaped opening that fits around the presser bar, right where the old ankle was. The second, and the key to the whole operation, is a little lever or "fork" that sticks out to the right side.
That fork is the magic behind the walking foot. It absolutely must rest on top of the needle clamp screw—that’s the same screw you loosen to change your sewing machine needle. As your needle bar moves up and down, it pushes this fork, which engages the walking foot's own set of feed dogs.
Getting that fork in the right place is everything. If you accidentally position it under the needle clamp screw or let it float without touching, the top feed dogs won't move, and you'll just have a big, clunky presser foot that doesn't actually walk.
To get it on, slide the C-shaped part onto the presser bar while making sure that fork settles right on top of the needle clamp screw. Once it's all lined up, just tighten that thumbscrew you set aside earlier to lock the walking foot securely in place.
- Do a quick check: After it's tight, lower the presser foot and turn the handwheel toward you a few times. Watch the fork—you should see it moving up and down with the needle, making the little "teeth" on the bottom of the foot march forward.
Final Checks and Brand-Specific Notes
This installation process is pretty universal for the most popular machine brands we carry at Linda's, including Bernina, Janome, and Brother. That said, it never hurts to give your machine's manual a quick glance, just in case your model has a specific quirk.
Once it’s on, give the foot a gentle wiggle to make sure it's not loose. A wobbly foot can cause all sorts of problems, from skipped stitches to a broken needle. Taking an extra 30 seconds to double-check your work now will save you a massive headache later.
With your walking foot installed correctly, you're ready to dial in your settings and start quilting.
Dialing in Your Machine for Perfect Stitches
Alright, your walking foot is on and secure. Now for the fun part: tweaking your machine's settings to get those stitches looking absolutely perfect. Think of these dials and buttons as your project's control panel. A few small adjustments here are what separate a puckered, uneven quilt from one that lies beautifully flat.

First, a quick sigh of relief: threading your machine with the walking foot attached is business as usual. The thread path doesn't change, so just follow the standard sequence you always use. Just remember to raise the presser foot lifter before you start to open up those tension discs.
Lengthen Your Stitch for Smoother Results
The very first setting you'll want to adjust is your stitch length. When you’re piecing blocks, a tight little stitch (around 2.0mm) is great for strong seams. But for quilting through that thick quilt sandwich of fabric and batting? Those short stitches will fight you, compacting the fabric and causing puckers.
This is an easy fix. You'll want to lengthen that stitch quite a bit. A setting between 3.0mm and 3.5mm is the sweet spot for most quilting projects. This longer stitch glides over the bulk, giving you a much more professional look and letting the quilt drape softly.
A longer stitch means less density in the quilting line, which is key to preventing the fabric from drawing up. This is probably the single most effective adjustment you can make for better results with your walking foot.
Fine-Tuning Your Thread Tension
Thread tension is all about finding that perfect balance. Your machine tries to lock the top and bobbin threads right in the middle of the fabric. When you add bulky batting, that "middle" becomes a much thicker target, and your machine's default tension setting is often no longer correct.
Have you ever noticed tiny dots of your bobbin thread peeking through on top of your quilt? That's a classic sign that your top tension is a little too tight, pulling that bobbin thread all the way up.
To solve this, just slightly lower your upper thread tension. If your machine is usually on an "auto" or 4 setting, try dialing it down to a 3 or 3.5. Always—and I mean always—test your settings on a scrap quilt sandwich before you touch your actual project. This lets you find that perfect lock right in the center of the batting.
The Importance of the Right Needle and Thread
Don't underestimate the humble needle! It's doing some serious work, punching through three layers over and over. Starting a project with a dull or incorrect needle is just asking for skipped stitches and shredded thread. My rule? A new quilting project always gets a fresh needle.
- Needle Type: A Quilting Needle or a Topstitch Needle is your best bet. Quilting needles have a tapered point made for piercing multiple layers cleanly, while Topstitch needles have a larger eye that's gentler on thicker quilting threads.
- Needle Size: You can't go wrong with a size 90/14 needle for quilting with standard cottons.
Your thread choice is just as critical. A high-quality 100% cotton 50wt thread is the gold standard for a reason—it’s strong, durable, and blends into the quilt top beautifully. To get your project started right, you can find a wonderful selection of quilting needles and premium threads like Aurifil right here at Linda's. Having these quality supplies on hand is the final, crucial step in setting yourself up for success.
Mastering Quilting with Your Walking Foot
Alright, your machine is threaded, the walking foot is on, and you're ready for the main event: quilting! This is where the magic really happens, turning that pieced top into a cozy, textured quilt. Don't let the size of your project psych you out; a few core techniques are all you need to get beautiful, professional-looking results.
But before you even think about putting needle to fabric, let's talk basting. A well-basted quilt sandwich—your smooth, secure layers of backing, batting, and quilt top—is your absolute best friend. Seriously, take your time here. Most of the puckers and tucks I see in finished quilts trace back to a rushed or loose baste. Use safety pins or your favorite basting spray and make sure it's perfect.
Straight-Line Quilting for a Modern Look
One of the easiest and most striking ways to quilt with a walking foot is simple straight-line quilting. It creates that clean, modern grid that looks fantastic on almost any quilt. The secret here is a good plan and your quilt guide bar.
That little L-shaped rod that came with your walking foot? It's your new best friend for parallel lines. Just slide it into the slot on your foot. Once you stitch your first line, set the guide to your desired spacing (let's say 1 inch), and then just follow that first line of stitching with the guide. It’s like having built-in painter's tape!
Here’s a tip I learned the hard way: always start quilting in the middle and work your way out. This pushes any extra fullness toward the edges instead of trapping it in the center as an ugly pleat. I usually stitch a line right down the middle, then quilt one entire half before spinning the whole thing around to finish the other side.
Invisible Stitches with Stitching in the Ditch
Another classic technique is "stitching in the ditch." This is exactly what it sounds like: quilting directly inside the seam lines where your fabric pieces meet. When you get it right, the stitches just sink into that "ditch" and virtually disappear, adding texture and stability without competing with your beautiful piecing.
The key is to use a high-quality thread that matches your fabric well. The goal is pure camouflage. You’ll need to guide the quilt sandwich slowly, keeping that needle dead-center in the seam. It takes a little practice to get the hang of it, but the results are so worth it.
The secret to great stitching in the ditch is to slightly lengthen your stitch and use a neutral-colored thread. This combination is very forgiving and helps the stitches disappear beautifully into the seams.
Exploring Gentle Curves and Wavy Lines
Think a walking foot can only do straight lines? Think again! You can create gorgeous, organic wavy lines and gentle curves that add a soft, flowing texture to your quilt. And the best part? It's incredibly forgiving for beginners.
Don't try to force a sharp turn. Instead, think of it as gently steering your quilt. With both hands flat on your quilt sandwich, slowly guide it left and right as you sew to create a meandering path. It’s a rhythmic, almost relaxing, motion once you get into it.
- Practice First: Always warm up on a scrap quilt sandwich to find a comfortable rhythm.
- Keep it Gentle: Avoid sharp, sudden turns. They'll just cause the fabric to bunch up.
- Embrace Imperfection: The beauty of wavy lines is their organic feel. They aren't supposed to be perfect!
Whether you're tackling crisp straight lines or soft curves, your walking foot is the tool that will get you there smoothly. To make the process even more of a joy, pair your skills with great materials. At Linda's, we've curated a fantastic selection of premium batting and threads that will help your project shine and ensure it lasts for generations.
Unlocking Your Walking Foot's Full Potential
While the walking foot is definitely the champion for quilting, keeping it just for that one job is like owning a sports car and only driving it to the grocery store. This powerful tool can solve so many everyday sewing headaches, turning frustrating tasks into total successes.
Let’s dig into some of the other areas where your walking foot will become your absolute go-to. Once you get the hang of using it for these other jobs, you'll find yourself reaching for it far more often than you ever imagined. It's a true workhorse.
Perfectly Matched Plaids and Stripes
There's nothing more satisfying than a perfectly matched plaid seam. And on the flip side, few things are more frustrating than finishing a seam only to see your stripes are off by a quarter-inch. The walking foot is the secret weapon for getting that professional, store-bought look.
A standard presser foot can cause the top layer of fabric to "creep" forward, which is what throws your patterns out of whack. Because the walking foot grips and feeds both layers at the same time, it stops that creep in its tracks. Your plaids and stripes stay perfectly aligned from start to finish.
Taming Tricky and Unconventional Fabrics
Ever tried sewing with vinyl or leather? It often sticks to a standard metal presser foot, creating a mess of uneven stitches. Or maybe you've wrestled with plush minky or velvet, which just wants to shift and stretch all over the place. This is exactly where the walking foot shines.
Its dual-feed action gives you a steady, even grip on fabrics that are normally a pain to control.
- Vinyl, Leather, and Laminated Cottons: The feeding mechanism prevents the material from sticking or dragging, so it glides smoothly for consistent stitches.
- Minky, Velvet, and Fleece: It gently feeds these plush, shifty fabrics without stretching them, making it perfect for soft blankets and cozy clothes.
- Knits and Jersey: For stable knits, the walking foot is fantastic for preventing wavy, stretched-out seams and hems.
Using a walking foot on these materials is a total game-changer. It takes a frustrating experience and makes it controlled and even enjoyable, opening up a whole new world of projects you might have been avoiding.
Conquering Bulky Layers and Binding
Finishing a quilt with binding is the final hurdle, and it means sewing through the thickest part of your project. Your walking foot is built for this. It powers through all those layers—the quilt sandwich plus the folded binding—without skipping a single beat.
The same goes for other bulky sewing tasks, like attaching straps to a heavy canvas tote or topstitching thick denim seams. The walking foot keeps everything under control, ensuring your stitches are even and your layers don't shift.
Quick Project Ideas to Get You Started
Ready to give it a try? Here are a couple of fun, simple projects perfect for mastering your walking foot beyond quilting:
- A Simple Vinyl Tote Bag: Grab some fun, printed vinyl and stitch up a quick tote. Your walking foot will handle the sticky fabric beautifully, making topstitching the handles a breeze.
- A Plush Minky Baby Blanket: See just how easy sewing with minky can be! The walking foot will prevent stretching, letting you create a super-soft, professional-looking blanket with perfectly straight seams.
To get started on your next creation, check out the incredible selection of specialty fabrics, from vibrant vinyls to the softest minky, at Linda's. We have all the notions and high-quality materials you need to confidently tackle any project with your trusty walking foot.
Your Walking Foot Questions Answered
Even after you get the hang of it, a few questions always seem to pop up when sewers start using this fantastic tool. Let's clear up some of the most common ones so you can get back to your projects with total confidence.
Why Is My Walking Foot So Noisy?
One of the first things you'll probably notice is that your walking foot is… well, louder than a standard presser foot. That distinct clicking or clacking sound is perfectly normal! It’s just the sound of the internal mechanism—the lever and the extra set of feed dogs—doing their job with every stitch.
However, if you hear a loud grinding or a heavy clunking noise, that’s a red flag. This almost always means the foot wasn't installed quite right. The most common culprit? The C-shaped fork isn't sitting properly on the needle clamp screw. Stop what you're doing, turn off your machine, and reinstall the foot, making sure that connection is snug and secure.
Do I Need a Special Walking Foot for My Machine?
Yes, and this is critical. Walking feet are not a one-size-fits-all accessory. Compatibility all comes down to your machine's shank height—it's either a low-shank or a high-shank model. Using the wrong one simply won't work and could even risk damaging your sewing machine.
While there are generic feet on the market, you'll always get the best fit and performance from a walking foot designed by your machine's manufacturer (like Bernina, Janome, or Brother). These are engineered to work in perfect harmony with your specific machine.
Choosing the right walking foot is the foundation for success. An ill-fitting foot will cause more problems than it solves, leading to skipped stitches and a lot of frustration. It's a small investment that makes a huge difference in your results.
You can find a full selection of brand-specific and compatible walking feet to get the perfect match for your machine right here at Linda's.
Can I Sew in Reverse with a Walking Foot?
Technically, yes, but you should do it carefully and only for a few stitches to lock a seam. The walking foot’s whole mechanism is designed for a complex, synchronized forward motion. A lot of aggressive backstitching puts unnecessary strain on all those moving parts.
For securing your seams, here’s a much better approach:
- Drop your stitch length: For the last couple of stitches, just shorten your stitch length way down (to about 1.0mm). This locks the seam in place beautifully without needing to go in reverse.
- Keep it minimal: If you absolutely have to backstitch, go slowly and for just two or three stitches at most.
Making this small adjustment to your sewing habit will help protect your walking foot and give it a long, happy life in your sewing room.
Can I Use a Walking Foot for All My Sewing?
While it's an amazing problem-solver, you shouldn't leave the walking foot on for every single task. It really shines when you need that controlled, even feed for bulky layers or slippery fabrics. For other jobs, a standard or more specialized foot will give you much better results.
| When to Use a Walking Foot | When to Use a Standard Foot |
|---|---|
| Straight-line quilting through batting | General piecing of cotton blocks |
| Matching plaids, stripes, or patterns | Sewing sharp curves or tight corners |
| Sewing with velvet, minky, or vinyl | Attaching a zipper (use a zipper foot) |
| Attaching bulky quilt binding | Creating buttonholes (use a buttonhole foot) |
Think of it like using the right knife in the kitchen. A chef's knife is a workhorse, but you wouldn't use it to peel an apple. Knowing when to use your walking foot—and when to swap it out—is a key skill for any confident sewer.
Feeling ready to tackle that next big quilting or bag-making project? The right tools make all the difference. At Linda's, we have a huge selection of high-quality walking feet, specialty fabrics, and premium threads to bring your creative vision to life. Explore our collection and find everything you need to finish your project with professional results. Shop now at lindas.com


