

Yes, you absolutely can achieve those stunning, intricate patterns by quilting with an embroidery machine. This technique turns the machine you already have into a precision quilting tool, letting you automate complex designs that would be a real headache to create with traditional free-motion quilting. It's a game-changer for getting professional, consistent results on your projects.
Your Embroidery Machine's Secret Quilting Talent
Have you ever seen a beautifully quilted project, with its perfectly spaced stitches and complex patterns, and felt a little overwhelmed? A lot of us assume those results are only possible with a pricey longarm machine or years of painstaking free-motion practice.
But what if the secret to elevating your quilting was already sitting in your craft room?
Your embroidery machine is so much more than a tool for adding monograms or cute motifs; it’s a powerful quilting partner just waiting to be unleashed. Using specialized quilting designs, your machine can stitch through the entire quilt sandwich—the top, batting, and backing—with incredible accuracy. This method opens up a whole new world of creative possibilities.
What Can You Create?
Thinking about quilting with an embroidery machine isn't just about the how; it's about the what. This method is perfect for a huge range of projects, adding a professional touch to anything you dream up. Imagine crafting a vibrant collection of quilted play mats or personalized throws with total confidence.
This technique also lets you explore different quilting styles without the steep learning curve:
- Edge-to-Edge Quilting: Create those beautiful, seamless, all-over patterns that cover your entire quilt top for a cohesive and polished look.
- Block-by-Block Quilting: Quilt intricate designs within individual quilt blocks before piecing them together. This makes it so much easier to handle larger projects on a smaller machine.
- Custom Motifs: Place specific quilting designs—like feathers, florals, or geometric shapes—in your sashing, borders, or right in the center of your blocks to really make parts of your quilt design pop.
The real beauty of quilting with an embroidery machine is the perfect blend of automation and creativity. You choose the design and placement, and the machine executes it with flawless precision every single time.
This guide is designed to take the mystery out of the whole process. We're focusing on practical, repeatable steps to help you build confidence and create quilts you'll be proud of. It’s time to unlock the full potential of the machine you already own.
Let's start making something beautiful together. First things first, you'll need the right supplies. At Linda's, we have everything you need, from the perfect thread to high-quality batting, to make sure your project is a runaway success.
How to Prepare Your Quilt Sandwich
Before your embroidery machine can even think about stitching, you need to get your foundation right. I'm talking about the "quilt sandwich," and getting this part perfect is probably the most important thing you'll do. A well-made sandwich ensures your fabric feeds like a dream and stops those dreaded puckers and shifts that can completely ruin a beautiful design.
Think of it this way: you wouldn't build a house on a wonky foundation, right? The same goes for your quilt. Your three layers—the top, the batting, and the backing—have to become one single, stable unit. This is especially true when an embroidery machine is involved, since the hoop's movement can easily pull and distort layers that aren't properly secured.
Choosing Your Batting
First things first, let's talk about the filling for your sandwich: the batting. This is the heart of your quilt, giving it warmth, drape, and character. What you pick here can totally change the finished product.
- Cotton Batting: This is the old faithful. It’s soft, breathable, and drapes beautifully. Being a low-loft (thinner) batting, it gives you that classic, slightly crinkled look after a wash. It’s my go-to for an all-around great result.
- Polyester Batting: Looking for more puff and loft? Polyester is your friend. It's super light but holds its shape really well, which makes it perfect for quilts that are going to get a lot of love and see the inside of a washing machine often.
- Wool Batting: For incredible warmth without feeling heavy, wool is a bit of a luxury. It has a natural springiness that resists creasing, which is a lifesaver for heavily quilted pieces.
- Blends (Cotton/Poly): Can't decide? Blends give you the best of both. You get the softness of cotton paired with the durability and stability of polyester.
Whatever your project calls for, we've got the perfect batting for you right here at Linda's. We carry a huge selection to match any quilt you can dream up.
The infographic below breaks down the simple journey from a pile of fabric to a finished quilt.
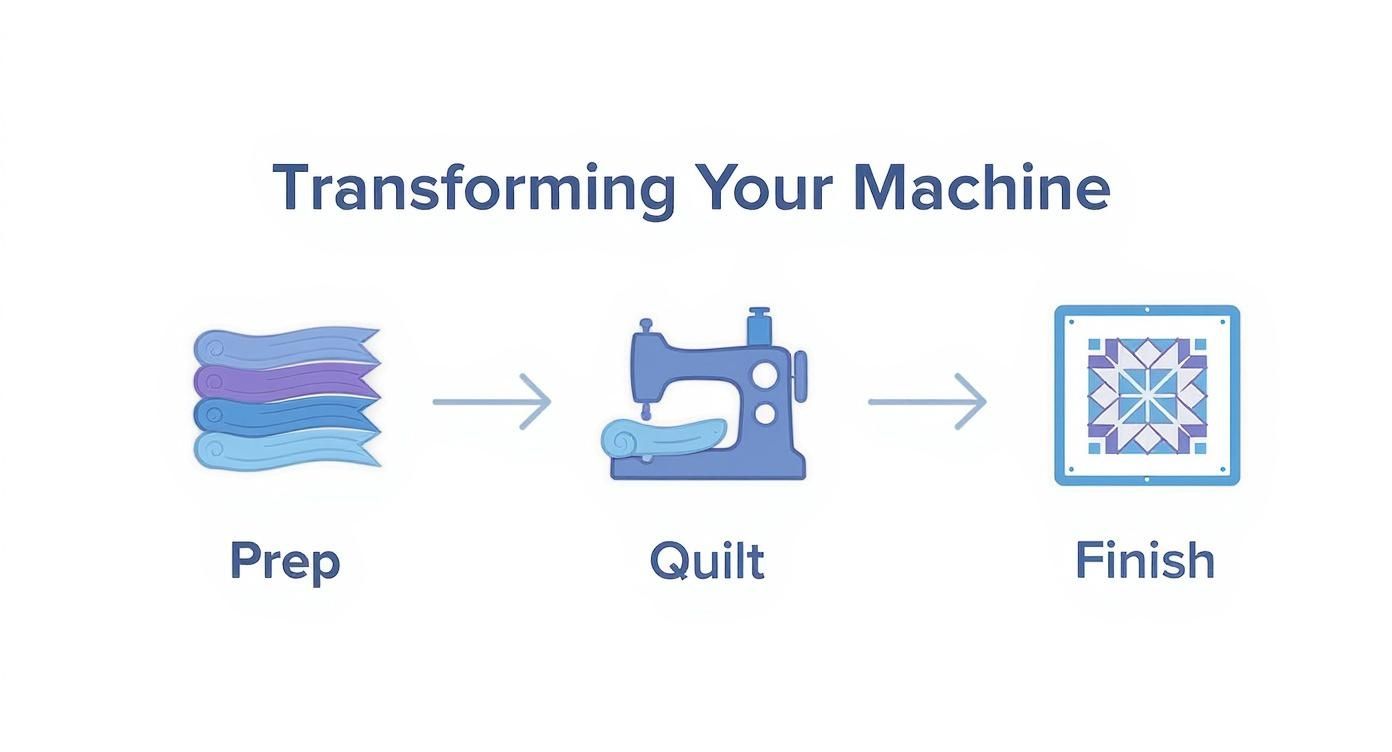
As you can see, that first prep stage is everything. It sets you up for success before the machine even gets threaded.
Basting Your Layers Securely
Once you’ve got your layers picked out, it's time to "baste" them together. Basting is just a temporary way to hold everything in place so nothing shifts around while you're quilting. For machine embroidery quilting, a securely basted quilt is non-negotiable.
Seriously, take the extra time to baste your quilt sandwich properly. A smooth, secure foundation will save you a world of frustration later by preventing puckers and fabric from bunching up under the needle.
There are a few ways to get this done:
- Spray Basting: This is the fast and popular route. A light mist of temporary spray adhesive between each layer does the trick. Just be sure to smooth the fabric from the center outwards to get rid of any wrinkles. It gives a really nice, even hold.
- Pin Basting: This involves using special curved safety pins to secure all three layers every few inches. It’s a super reliable method and doesn't involve any chemicals, but it definitely takes more time and patience.
- Hand Basting: The old-school technique. You use a needle and thread to make big, running stitches to hold it all together. You get a ton of control this way, but it's easily the most labor-intensive choice.
Whichever path you take, the mission is the same: create a smooth, stable canvas that’s ready for your embroidery machine to work its magic.
Setting Up Your Machine for Perfect Stitches

Okay, your quilt sandwich is basted and ready to go. Now it's time to get the star of the show—your embroidery machine—dialed in. Honestly, getting the machine settings just right is what separates a frustrating afternoon from a fantastic one. This is where we fine-tune everything to avoid those dreaded skipped stitches, thread breaks, and tension headaches.
The explosion in home quilting with embroidery machines is no big surprise when you see the tech. Today, automated, computerized machines make up a whopping 65.6% of the global market revenue, and that figure is expected to blow past 75% by 2030. Those single-head machines we all love for home use are a huge driver of this growth. If you're curious, you can dig into the industry trends and market insights to see just how big this has gotten.
Hooping Your Quilt Sandwich Correctly
The first real challenge is wrangling a bulky quilt sandwich into an embroidery hoop without stretching or messing up the fabric. It’s a super common beginner mistake that almost always ends in puckered stitches. The secret? Don’t force it.
Gently lay your quilt sandwich over the bottom ring of the hoop, making sure the area you plan to quilt is right in the center. Next, place the top ring over it and press down just enough to lock it in place. You’re aiming for a taut surface, not a drum-tight one. Think firm, but not stretched.
Pro Tip: Whatever you do, never pull the sides of your quilt to tighten it in the hoop. That stretches the fabric on the bias and is a one-way ticket to a puckered mess once you unhoop it. Just let the hoop itself secure the layers as they are.
Needles, Threads, and Tension
Alright, let's talk about the little things that make a huge difference in your stitch quality. These three elements—needles, thread, and tension—all work together. Getting the combo right is absolutely crucial.
- Needle Selection: Put that standard embroidery needle away. A Topstitch 90/14 needle is usually your best bet. It has a larger eye to handle thicker quilting thread and a sharp point that punches through those dense layers cleanly. A dedicated quilting needle is another fantastic choice.
- Thread Choice: Go for a high-quality 40-weight cotton or polyester thread. This weight is strong enough for quilting but still fine enough for gorgeous, defined stitches. Here at Linda’s, we’ve got a whole rainbow of perfect threads from top-tier brands like Aurifil and Glide.
- Tension Adjustments: Your machine's default embroidery tension is probably too tight for a thick quilt sandwich. The goal is a perfectly balanced stitch where the top and bobbin threads meet right in the middle of your layers. Always run a quick test on a scrap piece of your quilt sandwich to check for any pulling or little dots of bobbin thread showing on top.
One last piece of advice before you hit "start": slow down your machine's embroidery speed a bit. Quilting through all those layers is hard work, and you'll find that a slower, more controlled pace almost always gives you the most beautiful and consistent stitches.
Mastering Your Quilting Stitch-Out
Alright, this is the exciting part! All that careful prep is about to pay off as your quilt starts to come to life. Your sandwich is basted, your machine is ready—it’s time to get stitching.
When you're quilting with an embroidery machine, you've basically got two ways to go. You can tackle it block by block, or you can quilt the entire finished top in one fell swoop. Which path you choose really comes down to the size of your quilt and the throat space on your machine.
The Block-by-Block Method
Quilting one block at a time is an absolute lifesaver for big quilts on a home embroidery machine. You’re not trying to wrestle the entire bulk of a king-size quilt through your machine; you're just focused on one manageable square. It's so much less intimidating.
Hooping is pretty straightforward here. For each block, you'll make a little mini quilt sandwich: your pieced top, a slightly larger piece of batting, and your backing fabric. Hoop it up just like you practiced—nice and taut, but not stretched—and let the machine do its thing.
Once your blocks are all quilted, you'll trim them down to size. The trickiest part is joining them together. You have to be smart about managing the seam allowances, otherwise, the spots where the corners meet can get really thick and lumpy.
A little pro tip for joining quilted blocks: press your seams open. This helps distribute all that bulk evenly and makes a huge difference in getting your finished quilt top to lay nice and flat.
Quilting a Full Quilt Top
For smaller projects like baby quilts or table runners—or if you're lucky enough to have a machine with a big throat space—quilting the whole top at once is incredibly satisfying. This is how you get those gorgeous, flowing, edge-to-edge designs that cover the quilt seamlessly.
The real challenge here is managing all that fabric. I like to roll the sides of the quilt up tightly and use quilt clips or even wonder clips to keep everything contained and out of the embroidery field. It’s also a must to have a table or something to support the weight of the quilt so it’s not pulling and dragging on your hoop.
Perfectly re-hooping is the make-or-break skill for this technique. You have to line up each new section precisely with what you’ve already stitched to keep the pattern continuous. Thankfully, a lot of modern quilting embroidery designs are built with placement marks or alignment stitches that make this process a whole lot easier.
Finding the Perfect Quilting Design
The way we quilt has been completely changed by the internet. It's estimated that 25–35% of all sewing and embroidery machine sales now happen online, which has created a massive boom in digital resources. There are endless libraries of downloadable embroidery patterns out there. You can actually read more about how the digital marketplace has grown and what it means for creators like us.
Finding the right design is half the fun! Are you feeling classic feathers, crisp geometric lines, or something more whimsical? Whatever your vision, the perfect design is out there waiting for you.
To get your project started on the right foot, come check out the amazing selection of quilting embroidery files right here at Linda's. We’ve put together a collection that’s perfect for both block-by-block and edge-to-edge quilting. Let us help you find a design that gets you excited to start stitching
Adding the Final Touches to Your Quilt
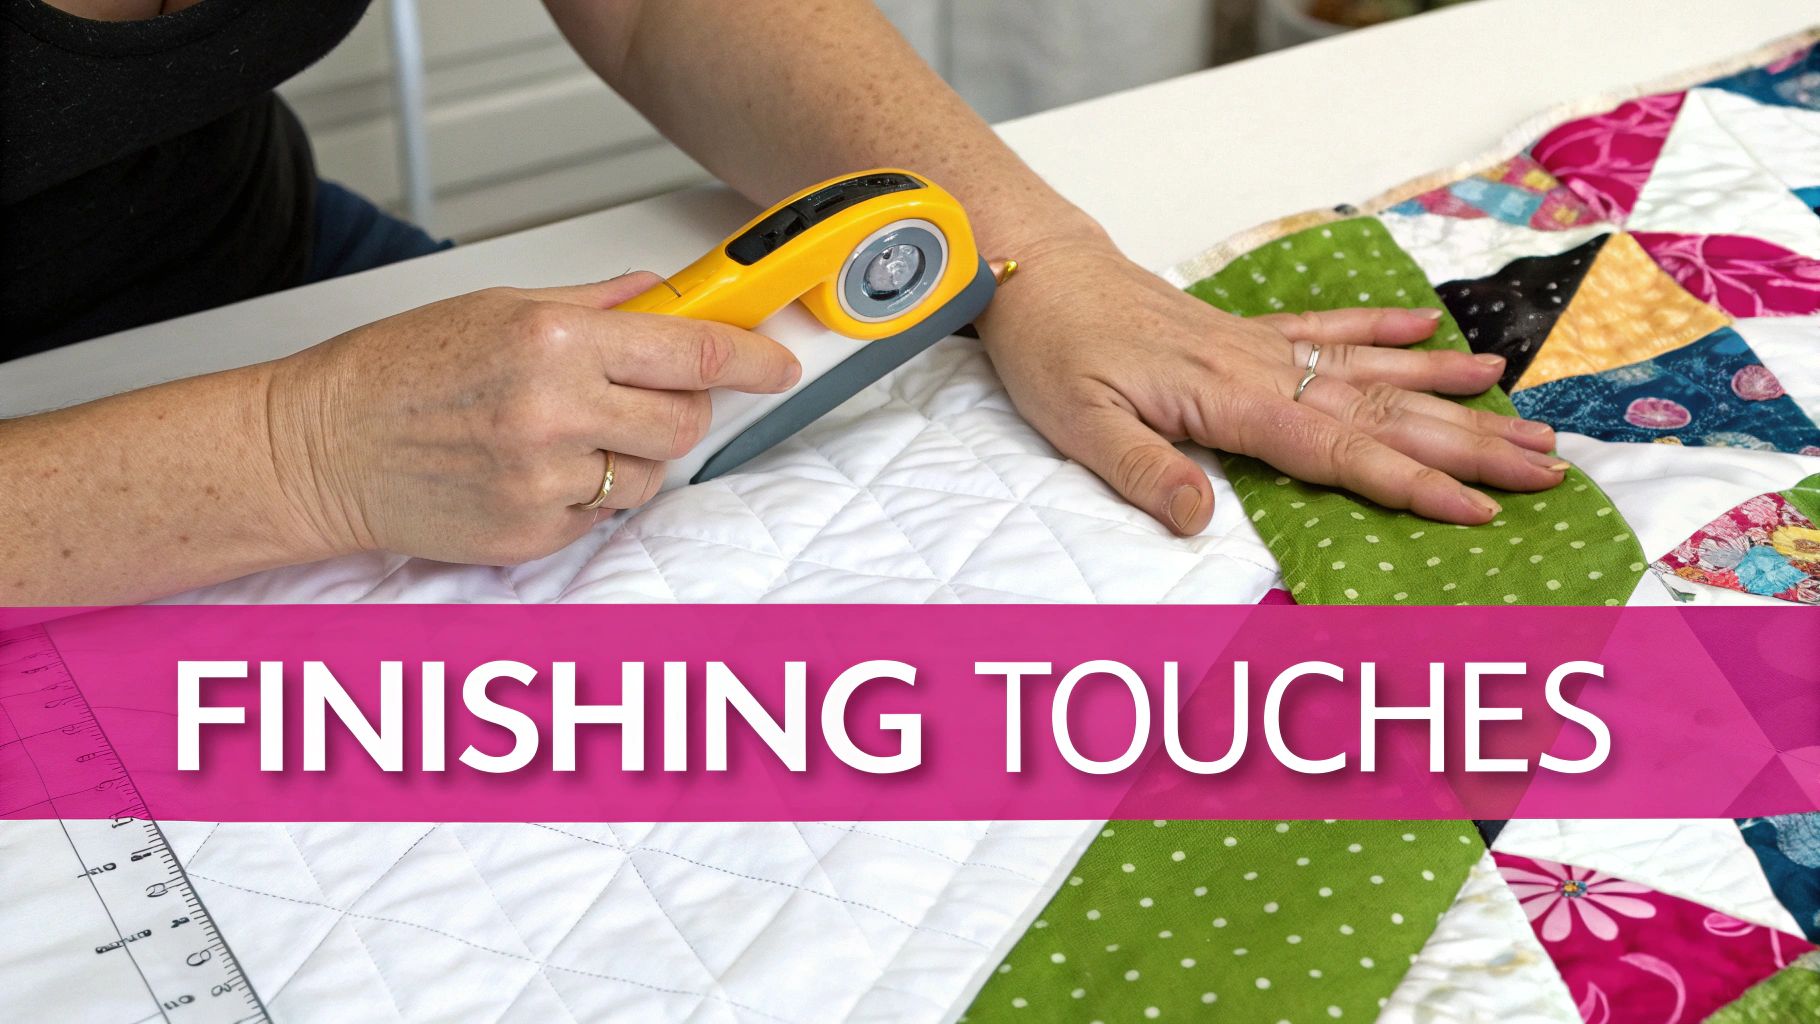
You’ve done all the beautiful embroidery work, and the finish line is in sight. But these next steps are what really make a quilt sing. We're talking about the details that elevate your project from a pretty top to a true heirloom piece that can stand the test of time.
Before we even get to the binding, though, we have to prep our canvas. That means squaring up the quilt.
This part is absolutely non-negotiable if you want a professional look. After hours of stitching, it's totally normal for the edges to be a little wavy or uneven. Squaring up is simply the process of trimming the excess batting and backing fabric to get perfectly straight sides and crisp, 90-degree corners.
Squaring Up for a Perfect Finish
To nail those clean edges, you'll need a large self-healing mat, a good rotary cutter with a fresh blade, and a long acrylic ruler. Don't just eyeball it!
Lay your quilt out flat and, here’s the key, align your ruler with one of the straight seams inside your quilt top. This is a game-changer because it ensures your cuts are perfectly parallel to your piecing, not just following an already wonky edge.
Make your first cut along one side. Then, rotate the whole quilt 90 degrees and repeat the process, using that brand-new clean edge as your guide. Taking your time here is what saves you from the headache of a lopsided quilt later on.
A sharp rotary blade is your best friend during this process. A dull blade can snag and pull your fabric, potentially distorting the edges you just worked so hard to stitch.
Attaching the Binding
With your quilt squared up and looking sharp, it’s time to add the binding. This is the fabric border that wraps around those raw edges, protecting the quilt's structure and giving it that beautiful, polished frame. While there are a few ways to do it, I find machine-stitching to be both fast and incredibly durable.
Here’s my go-to method:
- Prep the Strips: Cut your binding fabric into strips, usually 2.5 inches wide. Join them end-to-end to create one long, continuous piece that can go all the way around your quilt.
- Attach to the Front: Line up the raw edge of your binding with the raw edge of your quilt top. Start sewing somewhere in the middle of one side, using a ¼-inch seam allowance.
- Miter the Corners: This is the trickiest part for some, but it's easy once you get the hang of it. Stop stitching ¼ inch from the corner, backstitch, and take the quilt out. Fold the binding strip up and away from the quilt (creating a 45-degree angle), then fold it straight back down along the next side. Start your stitching again right from the top edge. Perfect mitered corners every time!
- Join the Ends: When you've made it all the way around, join the two ends of your binding strip together for a seamless finish.
- Secure the Back: Now for the final step. Wrap the binding around to the back of the quilt and stitch it down. For a finish that looks almost invisible from the front, try "stitching in the ditch" right in the seam you already created.
Getting these final touches right comes down to precision and having the right gear. For the sharpest cuts and most reliable results, you need quality tools. Visit Linda's to explore our curated selection of top-notch rotary cutters, rulers, and threads that make finishing your quilt just as fun as creating it.
We Get These Questions All The Time
Even after laying everything out, it's totally normal to have a few lingering questions before you dive into quilting with your embroidery machine. Let's walk through some of the most common ones we hear in the shop. Hopefully, this will give you that extra boost of confidence to get started.
Is My Embroidery Machine Strong Enough for Quilting?
This is, without a doubt, the number one concern we hear. The short answer? Almost certainly, yes.
Most home embroidery machines these days are built to handle multiple fabric layers. The real secret isn't about brute force; it's about using the right tools for the job. A fresh topstitch or quilting needle and some quality 40-weight thread will make a world of difference, helping your machine punch through that quilt sandwich smoothly.
One of the best things you can do? Just slow your machine down a bit. This simple adjustment dramatically reduces strain on the motor and gives you much cleaner, more accurate stitches.
What’s the Best Stabilizer for This Technique?
Since your quilt sandwich is already pretty stable on its own, you really don't need a heavy-duty stabilizer.
For this kind of work, a light to medium-weight tear-away stabilizer is usually your best bet. It gives just enough support to keep the stitches from distorting while you're embroidering, but it comes off easily when you're done. This keeps your finished quilt beautifully soft and flexible.
Whatever you do, stay away from the heavy cut-away stabilizers. They'll stay inside the quilt forever and can make it feel stiff and board-like.
The stabilizer's job here is just to support the stitches as they're being formed, not the fabric itself. Your basted quilt sandwich is already doing all the hard work.
Can I Use Any Embroidery Design for Quilting?
Technically, you could, but you probably shouldn't. You'll get much, much better results if you stick to designs that were specifically digitized for quilting.
These files are designed with long, continuous lines and avoid dense, heavy fills—perfect for stitching through three layers. Trying to use a standard, dense embroidery design often leads to a stiff, bulletproof patch on your quilt and can even cause needles to snap.
Look for designs labeled for quilting, edge-to-edge, or even redwork. They'll give you a smoother ride and a finish that looks like it was done by a pro.
If you're curious about what makes a quilt a quilt in the first place, it's worth exploring the differences between a comforter and a quilt. Understanding this can really help you make smart choices about your quilting designs.
Here at Linda's, our goal is to give you the know-how and the right supplies to make every project a success. If you've got more questions or need a hand picking out the perfect quilting design or tool, our team is always ready to help. Come explore our huge collection and start your next quilting adventure by visiting us at https://lindas.com.


