
So, you want to make a t-shirt quilt? At its heart, the process is pretty straightforward: you stabilize that stretchy t-shirt fabric, cut your shirts into uniform blocks, and sew them all together into a quilt top. After that, it’s just a matter of layering it with batting and a backing fabric before stitching through all three layers to finish it off.
The end result? You’ve turned a pile of sentimental clothes into a functional, memory-filled keepsake. This guide will walk you through every step, ensuring your project is a success.
Your Guide to Crafting a Perfect T-Shirt Quilt
Welcome to the incredibly rewarding world of t-shirt quilting! Think of this guide as your complete roadmap for transforming that stack of cherished shirts into a beautiful, functional keepsake that tells a story. We'll provide the educational foundation and point you to the amazing products at Linda's to help you finish your project with professional results.
T-shirt quilts are so much more than just blankets—they're memory quilts. Each square represents a moment in time: a concert, a sports team, a favorite vacation, or a school event. When you stitch these pieces together, you aren't just sewing fabric; you're preserving a personal history. It's no wonder this craft has become such a beloved way to upcycle clothing that might otherwise just stay hidden in a drawer.
The Rise of Memory Quilting
The interest in creating personalized, handcrafted items is definitely on the rise. In fact, the global quilt market hit about USD 5.32 billion in 2024 and is expected to climb to nearly USD 9.26 billion by 2034. This huge growth really shows how much people value artisanal, one-of-a-kind textile products. T-shirt quilts are a huge part of that trend.
This project is the perfect way to create something both meaningful and practical. And if you get hooked on preserving memories, you might also find some great ideas in this guide to crafting a perfect baby memory book for other life milestones. Both projects are all about the art of storytelling through keepsakes you can touch and feel.
Essential Supplies for Your Project
The secret to a smooth and enjoyable quilting process? Gathering all your tools and materials before you even think about making that first cut. Being organized from the get-go makes all the difference.
To make sure you’re ready to hit the ground running, we've put together a handy checklist of all the essential supplies you'll need. Linda’s has all the high-quality products you need to get started.
Your T-Shirt Quilt Supply Checklist
Here are the essential tools and materials you'll need to begin your t-shirt quilt project, from fabrics to cutting tools.
| Category | Item | Expert Tip (CTA Opportunity) |
|---|---|---|
| Fabric Preparation | Fusible Interfacing | A high-quality interfacing is non-negotiable! It stops the t-shirt knit from stretching out of shape. Shop professional-grade interfacing at Linda's! |
| Cutting Tools | Rotary Cutter & Self-Healing Mat | These tools are your best friends for getting those perfectly straight, accurate cuts every time. Find the perfect size for your project at Linda's. |
| Cutting Tools | Clear Acrylic Quilting Rulers | Essential for measuring and cutting uniform blocks. Get a few different sizes for maximum versatility. Explore our selection of rulers today! |
| Sewing Essentials | Sewing Machine | A reliable machine that can handle multiple layers is a must for quilting. |
| Sewing Essentials | Quality Thread & Pins/Clips | Don't skimp here! Good thread prevents breakage, and plenty of pins or clips keeps everything aligned. Stock up on premium thread at Linda's. |
| Finishing Fabrics | Cotton Fabric for Sashing & Backing | Pick a coordinating cotton for sashing (the fabric between blocks), borders, and the quilt back. Find beautiful, high-quality cottons at Linda's. |
| Finishing Fabrics | Quilt Batting | This is the fluffy middle layer that gives your quilt warmth and dimension. We carry the best batting to ensure your quilt is cozy. |
Getting these basics together will set you up for a fantastic quilting experience.
Expert Tip: The two things you should never skimp on are your interfacing and your backing fabric. The quality of these foundational materials directly impacts how durable your quilt will be and how professional it looks in the end. Visiting Linda's for premium interfacing and a wide selection of coordinating fabrics will set your project up for success from the very beginning.
Preparing and Stabilizing Your T-Shirts
If you want a t-shirt quilt that looks amazing and holds up for years, the prep work is where the magic really begins. This is the foundation of your entire project. Trust me, taking your time here will save you a world of headaches down the road, ensuring everything is stable, flat, and ready to sew.
First things first, let's pick our all-stars. Sift through your pile of shirts and pull out the ones with graphics that are still in decent shape—avoid anything that’s super cracked, peeling, or faded into oblivion. The fabric matters, too. You’ll have a much easier time with shirts that are 100% cotton or a blend with a high cotton content.
Washing and Shrink-Proofing
Every single shirt needs a trip through the washer and dryer. No exceptions! Even if they look clean, this step is non-negotiable. Washing gets rid of any leftover fabric softeners or sprays that can prevent the fusible interfacing from sticking properly.
More importantly, it pre-shrinks the fabric. If you skip this, your t-shirt blocks could shrink after you’ve sewn them into the quilt top, which causes all sorts of ugly puckering and distortion. For a deep dive, it's worth learning how to prevent clothes from shrinking to give yourself extra peace of mind. Just use a basic detergent (no softener!) and tumble dry them completely.
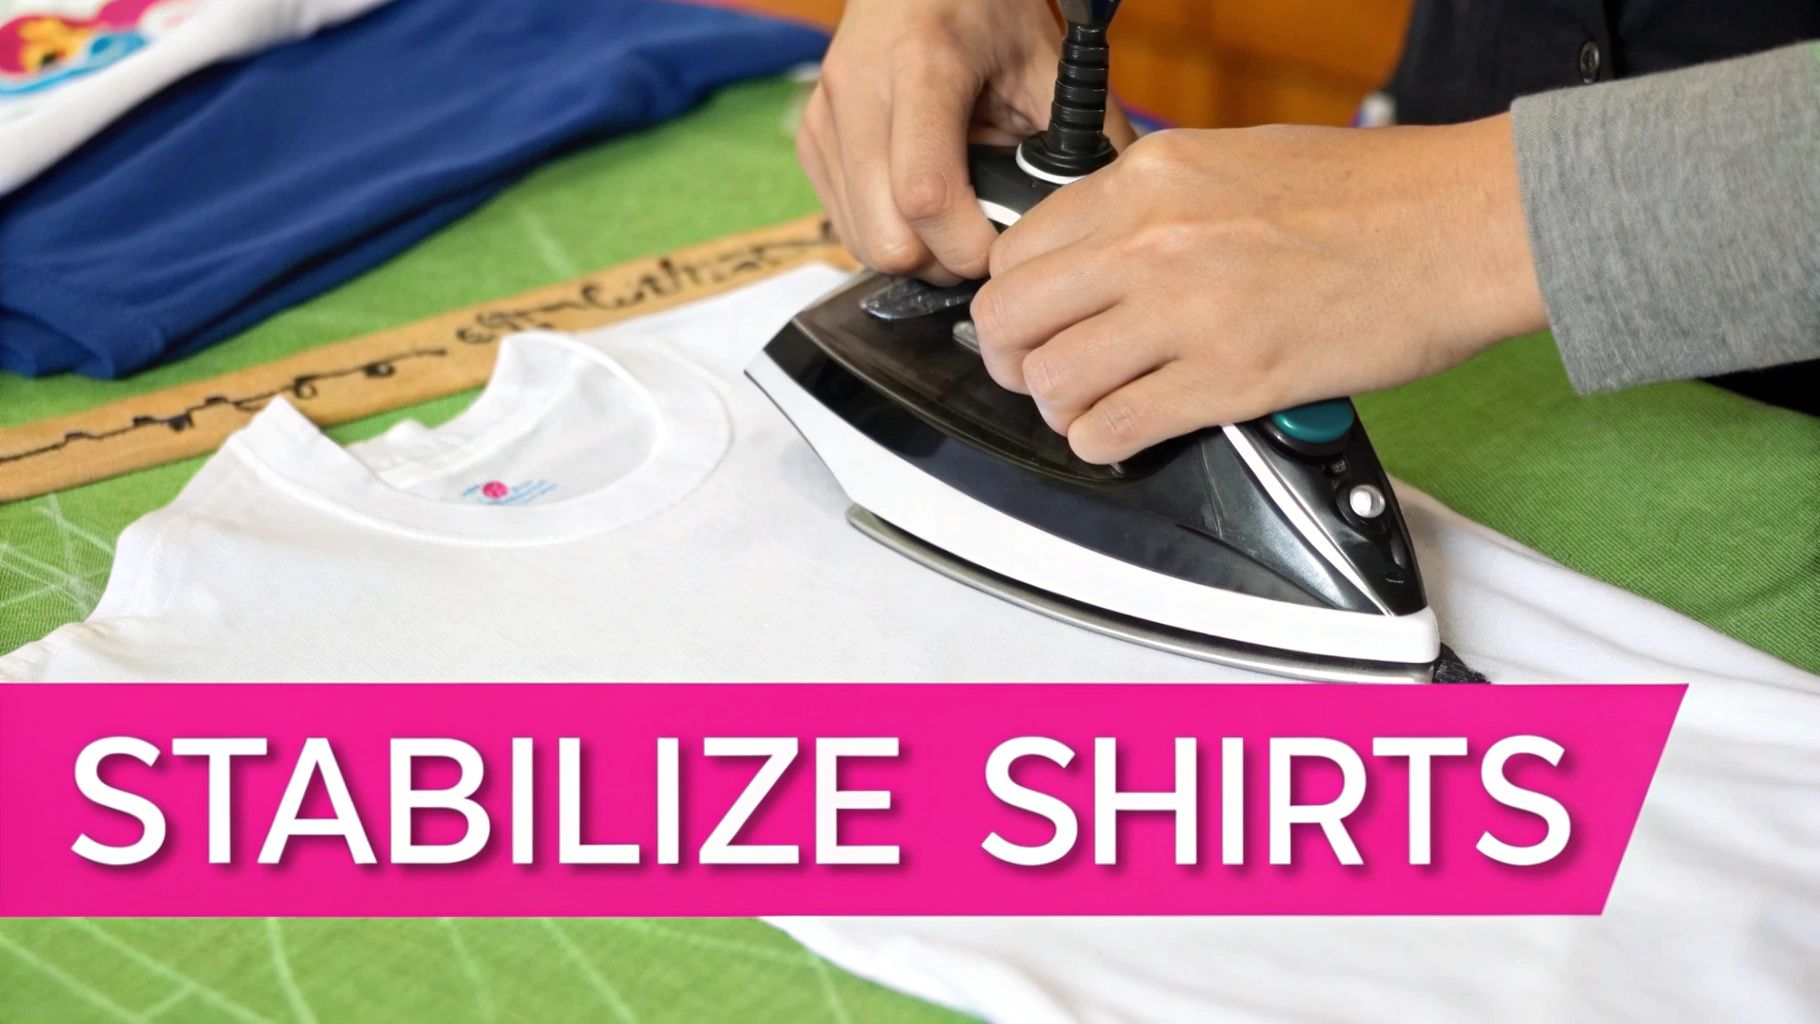
The Magic of Fusible Interfacing
Here's the deal with t-shirt material: it's a knit fabric, which means it’s built to stretch. That's fantastic when you're wearing it, but an absolute nightmare when you're trying to quilt with it. Sewing with stretchy, unstable fabric leads to warped blocks, wavy seams, and a quilt top that refuses to lie flat.
The secret weapon to fix this is fusible interfacing. This stuff is a game-changer. It’s a woven material with a heat-activated adhesive on one side. When you iron it onto the back of your t-shirt, it completely tames the stretch, making that floppy knit behave just like a dream woven cotton. This is probably the most critical step for getting a professional-looking finish.
Here’s why you absolutely can't skip interfacing:
- It Stops the Stretch: Interfacing provides the structure you need to cut perfectly square and accurate blocks.
- It Guarantees Flat Seams: When your blocks are stable, they sew together cleanly and precisely.
- It Adds Serious Durability: This extra layer gives your quilt a longer life, helping it handle all the love and snuggles it’s going to get.
I always recommend a quality, lightweight interfacing like Pellon SF101 Shape-Flex. It’s pretty much the industry standard for a reason. It adds the perfect amount of stability without making your quilt feel stiff or bulky. The right product really does make all the difference.
Applying it is simple, but you need to pay attention. You’ll be working on the back of the t-shirt, making sure your iron is set to the right temperature and you apply good, even pressure. For a complete tutorial on getting this just right, check out our guide on how to use fusible interfacing.
Once your shirts are stabilized, you’re officially ready for the fun part—designing and cutting your blocks! And if you need to stock up, you can find the perfect interfacing for your project, like the Pellon SF101, right here at Linda's.
Designing and Cutting Your Quilt Blocks
Now that your shirts are stabilized and ready to go, we get to the fun part—designing the layout and actually cutting your blocks. This is where that pile of memories starts to look like a real quilt and its personality begins to shine through.
Don't worry about hard-and-fast rules here; there really aren't any! You could go for a classic grid where every block is the same size, which creates a very uniform look. Or, you could get creative with a mosaic or "puzzle" style layout that mixes different sizes of squares and rectangles. I find this second option is perfect for quilts that have shirts with all sorts of graphic sizes.
Mastering Your Cutting Tools
For clean, accurate blocks, you'll want to lean on a few key tools: a rotary cutter, a clear acrylic quilting ruler, and a self-healing cutting mat. Trust me, using these in tandem is the secret sauce for perfectly straight cuts. It makes piecing the quilt top together so much smoother down the line. Scissors simply can’t deliver the same crisp, professional edge. You can find a complete range of professional cutting tools at Linda's to guarantee your success.
When you're ready to cut, lay a stabilized shirt flat on your mat and use the ruler to frame the graphic. Here's my go-to piece of advice: try to leave at least one inch of space around all sides of the main design. This buffer gives you seam allowance and some visual breathing room, so the graphic doesn't get swallowed up by the seams.
Expert Insight: Before you make a single cut, take a second to make sure the graphic is truly centered under your ruler. A logo that's even slightly off-kilter can throw off the balance of the whole quilt. I always use the grid lines on my ruler to measure the distance from the design's edge to the ruler's edge on all four sides. It’s a little extra step that guarantees it's perfectly centered.
Planning Your Layout and Sashing
Once you have a few blocks cut, clear some space on a large table or the floor and start arranging them. This is your chance to play! Move them around, see how the colors interact, and balance the different themes before you even think about sewing. You'll quickly see which blocks look best next to each other and how to alternate between busy graphics and simpler ones.
This is also the perfect moment to consider adding sashing—those strips of fabric that go between your blocks. Sashing acts like a frame for each t-shirt, giving the quilt a beautifully structured look while adding a pop of complementary color. It's also a great trick for reaching your target quilt size without needing more shirts.
If you need a hand picking out the right material, take a look at our guide on the best quilting fabric. Here at Linda's, we have a wonderful selection of high-quality cottons that are ideal for the job.
With your design locked in and your blocks cut with care, you're all set to start piecing everything together
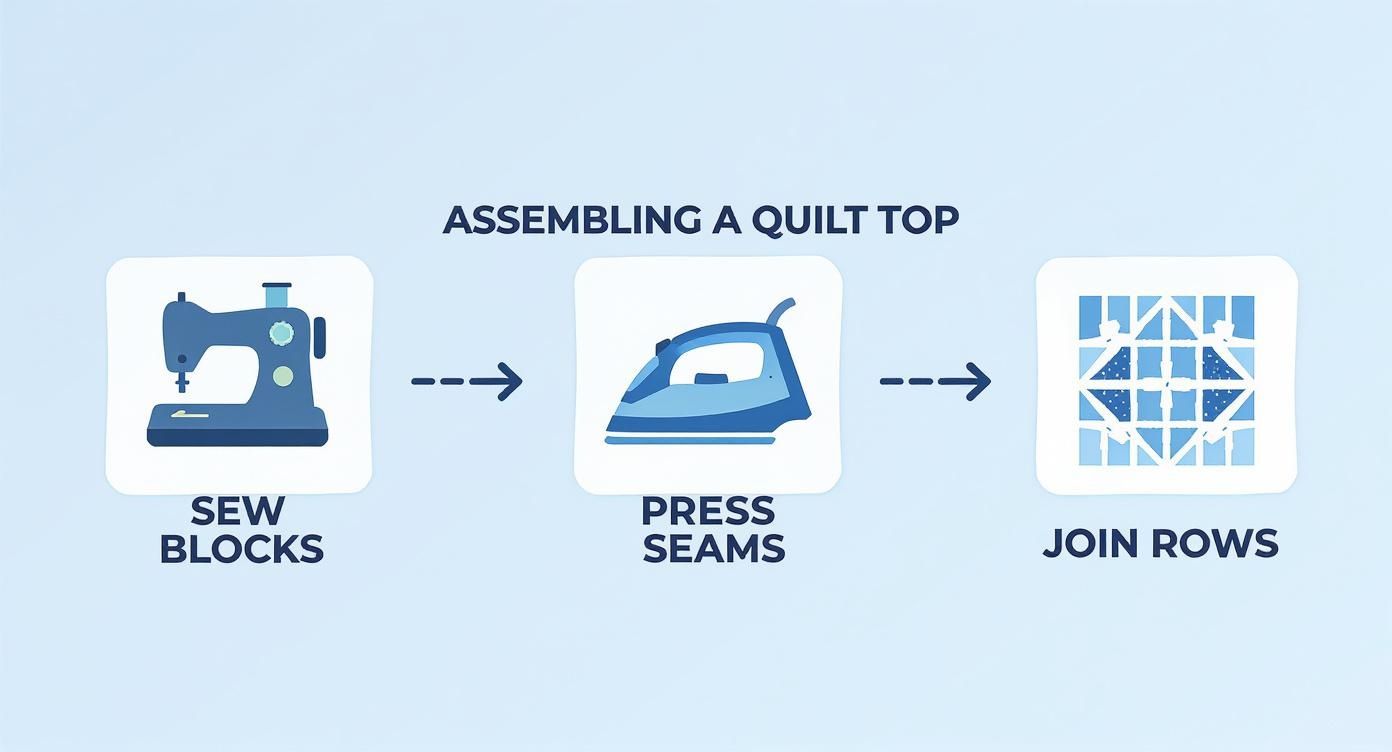
Assembling the T-Shirt Quilt Top
Now for the fun part! With all your t-shirt blocks cut and your layout looking just right, it’s time to actually start sewing this quilt together. This is where you’ll see all those individual memories finally connect and begin to tell a bigger story.
We're going to tackle this systematically by sewing the blocks into rows first. Trying to piece the whole thing at once is a recipe for chaos, trust me. So, grab the first two blocks from your top row and place them right sides together. Line up the edges as perfectly as you can and pin them in place so nothing shifts on its way to the needle.
Achieving the Perfect Seam
Consistency is your best friend in quilting. You'll want to stitch every single seam with a precise quarter-inch seam allowance. It's the gold standard for a reason—it guarantees all your blocks will fit together like puzzle pieces, keeping your rows straight and your finished quilt top perfectly square.
Most sewing machines have a quarter-inch foot that makes this foolproof, but a magnetic seam guide works just as well. Sticking to this measurement religiously is what separates a beautifully finished quilt from one with wonky, mismatched corners. Once you’ve sewn your first pair, just keep adding the next block in the row until it's complete. Linda's carries a variety of sewing machine feet and guides to help you achieve that perfect seam every time.
Pressing for a Flat Finish
Don’t even think about skipping the pressing! This is a game-changing step that helps your quilt top lay beautifully flat, which is absolutely critical for the final quilting process. You've got two main ways to go about it:
- Pressing Seams Open: This is my go-to for reducing bulk. You simply press the two seam allowances flat in opposite directions. It’s fantastic for getting crisp, flat blocks, especially where multiple corners meet up.
- Pressing Seams to One Side: The other common method is to press both seam allowances toward the darker fabric. This is great for preventing a dark seam from peeking through a lighter t-shirt. The real magic happens when you join your rows—if you press the seams in alternating directions for each row, they will "nest" together perfectly for a super-accurate join.
Pro Tip: Remember, we press, we don't iron. Scrubbing the iron back and forth can stretch out your stabilized blocks, even with the interfacing. Instead, just place the hot iron down, let it sit for a few seconds, lift it straight up, and move to the next spot.
If you decided to add sashing between your blocks, the process is pretty much the same. Just sew your sashing strips to the blocks before you join the blocks into rows. It frames each shirt so nicely. For anyone wanting to really level up their precision, taking a look at different ruler quilting templates can open up a whole new world of accuracy.
After all your rows are pieced and pressed, it's time to join them together. Use that same quarter-inch seam, take your time, and don't be shy with the pins. Before you know it, you’ll have a finished quilt top ready for quilting! And if you need the perfect fabric for your sashing or backing, Linda's has an amazing selection of high-quality cottons to complement your t-shirts.
Layering and Quilting Your Project
Alright, this is where the magic happens. Your quilt top is pieced and pressed, and now it’s time to turn that flat panel into a real, huggable quilt. Layering and quilting are all about bringing together your T-shirt top, a fluffy middle layer called batting, and the backing fabric. We call this the "quilt sandwich," and the stitches you add will lock it all together, adding texture and making sure it lasts for years of snuggling.
Putting together your blocks and rows correctly is the foundation for this stage. Think of it like building a house—you need a solid base. Every seam you sew and press creates the flat, stable surface you need now.
With a perfectly square quilt top, you're ready to build that sandwich. Let's get to it.
Choosing the Right Batting
Batting is the soul of your quilt. It's the unseen middle layer that provides warmth and gives the quilt its final drape and feel. Since T-shirt quilts are all about comfort, you'll want a batting that complements that soft, lived-in vibe. There are a few fantastic choices, and you really can’t go wrong with any of them.
- Cotton Batting: This is my go-to for a classic, traditional feel. It creates a flatter look and just gets softer and crinklier with every wash. It’s also breathable, which makes it perfect for a quilt that won’t be too heavy.
- Polyester Batting: If you’re dreaming of a puffy, cloud-like quilt, polyester is your best friend. It offers more loft (that's the quilting term for puffiness!), is incredibly lightweight, and holds its shape beautifully through washing.
- Cotton/Poly Blend: Can't decide? A blend gives you the best of both worlds. You get the soft, natural feel of cotton combined with the loft and durability of polyester. It’s a super versatile and popular choice for T-shirt quilts for a good reason.
For a deeper dive into what makes different batting types tick, you can learn more about The Warm Company Batting we carry right here at Linda's. We can help you select the perfect batting to achieve the look and feel you want for your finished quilt.
Creating and Basting the Quilt Sandwich
Basting is just a temporary step to hold your three layers together so nothing shifts, puckers, or gets bunched up while you're quilting. Don't skip this—it's a lifesaver!
Find a large, flat surface. A clean floor is honestly perfect for this. Lay your backing fabric down first, wrong side facing up. Use some painter's tape to secure the edges to the floor, pulling it taut but not stretching it out of shape.
Next, smooth your batting over the backing, making sure it's centered and free of wrinkles. Finally, lay your gorgeous quilt top over the batting, right side up. Spend a few minutes smoothing everything out from the center to the edges. You want all three layers to be perfectly flat and happy together.
You have a couple of options for basting:
- Pin Basting: Grab some curved quilting safety pins. They’re much easier to handle than regular ones. Place a pin every 4-6 inches or so, making sure you have an even scattering across the entire quilt.
- Spray Basting: This is a quilter’s secret weapon. A light mist of temporary adhesive spray holds the layers together without pins. Just work in small sections, spraying and smoothing as you go.
No matter your preference, you can find high-quality safety pins and basting spray in our shop to make this step a breeze.
Stitching It All Together
Now for the fun part—the actual quilting! How you decide to stitch your quilt sandwich is a totally personal choice that adds the final artistic touch.
For T-shirt quilts, simple straight-line quilting is a fantastic and modern-looking option. Pop a walking foot on your sewing machine (it helps feed all the layers through evenly) and stitch lines vertically, horizontally, or on a diagonal. A really popular and easy place to start is "stitching in the ditch," which just means sewing right along the seam lines between your T-shirt blocks. It gives a clean, professional finish.
Feeling a bit more adventurous? Free-motion quilting is like drawing with your sewing machine. You can add swirls, loops, or even trace around some of the cool graphics on the shirts. This approach adds a one-of-a-kind, personal flair to your quilt. Whatever you choose, Linda’s has all the threads, needles, and notions you’ll need to bring your vision to life.
Finishing with a Professional Binding
Alright, we're in the home stretch! The final, triumphant step in bringing your T-shirt quilt to life is adding the binding. This isn't just a pretty border; this narrow band of fabric is what encases all the raw edges of your quilt sandwich. It provides a durable, polished frame that protects all your hard work for years to come. Think of it as the perfect handshake that says, "I'm officially done!"
Before you can get that binding on, you need to prep the quilt itself. Grab your rotary cutter and a long ruler. You're going to carefully trim the excess batting and backing fabric so they're perfectly flush with your quilt top. A clean, square quilt is the secret foundation for a flawless binding. Trust me, taking your time here makes the whole process so much smoother.
Creating and Attaching Your Binding
First things first, you'll need to create one long, continuous strip of fabric. The gold standard for binding strips is 2.5 inches wide—it just creates such a beautiful, substantial finished edge. Cut enough strips to go all the way around your quilt's perimeter, then join them on the diagonal (a 45-degree angle). This little trick helps reduce a ton of bulk in the seams. Press those diagonal seams open.
Once you have your long binding strip, give it a good press, folding it in half lengthwise with the wrong sides together. Now you've got a perfect double-fold binding, ready to go.
Here's how I like to attach it by machine:
- Start on the Front: Find the middle of one side of your quilt. Align the raw edge of your binding strip with the raw edge of the quilt top.
- Sew It Down: Using your walking foot (a lifesaver for this!), sew the binding down with a quarter-inch seam allowance.
- Turn Those Corners: Stop sewing a quarter-inch from the first corner. Fold the binding strip up and away from the quilt at a 45-degree angle. Then, fold it straight back down along the next side of the quilt. This creates a neat little pleat that will become your mitered corner. Start sewing again right from the edge.
- Join the Ends: After you've gone all the way around, join the two ends of your binding strip for a seamless look before sewing down that last little section.
Securing the Binding for a Lasting Finish
With the binding machine-sewn to the front, the very last step is to wrap it around to the back and stitch it down for good. This is where your choice of thread really matters for both strength and looks. We've actually got some great advice on choosing the best thread for quilting to make sure your binding holds up beautifully over time.
Flip the folded edge of the binding over to the back of the quilt, making sure it just covers your first line of stitching. I like to use plenty of wonder clips to hold it securely in place. From here, you can either "stitch in the ditch" from the front (catching the binding on the back as you go) or hand-stitch it for a truly invisible, heirloom-quality finish. Linda's has a wide selection of beautiful, strong threads and clips to help you complete this final step flawlessly.
A Satisfying Final Step: Properly finishing your quilt with a crisp, clean binding is one of the most satisfying moments in the whole quilting journey. Nailing those sharp, mitered corners is a true hallmark of a well-made quilt and a real testament to your skill and patience.
Congratulations on finishing your incredible T-shirt quilt! Ready to dive into your next creative adventure? Explore the amazing selection of fabrics, notions, and supplies we have waiting for you at Linda's Electric Quilters. You can find everything you need to bring your next vision to life at https://lindas.com.


