
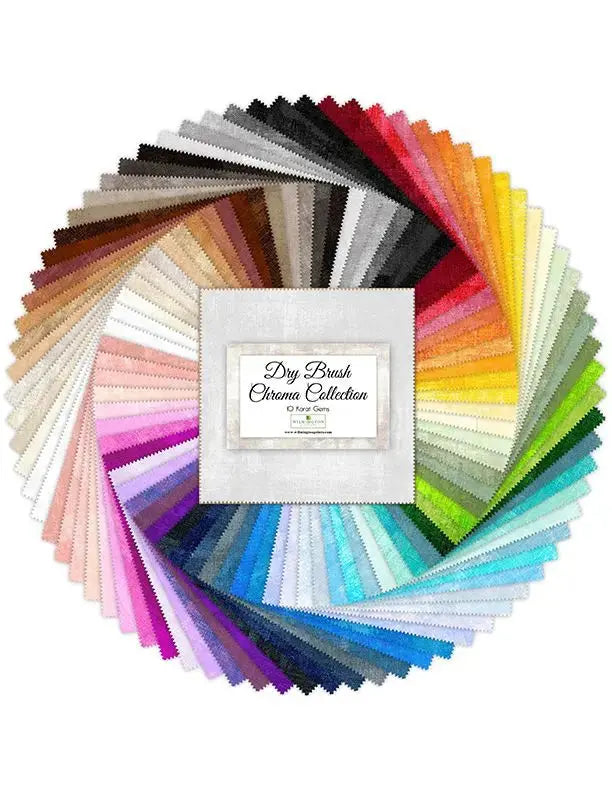
Hey everyone! Today you will learn how to turn one pack of big, colorful squares into a simple layer cake quilt that lets the color do all the work.
Here we go.
First, let's look at this fabric
This is Dry Brush Chroma - 10 Karat Gems.
It comes from Wilmington Prints.
Wilmington Fabrics is the maker.
It is a pre-cut pack of fabric squares.
You get 76 squares in one pack.
Each square measures about 10" by 10".
That is a nice, generous starting size.
No long yardage to cut down first.
You open the pack and you can sew.
The collection is Dry Brush Chroma.
These are vibrant tonal fabrics.
That means color on color, not a busy print.
Each square has a dry-brush effect.
You can see a soft, brushed texture.
It adds depth without shouting at you.
And the pack gives you a spectrum.
A stunning spectrum of vivid shades.
Light tones sit right next to deep ones.
That range is the whole point here.
One pack moves through so many colors.
You get contrast and harmony together.
Just like that, the design is built in.
The project: a layer cake quilt
We are making a simple layer cake quilt.
It finishes about 57" wide by 76" long.
That is a generous throw size.
Big enough for the couch, folks.
Big enough to really wrap up in.
We sew the squares in straight rows.
No triangles. No tricky cutting.
Why does this fabric suit this quilt?
The 10" squares are already cut for you.
The tonal colors play well side by side.
Put a light square next to a dark one.
Oh my goodness, that pop is instant.
The dry-brush texture keeps it interesting.
Even a plain grid looks really really good.
Super duper easy, and super duper fun.
Materials list
- 1 pack Dry Brush Chroma - 10 Karat Gems — 76 squares, 10" by 10" each; you will use 48 squares for the top
- Batting — one piece about 62" by 81"
- Backing fabric — about 3 1/2 yards of 44"/45" fabric, pieced, or trim a wideback to about 62" by 81"
- Binding — 5/8 yard, cut into 2 1/2" strips, joined to about 275" total
- Thread for piecing — I like 50-weight cotton in a soft neutral
- Thread for quilting — 50-weight to match or contrast, completely up to you
- A size 80/12 needle for piecing
- Rotary cutter, ruler, and mat for trimming and binding
- Pins or clips, plus basting pins or spray for layering
For piecing, I set my stitch length to 2.5.
That is about 10 to 12 stitches per inch.
It holds those squares nice and secure.
Use a steady 1/4" seam throughout.
Brief steps
Step 1: Sort your colors. Lay out all 76 squares. Group lights, mediums, and darks. Pick 48 squares for your top and set the rest aside for a pillow or binding accents.
Step 2: Lay out the rows. Arrange 6 squares across and 8 rows down. Step back and look. Move a bright square if one corner feels too dark. Take a photo before you sew.
Step 3: Sew the rows. Join each row with a 1/4" seam. Press seams in one row to the right, the next row to the left. That helps your corners nest.
Step 4: Join the rows. Sew the 8 rows together, matching seams as you go. Your top should finish about 57 1/2" by 76 1/2" before quilting and trimming.
Step 5: Layer and baste. Lay backing wrong side up. Center the batting, then the top right side up. Baste every 4 to 6 inches so nothing shifts.
Step 6: Quilt it simply. Start in the center and work out. Try stitch in the ditch along the rows, then echo about 1/2" inside a few squares. Or try a gentle meander. All three work. I lean to stitch in the ditch here.
Step 7: Bind and finish. Trim the quilt square. Sew your 2 1/2" binding around with a 1/4" seam. Miter the corners, join the ends, and finish by machine or by hand.
Practical tips from my table
Slow down at those seam nests, y'all.
Here is your warning, right at the risk.
Rush over a thick nest and the needle snaps.
Ease over it. Let the machine walk.
I once forced a bulky seam too fast.
The corner came out a little wonky.
The fix was easy, though.
I unpicked two inches and sewed it slow.
Just like that, it laid flat again.
Press as you go, not just at the end.
Ten minutes of pressing saves real frustration.
And remember the permission beat here.
It does not have to be perfect.
You are your own worst critic.
Nobody at home measures every square.
They see the color and they smile.
Take your time, it is not a race.
If I can do this, y'all can do it.
We're not reinventing the wheel here.
Alrighty. Thanks for spending time with me today.
We'll see you next time. Bye.
Shop the Dry Brush Chroma - 10 Karat Gems at Linda's Electric Quilters.


