
How to Use the LED Needle Threader 202 by Dritz: Brighter, Easier Threading for Quilters
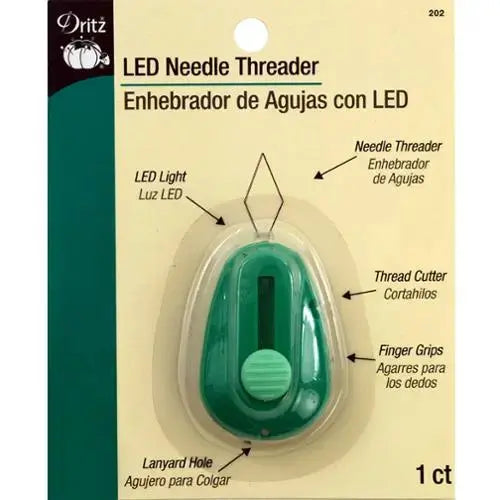
Threading a needle should be the quick start to a sewing session, not the part that slows you down. The LED Needle Threader 202 by Dritz is a small notion designed to thread needles quickly and easily. It combines a retractable threader with a built-in LED light, finger grips for stability and comfort, a built-in thread cutter, and a lanyard hole at the base for inserting a cord or string. Its compact design makes it easy to carry and store, whether you sew at home or take your projects on the go.
What This Needle Threader Is
A needle threader helps guide thread through the eye of a needle, so you spend less time squinting, aiming, and trying again. This one adds light to the job: the built-in LED light activates when the threader is exposed, giving you better visibility even in darker threading conditions. Finger grips help you hold the tool steady while you work, and because the threader is retractable, the wire is protected when it is not in use.
The extra details are practical, too. The built-in thread cutter means you can trim your thread without reaching for a separate pair of scissors, and the lanyard hole lets you add a cord or string so the threader can hang within reach or travel with a project kit.
Why Quilters and Sewists Use It
Quilters thread needles for hand-finishing binding, burying thread tails, appliqué, embroidery details, and mending — often more than once in a single sitting. Low light and tired eyes can make that simple step frustrating.
A lighted threader helps you see what you are aiming for, so you can thread accurately, work more productively, and reduce stress. That helps sewers and tailors of all skill levels: beginners gain confidence, and experienced sewists save time on a step they repeat constantly.
How to Use It, Step by Step
- Expose the threader. Slide or open the threader so the wire is out. The built-in LED light activates when the threader is exposed.
- Get a comfortable grip. Hold the tool by its finger grips, which are there to provide stability and comfort while you work.
- Pass the wire through the needle eye. Guide the threader through the eye of your needle, using the light to check that you can see the eye clearly before you start.
- Loop your thread. Place the thread through the threader, then draw the threader back so the thread passes through the needle eye.
- Check and trim. Pull the thread through to your working length, remove the needle from the threader, and use the built-in thread cutter to trim the end if needed.
- Retract it when you finish. Put the threader away in its retracted position so the wire stays protected until the next use.
Practical Tips
Work with the light on from the start — seeing the needle eye clearly on the first try is the whole point. Let the finger grips keep the tool steady rather than pinching the wire. If an attempt misses, reposition the needle in the light and try again with a freshly trimmed thread end, which passes more neatly. Keep the threader on a cord through the lanyard hole if you tend to set small notions down between steps.
Care and Storage
Always retract the threader when you are done so the wire is protected. Store the tool with your hand-sewing notions, in a project pouch, or on a lanyard so its compact size works for you instead of letting it disappear into a drawer. Keep it dry and treat the wire gently — no forcing it through an eye that is not lined up.
Project Ideas
Keep this threader nearby for hand-binding a quilt, appliqué and embroidery work, sewing on buttons and labels, mending garments, and any hand-finishing step. It also earns its place in a travel sewing kit, where light is rarely ideal.
Shop the LED Needle Threader 202 by Dritz at Linda's Electric Quilters.


