
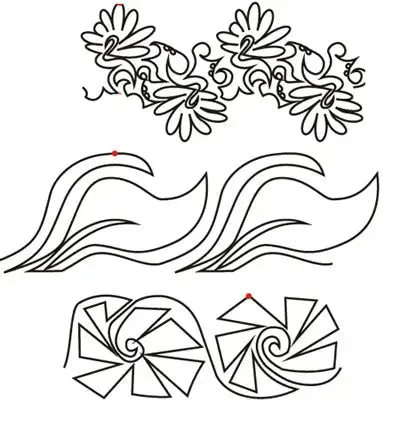
820 Combo Pantograph: Three Different 7-Inch Patterns on One Roll for Borders and Beyond
The 820 Combo Pantograph by Linda V. Taylor takes a different approach to the word “combo.” Instead of one design in several sizes, this roll carries three different continuous line patterns, and each pattern is 7 inches wide. The patterns were exclusively designed for mid-arm, short-arm and domestic machines, the roll measures 121 inches long, and like other patterns in the 800 series, these are wonderful for borders, too.
What the Design Is
A paper pantograph is a printed, continuous-line pattern worked from behind the quilting machine. You lay the paper on the pantograph table, follow the printed line with a laser light or a stylus, and the needle reproduces that path on the quilt. Because the line is continuous, you can stitch a full pass without stopping to tie off, then advance and repeat.
With the 820 Combo, one roll gives you three separate designs — a small pattern library in itself. Choose the pattern that best fits the quilt in front of you, or use one pattern across the body of a quilt and a different one from the same roll in its border.
What Quilts It Suits
This pantograph suits the everyday work of mid-arm, short-arm and domestic setups: lap quilts, throws, bed quilts, table runners, and quilts with borders you want to quilt as a distinct part of the design. A 7-inch row is a versatile middle size — large enough to move across a bed quilt at a comfortable pace, and small enough to sit neatly inside many border widths.
It is especially practical if you quilt varied projects and want options on hand: match each pattern to a different quilt, or audition all three against one top and let the fabric and piecing decide.
Working With a Fixed 7-Inch Row Height
Every pattern on this roll is 7 inches wide, so row height is decided for you — your planning job is spacing and placement. Work out how many 7-inch passes your quilt needs, and check how the final partial row will land at the far edge. If a full row would crowd the bottom border, start the first row slightly higher, adjust the overlap between rows, or plan for the border to be quilted as its own pass.
Before stitching, check the scale: seven inches reads differently on a small wall quilt than on a bed quilt with large blocks. A quick dry run with your laser or stylus shows where each row will begin and end.
How to Use It on Your Machine
Unroll the paper smoothly on the pantograph table and secure it so it cannot shift mid-pass. At 121 inches long, the pattern covers most quilts in a single pass. Choose which of the three patterns you are stitching, position your laser or stylus at the start of that printed row, and confirm the pointer tracks the line accurately before you begin.
Stitch at a steady, even pace, keeping your eyes on the pointer and the printed line rather than on the needle. When the pass is complete, advance the quilt by the planned spacing, re-align the pointer, and compare the new row against the stitched row above before starting again. Stay with one pattern for the whole body of a quilt unless you have planned a change — for example at a border — so the transition looks intentional.
Extending the Pattern and Practical Tips
Need the pattern to be longer than 121 inches? Find where the pattern repeats, mark that point on your pattern shield, and shift the pattern down to make it meet up. This allows you to extend the pattern to accommodate those larger quilts.
Mark a light reference line for your first row so the design begins square, and re-check alignment after the first advance, when drift is still easy to correct. Keep the paper flat, since a curl can pull the pointer off the line. Finally, audition thread on a corner: a gentle contrast shows the pattern, while a closer match gives a softer finish.
Shop the 820 Combo Pantograph by Linda V. Taylor at Linda's Electric Quilters.


