

Table of Contents
- Why Reading Quilt Patterns Matters Before You Start
- Understanding Quilt Pattern Abbreviations and Symbols
- How to Read Quilt Pattern Diagrams and Block Layouts
- Using a Quilt Pattern Cutting Chart Correctly
- Easy Quilt Patterns for Beginners: What to Look For
- Step-by-Step: Reading a Complete Quilt Pattern From Start to Finish
- Common Beginner Mistakes When Reading Quilt Patterns
- Digital and PDF Pattern Navigation Tips
- Frequently Asked Questions
Last Updated: October 8, 2026
Why Reading Quilt Patterns Matters Before You Start
Learning how to read quilt patterns for beginners is the foundation of every successful project. Without understanding the pattern, you'll waste fabric, make mistakes, and lose motivation before you finish.
A quilt pattern is a roadmap. It tells you what fabric to cut, how big each piece should be, and how to sew them together.

Most beginners want to jump straight to sewing. They see a finished quilt and think the pattern will be simple. Then they hit the cutting chart and freeze. Abbreviations look like alphabet soup.
Here's the good news: reading quilt patterns is a skill anyone can learn. It takes maybe 20 minutes to understand the basics. Once you know what to look for, every pattern becomes clearer.
Understanding Quilt Pattern Abbreviations and Symbols
Quilt patterns use shorthand to save space. You'll see the same abbreviations over and over. Learning them now means you won't be confused later.
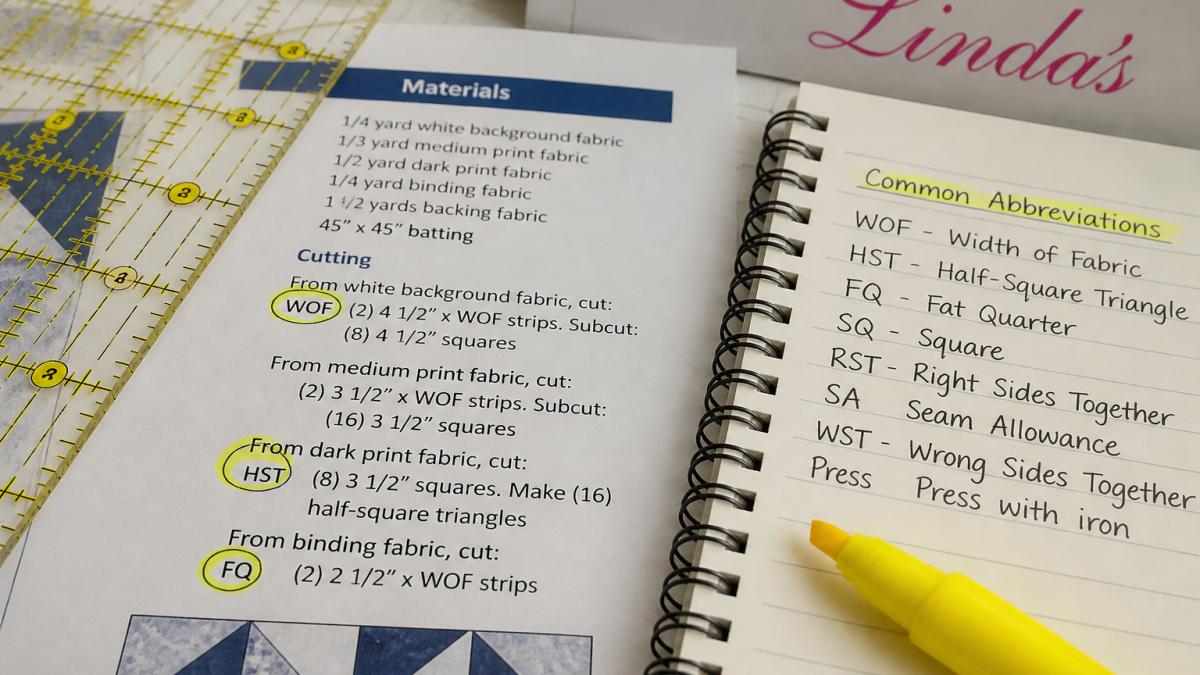
WOF stands for Width of Fabric. Most quilting fabric comes 44-45 inches wide.
HST means Half Square Triangle. This is a small triangle made by cutting a square diagonally. You'll see it in many beginner patterns.
FQ is a Fat Quarter. Instead of buying a full yard of fabric, you can buy a quarter yard cut into a wider shape.
Unfinished size is the measurement of a block before you sew it into the quilt. Finished size is what it measures after seaming. Most patterns list both.
Common Measurement and Cutting Abbreviations
Here are the abbreviations you'll encounter most:
- WOF = Width of Fabric (44-45 inches)
- FQ = Fat Quarter (18 x 22 inches)
- HST = Half Square Triangle
- SQ = Square
- RST = Right Sides Together (how to pin fabric before sewing)
- ¼" = Quarter-inch seam allowance
- LHS = Left-Hand Side
- RHS = Right-Hand Side
Symbols You'll Encounter in Pattern Diagrams
Diagrams use symbols to show how pieces fit together. A small arrow points in the direction to sew. A dotted line shows where to fold fabric. A solid line shows where to cut.
Some patterns use numbers inside blocks. These numbers tell you the sewing sequence. Sew piece 1 to piece 2 first. Then add piece 3. This prevents mistakes and keeps you organized.
Colors in diagrams match the fabrics you'll use. If your pattern shows a light square and a dark square, you'll cut one from light fabric and one from dark fabric. This visual guide makes assembly much faster.
How to Read Quilt Pattern Diagrams and Block Layouts
A quilt pattern diagram shows the finished block design. It's a visual picture of what your block will look like after you sew all the pieces together. The diagram is not to scale, so don't measure it with a ruler.
Look at the diagram first before reading anything else. This gives you a mental image of where you're heading. You'll understand the pattern better when you see the final design.
Interpreting Block Assembly Order
The assembly order is critical. Some patterns require you to sew pieces in a specific sequence. If you sew them in the wrong order, pieces won't fit together.
Look for numbers inside the diagram. These numbers show the sequence. Start with 1 and 2. Sew them together. Then add piece 3 to that unit. Continue until all pieces are sewn.
Some blocks are built in stages. You might sew four small units first, then sew those units together to make the final block. The diagram will show this with dotted lines separating the stages.
Understanding Finished Size vs. Unfinished Size
Finished size is the measurement of your block after it's sewn into the quilt top. A 12-inch finished block means it measures exactly 12 by 12 inches when complete.
Unfinished size is larger because you add seam allowances. A 12-inch finished block is usually cut at 12.5 by 12.5 inches unfinished. The extra half-inch accounts for the quarter-inch seam allowance on all four sides.
Always cut your pieces to the unfinished size listed in the pattern. Never trim to finished size before sewing. You need those seam allowances to attach blocks together.
Using a Quilt Pattern Cutting Chart Correctly
The cutting chart is where many beginners get stuck. It looks overwhelming at first. But it's just a organized list of what to cut and how many pieces you need.
Read the cutting chart from left to right. The first column lists the fabric color or type. The second column shows the size to cut. The third column tells you how many pieces to cut from that fabric.
Reading Fabric Strip Widths and Yardage Requirements
Strip width is measured in inches. A pattern might say "cut 2.5-inch strips." This means the strip should be 2.5 inches wide. The length of the strip runs the full width of your fabric (WOF).
Yardage requirements tell you how much fabric to buy. If the pattern says you need one yard of blue fabric, buy one full yard. Don't estimate or buy less. You'll run short.
Some patterns give you options. You might be able to use a Fat Quarter instead of a full yard for a smaller project. The cutting chart will show both options.
Calculating Width of Fabric (WOF) and Grain Direction
Most quilting cotton is 44-45 inches wide. When you cut strips WOF, you're cutting from one selvage edge to the other. This gives you the maximum length.
Grain direction matters for some pieces. The pattern might say "cut on the bias" or "cut on the straight grain." Bias cuts stretch more, so avoid them for outer edges. Straight grain pieces stay stable.
If the pattern doesn't mention grain direction, cut however is easiest. Most beginners can ignore this detail until they have more experience.
Easy Quilt Patterns for Beginners: What to Look For
Not all patterns are created equal. Some are genuinely beginner-friendly. Others claim to be simple but require advanced skills.
Look for patterns that use large pieces. Bigger pieces are faster to cut and easier to sew. They also forgive small mistakes better than tiny pieces do.
Patterns with simple block designs work best. A block made of four large squares is easier than one with 20 tiny pieces. Fewer seams mean fewer places to go wrong.
Check the skill level. Confident Beginner is the right level to start. Intermediate and Advanced patterns require more precision and experience.
Linda's Electric Quilters carries patterns designed specifically for new quilters. The Backyard Party Quilt Pattern and Porch Party pattern are both confident beginner projects.

Step-by-Step: Reading a Complete Quilt Pattern From Start to Finish
Here's how to approach a new pattern without feeling overwhelmed.
Step 1: Read the Entire Pattern Before Cutting Any Fabric
This is the most important step. Many beginners skip it and regret it later.
Sit down with the full pattern. Read every page from beginning to end. Don't cut anything yet. Just read.
As you read, highlight key information. Mark the finished size. Circle the yardage requirements. Underline any special instructions. This takes maybe 15 minutes but saves hours of confusion.
Step 2: Gather Your Materials Using the Cutting Chart
Now that you understand the pattern, gather everything you need. Pull out the fabrics listed in the cutting chart. Measure your batting and backing fabric.
Check that you have all the notions. Do you need thread? Bobbins? A walking foot? Most patterns don't require special tools, but some do.
Lay out your cutting mat, rotary cutter, and ruler. Make sure your iron works. You'll need it for pressing.
Step 3: Follow the Assembly Sequence
Cut your pieces according to the chart. Label them if the pattern suggests it. Some quilters use sticky notes with numbers.
Start sewing in the order shown in the diagram. Don't skip ahead. The sequence exists because it's the easiest way to build the block.
Press after each sewing step. This keeps everything flat and makes the next seam easier.
Step 4: Apply Pressing Directions and Seam Allowances
Pressing directions tell you which way to press your seams. This matters because seams that point in different directions can create bulk at intersections.
The pattern might say "press toward the darker fabric" or "press to the side." Follow these instructions exactly.
Seam allowances are almost always quarter-inch. Use a quarter-inch presser foot on your machine to ensure accuracy. Consistent seam allowances make blocks fit together perfectly.
Common Beginner Mistakes When Reading Quilt Patterns
Understanding these mistakes helps you avoid them.
Mistake 1: Not reading the pattern before cutting. You'll cut wrong sizes or too many pieces. This wastes fabric and creates frustration. Always read first.
Mistake 2: Confusing finished and unfinished sizes. Many beginners cut to finished size, then wonder why pieces don't fit. Remember: cut unfinished, sew to finished.
Mistake 3: Ignoring seam allowances. A quarter-inch difference on each seam adds up. By the time you finish a block, pieces won't align.
Mistake 4: Skipping the pressing step. Pressing after each seam keeps everything flat and accurate. It takes two minutes but prevents major problems later.
Mistake 5: Rushing through the cutting chart. Read it slowly. Make sure you understand what each line means. A few seconds of attention here saves minutes of rework later.
Digital and PDF Pattern Navigation Tips
Many patterns come as PDFs now. Digital patterns save paper and let you zoom in on details.
Print the pattern at 100 percent scale. Some printers automatically shrink PDFs to fit the page, which throws off all your measurements. Check the printer settings before printing.
If you don't want to print, use the PDF zoom feature to read sections. Zoom in on the cutting chart so you can read small numbers clearly.
Some digital patterns let you add notes. Use this feature. Write reminders or mark sections you need to reference again.
Learning to read quilt patterns opens up hundreds of projects. Once you understand the basics, patterns that once seemed confusing become straightforward.
| Abbreviation | Meaning | Example |
|---|---|---|
| WOF | Width of Fabric | "Cut 2.5-inch strips WOF" |
| FQ | Fat Quarter | "Use 8 FQs for this quilt" |
| HST | Half Square Triangle | "Make 16 HSTs" |
| RST | Right Sides Together | "Sew RST" |
| ¼" | Quarter-inch seam allowance | Standard for all seams |
Frequently Asked Questions
Why should you read a quilt pattern all the way through before starting?
Reading the entire pattern first helps you understand the finished size, fabric requirements, and assembly sequence before you cut a single piece. This prevents costly mistakes like cutting strips the wrong width or discovering halfway through that you don't have enough fabric. Many quilters highlight key sections and make notes as they read, which creates a roadmap for the entire project.
What do the abbreviations and symbols in quilt patterns mean?
Common abbreviations include WOF (width of fabric), FQ (fat quarter), and HST (half-square triangle). Symbols in diagrams show seam lines, grain direction, and which pieces to sew together. A glossary appears in most printed patterns, and digital patterns often include a legend. Understanding these shorthand notations saves time and prevents confusion during cutting and piecing.
How do you use a quilt pattern cutting chart?
A cutting chart lists fabric pieces by size and quantity. Find your desired quilt size, then note the strip width and number of strips needed from the chart. The chart also specifies how to cut those strips into smaller pieces. Always cross-reference the chart with the yardage requirements to ensure you purchase enough fabric, accounting for shrinkage and grain direction.
What is the easiest type of quilt pattern for someone just starting out?
Beginner patterns feature large, simple blocks with few pieces per block, minimal seam intersections, and straightforward assembly. Look for patterns labeled 'confident beginner' or 'quick-finish' that use strip piecing or simple squares. Patterns like Porch Party or Backyard Party from Linda's Electric Quilters are designed for new quilters and can be completed in a weekend, building confidence before tackling more complex designs.


