
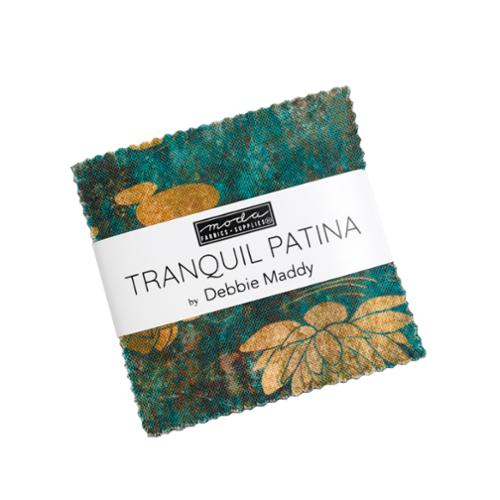
Hey everyone. Today we're making a four-patch mini quilt wall hanging from one mini charm pack. You'll learn how 2½-inch squares become 4-inch four-patch blocks.
This hanging finishes 16 inches square, for a confident beginner. Nine blocks and one solid border do the work.
The finished hanging, up front
Finished size: 16 by 16 inches. Each block finishes 4 inches square. The centre finishes 12 inches square. The border finishes 2 inches wide. Seam allowances are ¼ inch throughout. Before binding, the top measures 16½ inches square.
Why this version?
Mini charms can feel too small to use well. Four-patch blocks solve that. Pairing light squares with darker ones gives clear contrast. A solid border frames the centre and rests your eye. A print border works.
What you need
| Material or tool | What you need | Required or optional |
|---|---|---|
| One mini charm pack (42 squares, 2½ in.) | 36 squares used, 6 left over | Required |
| Coordinating solid yardage | ¾ yd for border, binding, and optional sleeve | Required |
| Backing cotton | ⅝ yd, cut as one 20-inch square | Required |
| Low-loft batting | One 20-inch square | Required |
| Thread | 50-weight cotton | Required |
| Rotary cutter, mat, ruler, pins, iron | Cutting, pressing, basting | Required |
| Hanging rod or dowel | Fits the optional sleeve | Optional |
This project features the Tranquil Patina Mini Charm — 42 cotton squares, 2½ inches, by Debbie Maddy for Moda. A warm neutral border keeps prints in charge — see Etchings Stone Bella Solids and Natural Bella Solids.
Cutting list
From the pack: use 36 squares as they come, no trimming. Keep 6 as spares. Cut the backing and batting each as one 20-inch square.
From the solid, largest first: cut one 8-inch strip across the width and subcut a sleeve rectangle, 8 by 15 inches. Next cut two 2½-inch border strips. Subcut the first into two 16½-inch pieces — check it gives at least 33 usable inches. Subcut the second into two 12½-inch pieces. Last, cut two 2½-inch binding strips. Base-plan total: 18 inches of your ¾ yard. No sleeve drops that to 10 inches. One extra binding strip raises it to 20½ inches — still inside 27 inches.
How to sew the wall hanging
- Sort the squares by value: lights, mediums, darks. Choose 36. Set 6 aside as spares.
- Pair each light or medium square with a contrasting partner. Make 18 pairs, laid out before you sew.
- Sew each pair with a ¼-inch seam, chain piecing to keep order. Press toward the darker square. Each pair should measure 4½ by 2½ inches.
- Join two pairs into one block. Turn one pair end for end, so lights sit diagonally opposite. Nest the centre seams, pin there first, and go slow.
- Check each block: 4½ inches square. Press the final seam open, or to one side consistently. Make 9 blocks.
- Lay out three rows of three. Turn blocks so neighbouring corners differ in value.
- Sew each row. Press block seams in alternate directions per row, so rows nest.
- Join the rows, pinning at every corner. The centre should measure 12½ inches square.
- Add borders: sew a 12½-inch strip to each side, press toward the border, then 16½-inch strips to top and bottom. The top should measure 16½ inches square.
- Layer: backing wrong side up, batting, top right side up. Smooth from the centre out and baste well — small quilts shift fast.
- Quilt simply: stitch in the ditch around the border and block seams, or use gentle diagonal lines. Completely up to you. Trim the sandwich to 16½ inches square.
- Optional sleeve: fold each short end of the 8-by-15-inch rectangle under ¼ inch twice and stitch. Fold it lengthwise, wrong sides together, raw edges even, but off-centre: outer layer 4½ inches fold to raw edge, backing layer 3½. That extra inch is rod fullness, so the front hangs flat. Lay the raw edges flush with the top edge, on the back, and baste.
- Bind it. Join the binding strips end to end — check for at least 76 inches first, and cut another strip from spare solid if short. Fold the binding in half lengthwise, wrong sides together. Sew raw edges to the front, ¼-inch seam, mitring corners. Fold to the back and stitch down. The top binding catches the sleeve's raw edges. Hand-stitch the sleeve's folded lower edge to the backing along its full length. The rod slides in through the open short ends.
How does the precut math work?
A mini charm starts at 2½ inches and finishes 2 inches wide, sewn on two sides. So each four-patch finishes 4 inches square. Nine blocks in a 3-by-3 grid finish 12 inches square. Add a 2-inch border each side: 12 plus 4 equals 16 inches.
Yield: 42 squares in the pack, 36 used, 6 spare. Sort by value first — that creates the contrast. Check several squares against your ruler to see where the 2½-inch measurement falls on the pinked edges. Use that reference consistently. Test it: two joined squares should measure 4½ by 2½ inches after pressing. Chain piecing keeps pairs in order, pressing toward the darker square lets centre seams nest, and cutting longest pieces first leaves small pieces last.
Troubleshooting
| Symptom | Likely cause | Fix |
|---|---|---|
| Block measures under 4½ in. | Seams crept wider than ¼ in. | Test with two spare squares: the pair should read 4½ by 2½ in. Adjust, then resew |
| Centre point does not meet | Pair seams were not nested before sewing | Pin the centre first and sew slowly across it |
| Border waves at the edges | Border strip was stretched while sewing | Pin at ends and middle, then ease — never pull |
Questions folks ask
Will one mini charm pack really make this?
Yes, if your pack holds 42 squares. This layout needs 36; the other 6 are spares and seam testers.
Can I make the hanging bigger?
Yes. Add a row and a column: 16 blocks, 64 squares, so you need a second pack. The centre then finishes 16 inches square.
Must the blocks alternate perfectly?
No. Same-value corners look scrappy, not wrong. It doesn't have to be perfect. You're your own worst critic. Take your time — it's not a race.
Can I skip the sleeve?
Yes. Hanging clips also hold a mini quilt. Completely up to you.
Care and easy adaptations
Care follows the components: use the gentlest guidance among your cotton squares, solid, backing, batting, and thread. For adaptations, change placement, not the math. Group dark blocks in the centre, or scatter them. Y'all can do this.
Shop the Tranquil Patina Mini Charm at Linda's Electric Quilters.
Thanks, folks. We'll see you next time. Bye.


