
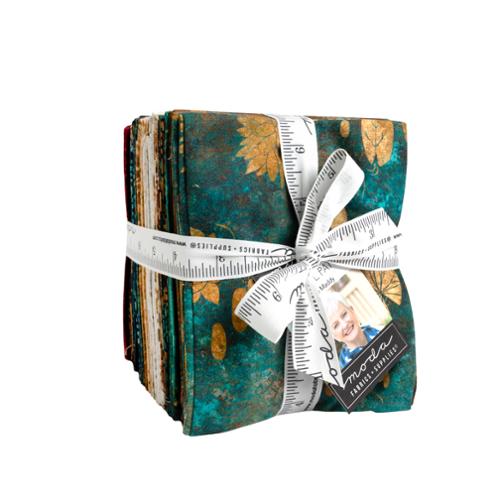
Hey everyone. Today we're turning five fat quarters into a flat market tote, with whole panels and folded handles.
The short version: pick five fat quarters: two outer, two lining, one for handles. Trim each panel piece to a 16½-inch square. Cut two handle strips 4 by 21 inches from the fifth. A lightweight, lined, hand-carry tote; planned finished size 16 by 16 inches, flat. It suits a confident beginner.
What is the finished size, and what are the key numbers?
Planned finished size: 16 by 16 inches, flat, no boxed bottom. Panels start as 16½-inch squares. Seams are ¼ inch throughout. Handles finish 1 inch wide. Short hand-carry handles; the finished drop is not tested. Skill level: confident beginner. Note: this is a paper-planned project, not sewn or tested.
Why make this version from fat quarters?
Earlier totes in this series piece their panels — strips in the jelly roll tote, squares in the charm pack tote. This one keeps each panel whole: one fat quarter, one panel, print unbroken.
What do you need?
| Material or tool | What you need | Required or optional |
|---|---|---|
| Fat quarters, 18 by 21 in. | 5: 2 outer panels, 2 lining panels, 1 handles | Required |
| Thread | 50-weight cotton for seams and topstitching | Required |
| Rotary cutter, mat, ruler, pins or clips, iron | Cutting, holding, pressing | Required |
| Hand-sewing needle | Closing the turning gap by hand | Optional |
My pick is the Tranquil Patina AB 30 Fat Quarter — a 30-piece 100% cotton bundle, 18 by 21 inches, by Debbie Maddy for Moda. For an alternative lining-fabric color idea, see our read on Natural Bella Solids.
What gets cut, and from where?
Press and square each fat quarter. Panel pieces: trim two outer and two lining fat quarters to 16½-inch squares. Each leaves a strip about 1½ by 16½ inches, and one 4½ by 18 inches. Handles: from the fifth fat quarter, cut two strips 4 by 21 inches if the usable fabric allows. If the squared piece is shorter, piece in fabric from the remaining handle piece to reach 21 inches per strip, allowing for joining seams. The strips use 8 of the 18 inches across. Cut longest pieces first. Sizes are nominal: measure the squared piece first; squaring can trim.
How do you sew the market tote, step by step?
- Sort by value: lights, mediums, darks. Pick two prints outside, two for lining, one calmer for handles.
- Press all five pieces. Trim the four panel pieces to 16½-inch squares; check each on two sides.
- Cut the two handle strips from the fifth piece, piecing to 21 inches each if the squared piece runs short.
- Check your seam first: cut two 3-inch squares from a 4½-inch remnant strip, sew, press, measure. The pair should measure 5½ by 3 inches.
- Make each handle: fold the strip in half lengthwise, wrong sides together, press. Open it, fold both long edges to the center crease, fold closed, stitch both edges. Pin first: four layers shift.
- On the right side of the front panel, mark the top raw edge 4 inches in from each side edge. Center one handle end on each mark, raw ends flush with the panel's top raw edge, loop lying over the panel toward its middle. Check for twists, then baste ⅛ inch from the top edge. Repeat on the back panel.
- Sew the outer panels right sides together along both sides and the bottom, ¼-inch seam, backstitching at both ends. Leave the top open.
- Sew the lining panels the same way, but leave a 4-inch gap in the bottom seam. Check the gap: the tote turns through it.
- Turn the outer tote right side out. Slip it inside the lining, right sides together. Match side seams, pin around the top, sew the full circle, ¼-inch seam. Go slowly over the bulky handle ends. Backstitch over each end to lock it in the seam.
- Turn the tote right side out through the gap. Stitch the gap closed.
- Tuck the lining inside. Press the top edge flat.
- Topstitch around the top, about ⅛ inch from the edge. Target finished size: 16 by 16 inches.
How does the fat quarter math work?
A panel starts at 16½ inches square. Side seams take ¼ inch per side, so width finishes at 16 inches. Bottom and top seams take ¼ inch each, so height finishes at 16 too.
Yield math: one tote uses 5 of the 30 bundle pieces, so the bundle fabric covers six totes, thread extra. Each handle starts as a 21-inch strip; its ends sit in the top seam, held by basting, the top seam, backstitching, and topstitching. Short hand-carry handles; the finished drop is not tested. Measure usable fabric after pressing and squaring, before you cut.
What can go wrong, and how do you fix it?
| Symptom | Likely cause | Fix |
|---|---|---|
| Tote finishes under 16 in. | Seam allowance crept too wide | Re-run the two-square check; adjust your guide. Unpick and re-sew the affected seams to recover the planned size |
| Handle loop twists at the top | One end flipped before basting | Unpick the basting, lay it flat, re-pin |
| Lining peeks above the top edge | Top edge not pressed flat first | Press again, lining tucked inside, then topstitch |
What do people ask before making this tote?
How many totes does one bundle make?
Six, by fabric count: five per tote, and the bundle holds 30 pieces. Thread is extra.
What if a fat quarter squares up a little small?
Trim all four panels to the smallest common square, then redo the math: finished size is cut size minus ½ inch each way. A 16-inch cut finishes at 15½.
Can I make the handles longer?
Yes, with piecing. For longer handles, piece additional strips from the remaining handle fabric, or use yardage. Recalculate the cuts and allow for the joining seams.
Can I use a dark lining?
Yes. A deep solid yardage is an alternative lining fabric — see our read on Black Bella Solids.
Is there a weight rating for this tote?
No rating is claimed here. Load capacity has not been tested.
How do you care for it, and what can you change?
Care follows the components: follow the fabric maker's care instructions for your cotton pieces. Adapt by print placement: two bold prints outside read lively; one print and one calmer piece read quiet. Take your time with the handles. It doesn't have to be perfect.
Shop the Tranquil Patina AB 30 Fat Quarter at Linda's Electric Quilters.
Thanks for spending a little sewing time with us. We'll see you next time. Bye.


