
Hey everyone. Today we're making four placemats from whole charm squares — no subcutting at all. Each placemat finishes at 18 by 13½ inches, pieced from twelve 5-inch squares in a four-by-three grid. It suits beginners who can sew a straight ¼-inch seam.
What is the finished size, and what are the key numbers?
Finished size: 18 by 13½ inches per placemat, four in the set. Each top measures 18½ by 14 inches before binding. Seam allowances are ¼ inch throughout, and each 5-inch square finishes at 4½ inches once sewn on all four sides.
Why make this version with whole squares?
Whole squares let the prints do the talking. Nothing gets cut down, so larger motifs stay whole. The grid is honest patchwork: sort, sew rows, join rows, quilt, bind. Which print sits beside which? Completely up to you.
What do you need?
| Material or tool | What you need | Required or optional |
|---|---|---|
| Two charm packs (42 squares each, 5 in.) | 48 squares used; 36 left over | Required |
| Backing and binding yardage, 44-in. nominal width | 1½ yd; needs 39 in. usable width; cutting below | Required |
| Low-loft batting | Four pieces, 15 × 19½ in. | Required |
| Thread | 50-weight cotton | Required |
| Quarter-inch foot, pins, marking pencil, seam ripper | Seams, layout marks, and fixes | Required |
| Rotary cutter, mat, ruler, iron | Yardage cutting, pressing | Required |
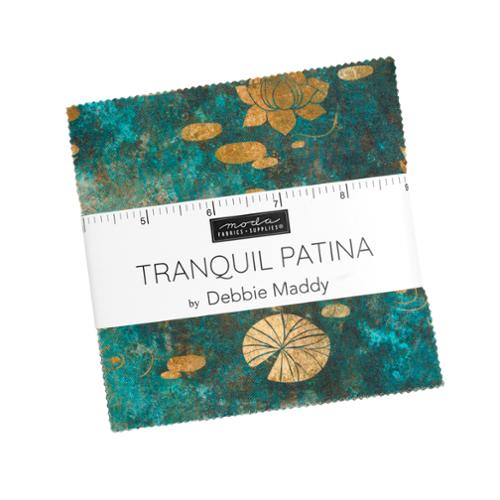
My pack pick is the Tranquil Patina Charm Pack — 42 cotton squares, 5 inches, by Debbie Maddy for Moda. For the backing and binding, a warm solid keeps busy prints calm — see Etchings Stone Bella Solids.
What gets cut, and from where?
From the packs: nothing gets cut. Choose 48 squares and set the other 36 aside. From the yardage, longest pieces first: cut two sections 15 inches long across the width. Subcut each into two backing rectangles, 19½ by 15 inches — four in all, using 39 of the 44 inches of width. From the remaining yardage, cut eight binding strips at 2½ inches across the width — two joined strips bind one placemat, corners and closing join included. Batting: four pieces at 15 by 19½ inches, a ½ inch past the top on every side.
How do you sew the placemats?
- Open both packs. Sort all 84 squares into lights, mediums, and darks, then choose your 48.
- Lay out one placemat: four squares across, three rows down. Spread values out; keep the same print from touching itself.
- First, sew two spare squares together, press, and measure: the pair should read 9½ by 5 inches. Adjust your guide if it does not. Then sew each row with a ¼-inch seam, chain piecing to keep your order straight.
- Press row one seams to the right, row two to the left, row three to the right. Alternating directions lets the joins nest.
- Join the three rows. Pin at every square corner before you sew — pins help the seams meet. If a corner lands a little off, that's okay; aim for a steady ¼-inch seam and keep going.
- Press the top flat and measure it: 18½ by 14 inches. Repeat for the other three tops.
- Layer one backing piece wrong side up, one batting piece, and one top right side up. Smooth from the center out, then pin or baste.
- Quilt simply: stitch in the ditch along the grid lines. Keep quilting lines within the maximum spacing your batting label allows. Go slow at intersections — seam bulk there can push your needle off line.
- Trim the sandwich even with the top on all four sides.
- Join two binding strips end to end for each placemat. Sew the binding to the front, fold a neat miter at each corner, turn it to the back, and stitch it down. Just like that — one done, three to go.
How does the precut math work?
Each square starts at 5 inches and finishes at 4½: a ¼-inch seam comes off each side. Four squares across give 18 finished inches; three rows down give 13½. Twelve squares per placemat, four placemats, 48 squares total.
Yield: two packs hold 84 squares, so 36 stay back — enough for three more placemats, or a stack of mug rugs. Pinked edges need no trimming. Pick one edge reference — most folks measure from the body of the square, not the pinked tips — and use that same reference for every square. Your test pair in the steps proves the reference before the rows go together. Sort by value before you sew, not after — a layout fixed on the table costs nothing. Cutting economy counts too: backs first, binding second, so long pieces are never shorted by short ones.
What can go wrong, and how do you fix it?
| Symptom | Likely cause | Fix |
|---|---|---|
| Rows do not meet at the corners | Seams crept wider or narrower than ¼ in. | Sew two spare squares together, press, and measure: the pair should read 9½ by 5 in. |
| Placemat cups up after quilting | Layers shifted, or quilting is denser in one area | Baste closer and spread the quilting evenly across the surface |
| Binding corners look bulky | Miter fold not creased before turning | Crease each miter with your fingernail, trim nothing, and sew the corner slowly |
| One print shouts over the rest | Strong prints clustered in one corner | Re-sort on the table: one strong print per row, spread across the grid |
Questions folks ask
What if I only have one charm pack?
One pack holds 42 squares. That makes three full placemats at twelve squares each, with six squares left over.
Can I use a placemat as a hot pad?
No. This is a table placemat, not a heat-rated pad. Set hot dishes on a proper trivet instead.
Do the four placemats have to match?
Not at all. Same backing and binding, different layouts — that still reads as one set at the table.
Can I make the set bigger later?
Yes. Your 36 leftover squares make three more placemats the same way. You will need more backing, binding, and batting to finish them.
How do you care for them, and change them up?
Care follows the components: follow the gentlest guidance among your cotton fabric, batting, and backing labels. For a change of mood, keep the math and swap the palette — dark squares with pale binding read bold, while soft prints read quiet. It doesn't have to be perfect, folks. Take your time — it's not a race.
Shop the Tranquil Patina Charm Pack at Linda's Electric Quilters.
Thanks for sewing along. We'll see you next time. Bye.


