
A dull rotary blade usually announces itself at the worst moment. You're lining up a clean strip on beautiful fabric, the ruler is steady, and instead of that smooth whispering cut, you hear a drag, then feel a snag. The edge looks fuzzy. Threads cling. Your hand pushes harder than it should.
The good news is that a dull blade doesn't always need to go straight to the trash. If the edge is only worn and not badly damaged, sharpening can bring back the clean feel quilters want: light pressure, crisp separation, and that soft slicing sound that tells you the blade is doing the work instead of your wrist. If you want to see blade handling and shop techniques in action, it also helps to keep a video tutorial open while you work.
The Frustration of a Dull Rotary Blade
Most quilters know this moment instantly. You cut the first pass and the blade skips a thread. You try again with more pressure, and now the fabric shifts under the ruler. By the next strip, the cut edge looks chewed instead of clean.
That's not just annoying. It can throw off piecing accuracy, waste fabric, and make a calm cutting session feel tense fast. A rotary cutter should move with confidence. When it's sharp, the blade glides and the sound is almost silky against the mat. When it's dull, the sound turns scratchy and uneven. You can hear the struggle before you fully see it.

What a dull blade does to your cutting rhythm
A worn blade changes more than the edge of the fabric.
- It increases pressure: Your shoulder, wrist, and fingers compensate for what the blade should be doing.
- It disrupts accuracy: Fabric can bunch or drift when the blade hesitates.
- It steals confidence: You second-guess every strip, every trim, every stack cut.
That's why learning how to sharpen rotary cutter blades is worth having in your quilting toolkit. It can save a blade that's merely tired, reduce waste, and get you back to the enjoyable part of the work.
A sharp blade sounds clean before it looks clean.
If you're also evaluating whether your cutter itself is the right fit for your hand, it helps to compare handle styles and blade access before your next project. A related guide on choosing the right rotary cutter can keep that decision easier while you're tuning up the tools you already own.
Should You Sharpen or Replace Your Blade
The decision gets easier once you know what to listen for. A blade that only needs sharpening usually sounds rough and feels draggy, but the rotation stays even. A blade that needs replacing often announces itself with a tick, a hitch, or one bad spot you can feel every time the wheel comes around.
That difference matters at the cutting mat. A sharpenable blade still has its original shape. It has lost that clean edge that gives you the soft, steady whisper of a good cut through cotton. A damaged blade has a defect in the rim itself, and no amount of touch-up will make it track true again.
Signs the blade is a good sharpening candidate
Choose sharpening when the blade is worn but still sound.
- The blade cuts with drag, not impact: It struggles through fabric, yet you do not feel a snag in one exact spot.
- The edge misses fibers: Strips look mostly clean, but a pass leaves whiskers or an uncut thread or two.
- The rotation stays smooth: The blade turns evenly with no wobble, no pulse, and no visible bend.
Signs replacement is the safer choice
Replace the blade when the edge is physically compromised.
- You can see a nick, ding, or flat spot: Those flaws usually show up in the cut line right away.
- The blade catches at the same point each turn: That repeating hitch points to damage, not ordinary wear.
- The wheel is bent or out of true: A distorted blade will never feel right in use, even if you abrade the edge.
Pro tip from our McKinney, Texas team: Hold the blade under a strong light and rotate it slowly. A healthy edge reflects very little. Tiny flashes usually mark a flat spot or nick. Handle the blade by the center opening only, and keep your fingers off the rim.

That same habit of checking edge condition applies across the sewing room. For example, #80/12 Titanium-Coated Topstitch Needles use a titanium nitride coating. Different tools wear in different ways, but the principle stays the same. Clean penetration and smooth cutting both depend on a well-maintained edge.
If a rotary blade sounds scratchy yet still rolls true, I usually try sharpening once. If it clicks, skips at one point, or leaves a repeating defect in the fabric, I replace it and protect the quilt from a bad cut.
Safe Blade Handling and Preparation
Before sharpening starts, slow down. Rotary blades stay dangerous even when they're dull. The edge can still open skin quickly, and the small parts in the cutter are easy to fumble if you're working in a rush.
A clear table, good light, and a small dish for screws make the job calmer and safer. If your cutter has a safety lock, engage it before you touch anything. If it has a retractable shield, close it fully before disassembly.

How to remove the blade safely
Use a flat, stable work surface. Then work in order.
- Lock or retract the cutter so the edge is as protected as possible.
- Unscrew the center fastener carefully while keeping the cutter flat on the table.
- Lift parts off in sequence and set them down in the same order for reassembly.
- Handle the blade by the center opening or with protective gloves, never by the edge.
What to do before sharpening
A blade covered in lint or adhesive residue won't sharpen evenly. Wipe away fabric fibers and any visible buildup first. You want the metal edge exposed cleanly so you can work on the blade, not on the debris.
A few habits help here:
- Keep the washers oriented: Some cutters become stiff or misaligned if parts go back in backward.
- Don't overtighten on reassembly: The blade should turn freely without wobble.
- Choose comfort tools for long sessions: Ergonomic cutters and reliable notions reduce hand strain when you're cutting yardage or trimming many units.
If you're refreshing your setup, browsing a quilting notions collection is a practical way to compare gloves, cutter styles, and bench tools that support safer handling.
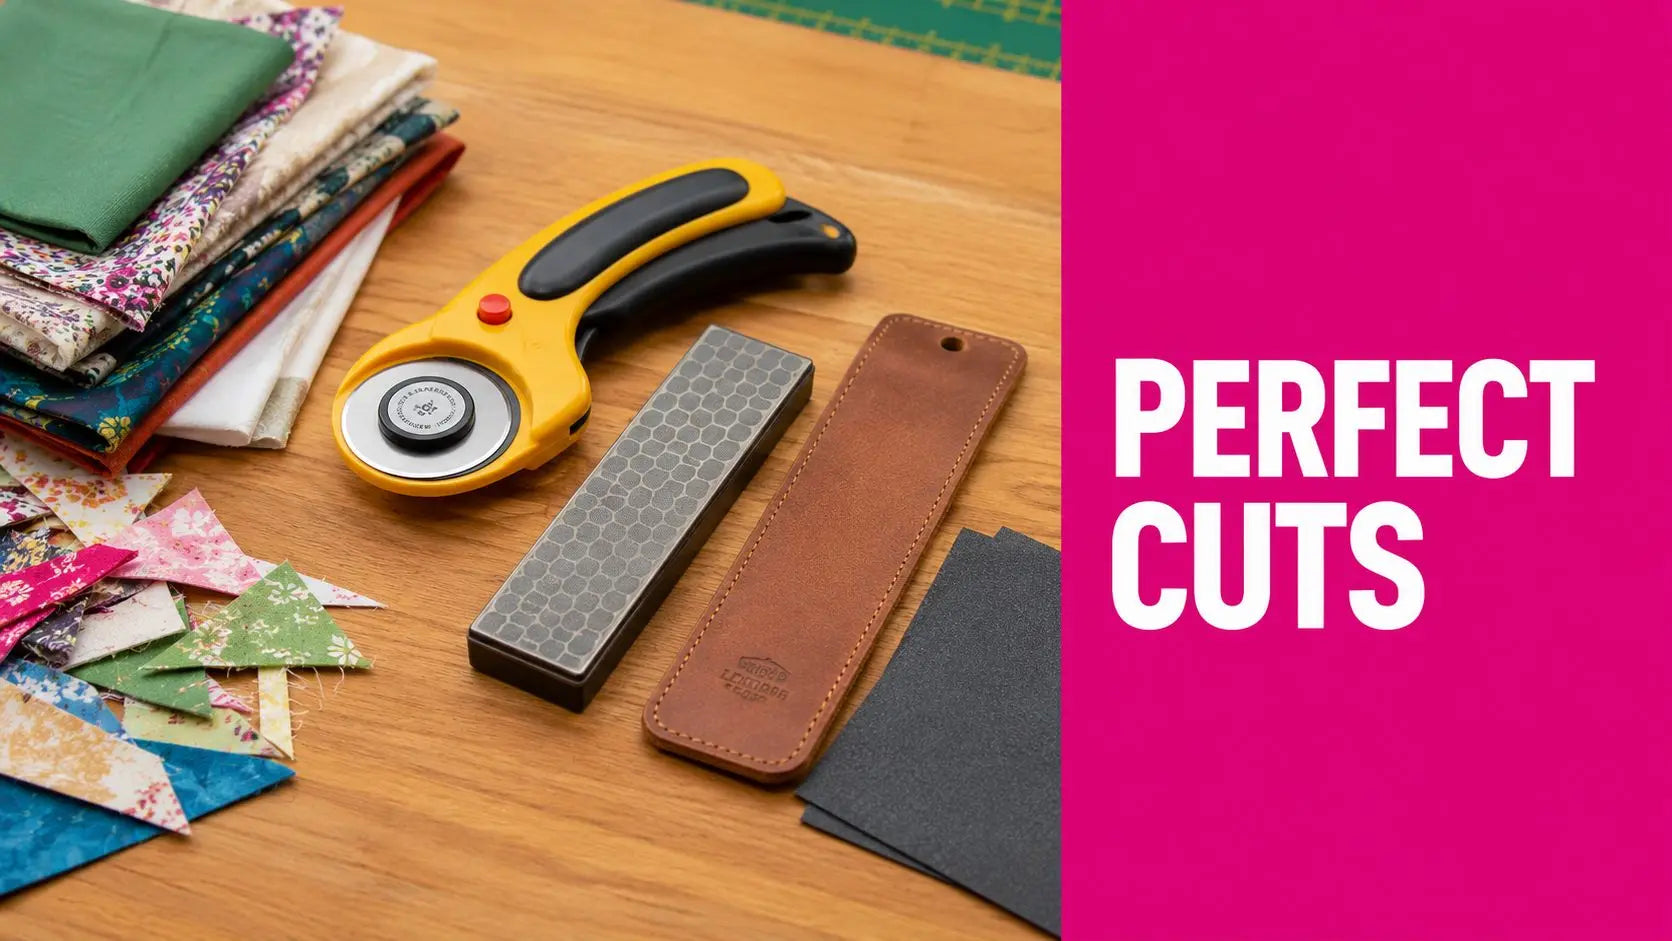
Comparing Rotary Blade Sharpening Methods
Some sharpening methods are for rescue. Some are for maintenance. Some are the fastest thing you can do when you're in the middle of cutting and don't want to stop the project.
The best method depends on the condition of the blade and the result you need. If the edge is only a little tired, a light touch may be enough. If the edge has rolled, you need more deliberate work.

Rotary Blade Sharpening Method Comparison
| Method | Best For | Relative Cost | Effort Level |
|---|---|---|---|
| Fine-grit sandpaper | Restoring a generally dull edge | Low | Moderate |
| Diamond hone or fine stone | Correcting a rolled or damaged edge that can still be saved | Moderate | Moderate to high |
| Leather strop | Refining and maintaining an already decent edge | Low to moderate | Low |
| Aluminum foil | Quick touch-up in a pinch | Low | Low |
What works well and what doesn't
Sandpaper is accessible and familiar. It gives many quilters enough control to restore a practical working edge. The trade-off is consistency. If your angle wanders, the blade may cut better, but not beautifully.
A fine stone or diamond plate can do more serious corrective work. It's the method I trust most when the edge has rolled and the blade still deserves saving. The trade-off is that it demands steadier hands and more patience.
A leather strop isn't a full rescue method by itself for a very dull blade. It shines after sharpening, or between larger sharpening sessions, when you want that smoother final feel.
Aluminum foil is a stopgap. It's useful because most quilters already have it, and sometimes that convenience matters more than perfection.
Practical rule: Match the method to the problem. Don't ask foil to repair damage, and don't reach for an aggressive surface when the blade only needs refinement.
If you like comparing sharpening systems before buying supplies, Blade Master's sharpening guide offers a useful look at how edge maintenance approaches differ across tools and use cases.
Your Step-by-Step Guide to a Razor-Sharp Edge
You notice a sharp rotary blade before you inspect the cut. The wheel rolls with almost no resistance, the sound on the mat turns into a soft, even hiss, and the fabric separates cleanly instead of tugging at the weave.

How to sharpen rotary cutter blades with sandpaper
For an ordinary dull blade, sandpaper gives many quilters the best balance of control and simplicity. A fine grit, usually in the 400 to 600 range, removes just enough metal to refresh the edge without chewing it up, as shown in Mrs Quilty's sharpening method.
Set the sandpaper on a flat, stable surface. Hold the blade at a consistent bevel and draw the edge across in smooth passes. Count your strokes so both sides get the same treatment. Light pressure works better than force. If you press hard, the blade can rock and the edge gets uneven fast.
Use this sequence:
- Keep the abrasive flat: Any wobble changes the edge shape.
- Match your angle on every pass: Consistency matters more than speed.
- Use light, even pressure: Let the grit cut gradually.
- Check the edge on scrap first: Paper is fine for a quick read, but fabric tells the truth.
A good result has a distinct feel. The blade starts the cut without that little bump at the first inch, and it travels under the ruler with less chatter.
How to restore a rolled edge with a fine stone or diamond plate
A stone or diamond plate is the better choice when the edge has rolled or nicked slightly and sandpaper is not enough. It takes a steadier hand, but it can save a blade that still has useful life in it.
The method in this rotary blade sharpening demonstration shows the motion clearly. Lay the blade against the abrasive surface, raise it just enough to meet the bevel, then pull while rotating so the whole edge contacts evenly. Work slowly. Listen while you sharpen. A steady, uniform scraping sound usually means your angle is holding. A broken or scratchy sound often means the blade is tipping.
Start with only a few passes per side, then inspect. More sharpening is easy. Putting metal back is not.
If you want another practical read on cutter behavior, edge control, and why blade condition changes cutting quality so dramatically, Display Guru's cutting insights are worth a look.
How to use a leather strop for upkeep
A leather strop refines the edge after sharpening and helps maintain a blade that is still cutting reasonably well. It smooths off the tiny burrs that make a blade sound harsher than it should.
Pull the blade with the edge trailing so it cannot bite into the leather. Keep the motion controlled and light. I treat stropping as finish work. If the blade is badly dull, stropping alone will not bring back that clean, whispery cut quilters love.
This is also a smart place to pause and watch the process in motion:
How to use aluminum foil in a pinch
Aluminum foil is the quick-fix method. Fold a strip of heavy-duty foil several times and make repeated cuts through it. The foil can freshen the edge enough to finish a small job, especially if the blade is dragging but not severely damaged.
Keep your expectations realistic. This is a temporary touch-up, not a full sharpening session. It can help you finish trimming blocks or cut the last binding strips before you swap or properly sharpen the blade.
Your final test should always be fabric. A blade that is ready to return to work cuts a clean line with light pressure, sounds smooth against the mat, and leaves no fuzzy edge behind.
Frequently Asked Questions About Blade Sharpening
How often should I sharpen my rotary blade
Sharpen according to performance, not a calendar. The blade is ready for attention when it starts dragging, skipping a thread in the weave, or leaving a cut edge that looks slightly roughed up instead of clean.
Experienced quilters usually notice it by sound first. A sharp blade gives a soft, steady hiss across the mat. A dull one has more scrape to it and asks for extra pressure, which is the point where I stop and deal with the blade before it risks the fabric.
Can you sharpen decorative edge blades like pinking or wave blades
You can try, but the margin for error is much smaller. Those blades need every point and curve to stay even all the way around, and hand sharpening can flatten the profile enough to change how the cut looks on fabric.
For most quilters, replacement is the better choice. It saves time, protects accuracy, and avoids turning a specialty blade into an expensive plain one that still does not cut well.
Will sharpening remove the titanium coating on my blade
It can affect the coating at the blade's edge. Sharpening removes metal, so any treatment sitting right on that edge may wear away as you refresh it.
That does not always make sharpening a bad idea. It means you should be selective. If the blade is high quality and only mildly dull, a light tune-up may be worthwhile. If you need perfect, predictable cutting for a prized project, replacing the blade is often the safer call.
Is aluminum foil really enough for a quick fix
Sometimes. Foil can freshen a tired blade enough to get through a small task, especially if the edge has lost some crispness but is not nicked or badly worn.
Treat it as a short-term fix. If the blade still sounds scratchy on the mat or you feel resistance through the handle after the foil test, it is time for proper sharpening or a new blade.
How do I know the blade is truly sharp again
Test on scrap fabric first. A properly sharpened blade glides with light pressure, stays on line, and leaves an edge that looks clean under good light.
The feel matters as much as the look. The cutter should roll smoothly, not chatter. The sound should be quiet and even, the kind of whispery pass that tells you the blade is slicing the fibers instead of forcing its way through them. That is the point where I trust it near good yardage.
If you're ready to finish the job with the right quilting tools, replacement blades, needles, batting, and notions, browse Linda's Electric Quilters for project supplies that support clean cutting and smoother stitching from the cutting table to the machine.


