
You've got a design ready, the shirt or towel is hooped, and then the question hits: which stabilizer belongs under this? That's where most embroidery mistakes start. A good machine embroidery stabilizer chart isn't just a fabric chart. It's a decision tool that weighs fabric stretch, design density, and wash exposure before you ever thread the needle.
If you've only been matching “cotton equals tear-away” or “knit equals cut-away,” you're missing the part that causes puckering, tunneling, and rough hand. The better approach is to read the chart like a map. Once you know how to do that, stabilizer selection gets much more predictable.
Suggested URL slug: /blog/machine-embroidery-stabilizer-chart
Meta description: Learn how to use a machine embroidery stabilizer chart for knits, wovens, lace, and more. Shop Linda's supplies to finish your project.
How to Read a Machine Embroidery Stabilizer Chart
You hoop a baby bodysuit, load a dense monogram, and glance at the chart on the stabilizer package. It points you toward one backing, but it does not explain why. That missing why is what turns a chart from a lookup table into a decision tool.
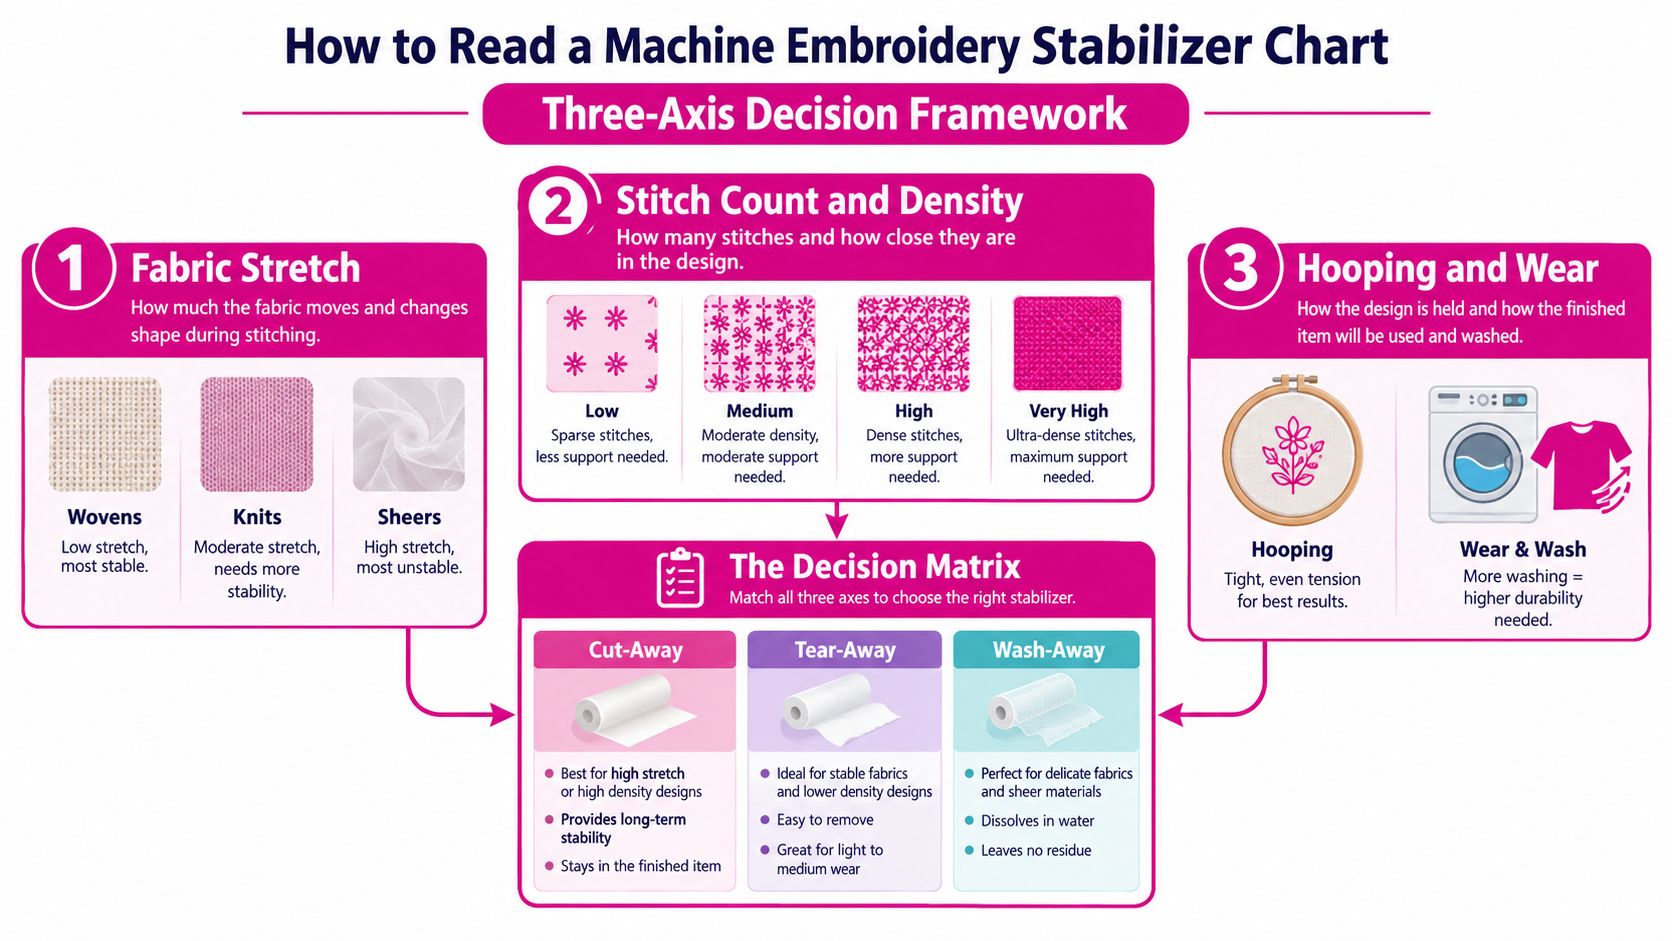
A useful machine embroidery stabilizer chart answers three questions at the same time. How much does the fabric move? How hard will the design pull on that fabric? What happens to the item after it is stitched and washed? Commercial guidance commonly organizes choices into cut-away, tear-away, and water-soluble groups, with heat-away, adhesive, and specialty options added for harder cases and project-specific charts such as towels, lace, knits, vinyl, and caps (Impressions stabilizer selection guide).
Start with fabric behavior
Read the fabric column first, but do not stop there.
Fabric behavior is the foundation because stabilizer has to control movement before it can support stitches. A firm woven napkin resists distortion in one way. A T-shirt knit stretches, relaxes, and shifts in another. A sheer fabric may not tolerate any backing left behind at all. Educational guidance from embroidery training materials explains that charts work best when you sort fabrics by stability first, then match the support method to that behavior (Embroidery Legacy stabilizer tutorial).
A simple comparison helps here. Fabric is the surface, but stabilizer is the frame under that surface. If the frame is too weak for the movement in the fabric, the stitches win and the fabric loses.
Then check stitch count and density
This is the step many beginner charts skip.
Two designs can go onto the same fabric and need different support. A light outline name and a filled logo do not place the same stress on the ground fabric, even if both are stitched on the same cotton tote. Training references for embroidery clubs and classes often sort designs by light, medium, and heavy stitch loads so users can increase stabilizer support as stitch count and density rise (SPSA stabilizer guide PDF).
If your chart gives a fabric recommendation but says nothing about stitch load, treat that recommendation as a baseline. Then ask two follow-up questions. Does the design have large filled areas? Are satin columns, underlay, or tight lettering packing stitches into a small space? If the answer is yes, you may need a heavier weight, an extra layer, or a different stabilizer type than the fabric row suggests on its own.
Practical rule: A fabric match gets you in the right neighborhood. Stitch count and density choose the exact house.
Use the notes column to judge wash performance
The last part of the chart is often buried in symbols, footnotes, or small print. Read it anyway.
Those notes tell you whether the support is temporary or meant to stay with the project. They also flag when to add a topper, when floating is safer than hooping, and when a finish like repeated laundering changes the best choice. A towel, a freestanding lace ornament, and a child's knit shirt can all start with very different priorities because their finished use is different.
When you read the chart this way, each part has a job:
- Fabric column: measures movement and recovery
- Design details: estimate stitch pull and compression
- Care notes: show whether the support must stay, tear away, or wash out
If you need thread for your stitch-out once your stabilizer choice is settled, Linda's thread selection lives in the Thread category.
Cut-Away Stabilizers for Knits and Heavy Designs
You hoop a soft T-shirt, stitch a full design, and it looks fine at first. Then the shirt relaxes, the stitches pull inward, and the fabric around the design starts to wave. That is the problem cut-away is built to prevent.
Cut-away stays with the embroidery after trimming, so the design keeps a stable base during wear, washing, and stretch recovery. For knits, fleece, and other fabrics that keep moving after they leave the hoop, that permanent support matters more than a clean tear line.
A good way to read your chart here is to stop asking only, “What fabric is this?” and ask a second question. “How hard is this design going to pull on that fabric?” A knit shirt with a tiny name and a knit sweatshirt with a dense filled logo do not need the same setup, even though both belong in the knit family.
Why cut-away stays on the short list for knits
Knit fabric is made of loops. Those loops stretch, rebound, and shift more than a stable woven. Embroidery stitches do the opposite. They lock into place and pull the fabric toward the design area.
That mismatch causes beginner headaches. You may see tunneling under satin columns, rippling around fill stitches, or small gaps where knit fabric has stretched away from the thread. Cut-away helps because it remains under the design like an internal frame. Tear it away, and you remove part of the support system the design still needs.
This matters even more on garments that will be washed often. A child's shirt, a gym hoodie, and a fleece pullover all go through repeated motion, moisture, and laundering. The backing has to keep helping after the first stitch-out, not just during it.
Choosing weight by fabric movement and design load
Within the cut-away category, weight changes the result. Soft mesh cut-away behaves differently from a firmer traditional cut-away, and beginners often miss that because many charts stop at “use cut-away for knits.”
Use the chart more like a decision tool:
| Cut-Away Choice by Fabric and Design Load | Lightweight Knit (jersey) | Midweight Knit (interlock) | Heavy Knit (sweatshirt fleece) |
|---|---|---|---|
| Lightweight cut-away | Good for light logos or small lettering when softness matters most | Better for lighter designs than filled blocks | Often too little support on its own |
| Medium cut-away | Better when the jersey is very stretchy or the design has more stitch packing | Reliable all-purpose choice | Handles moderate design load well |
| Heavy cut-away | May feel too firm on drapey garments | Useful for dense left-chest logos or fills | Better for dense embroidery, larger fills, or repeated wash wear |
Here is the practical reading: fabric hand decides how stiff the finished area can feel. Stitch count and density decide how much support the embroidery needs. Wash performance decides whether you can accept a softer, lighter option or need longer-term stability.
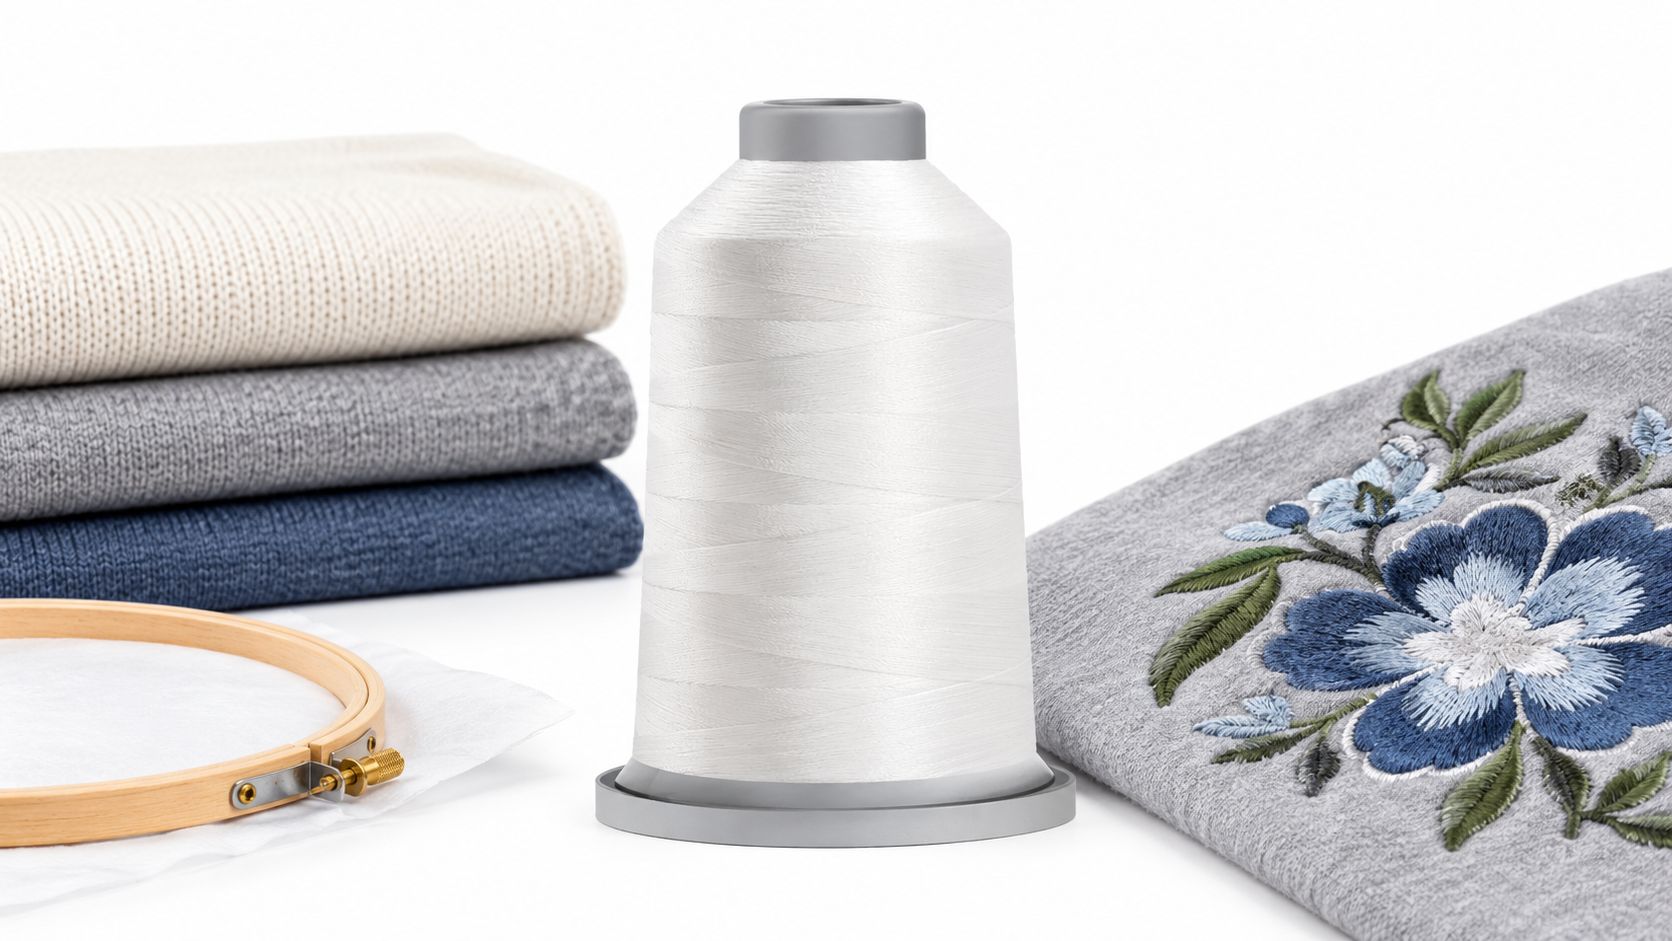
One thread option often paired with garment embroidery is 10000 White Glide Polyester Thread - 5,500 yards King Spool, a 40 weight, 2 ply polyester thread described by the manufacturer as colorfast, virtually lint-free, and engineered to maintain consistent tension through the spool.
When one layer is not enough
Beginners often assume “cut-away” is the whole answer. Often, the better answer is “cut-away plus enough total support for this design.”
A soft jersey with a dense chest logo may need a heavier cut-away or two layers of a lighter one. A stretchy performance knit can also benefit from pairing the backing choice with careful hooping and, if the fabric surface calls for it, a topper. The chart points you to the stabilizer family. The design itself determines how much of that family you need.
Comfort still matters. On wearables, the back of the embroidery sits against the body, so a softer mesh cut-away can be a better choice when the design load allows it. For skin-contact items such as shirts, baby garments, or sleepwear, many embroiderers balance support and feel by choosing the softest cut-away that still controls distortion.
If your chart labels a fabric as knit and the design is large, dense, or headed for frequent laundering, cut-away is usually the safer choice. The decision is which cut-away, and how much.
Tear-Away Stabilizers for Stable Wovens
You stitch a name onto a cotton tote, tear off the backing, and the result looks clean and light. Then you try a dense logo on another tote with the same stabilizer, and the fabric tunnels or ripples. That is the moment many beginners realize a stabilizer chart is a decision tool, not a simple fabric chart.
Tear-away works well on stable woven fabrics because those fabrics already resist stretching while the machine stitches. Quilting cotton, firm linen, canvas, twill, and similar wovens usually need temporary support, not a permanent layer left behind. The goal is to hold the fabric steady long enough for the design to form cleanly, then remove the excess backing so the project stays flexible.
The part many basic charts skip is design load. A stable fabric does not automatically mean tear-away is the right answer. Stitch count, fill density, and how often the item will be washed all matter.
Where tear-away usually makes sense
Start by checking three factors together instead of looking at fabric alone:
- Fabric stability: woven, with little stretch and good body
- Design intensity: light to moderate stitch count, open fills, lettering, simple motifs
- Project demands: items that do not need long-term structural support after stitching
A practical teaching guideline from Nancy Zieman stabilizer know-how is to test with two layers of medium-weight tear-away when one layer feels uncertain. That approach helps on projects like quilt blocks, napkins, tote bags, and home decor pieces where you want a cleaner back but still need enough support during stitching.
Why stable fabric can still go wrong
Fabric stability and design intensity are two different measurements. A woven cotton may sit nicely in the hoop, yet still distort under a dense design because the stitches themselves pull inward as they form.
A good comparison is paper under a drawing pin. The paper can be flat and firm, but enough pressure in one small area still puckers it. Embroidery does the same thing. Dense stitching concentrates tension.
That is why tear-away works best for wovens with lighter design loads and starts to struggle as the design gets larger, denser, or more fill-heavy. Frequent laundering raises the bar too. A tote bag used once for gifting asks less of the backing than a child's lunch bag or an apron that will be washed over and over.
| Tear-Away Density Thresholds by Woven Fabric | Low Density (under 4,000 stitches) | Medium Density (4,000 to 8,000 stitches) | High Density (over 8,000 stitches) |
|---|---|---|---|
| Quilting cotton | Usually suitable | Often suitable, may need layering | Often borderline, test first |
| Linen | Suitable if weave is stable | Watch for shifting in looser weaves | Distortion risk increases |
| Canvas | Usually suitable | Often handles medium density well | May still need heavier support or layering |
How to read the chart correctly
Use the chart in this order:
- Confirm the fabric family. If it is a stable woven, tear-away belongs on the shortlist.
- Judge the design load. More stitches and denser fills increase pull.
- Consider wash performance. Repeated laundering exposes weak support choices.
- Adjust the amount before changing the family. One layer, two layers, or a heavier tear-away can all change the result.
- Switch families if the test still shows distortion. A dense woven project can cross into cut-away territory even if the fabric itself is stable.
That last point trips people up. The chart does not say "cotton always gets tear-away." It says stable woven plus moderate design often gets tear-away.
A woven fabric can be stable and still distort under a dense design.
If you keep tear-away on hand for clean-finish projects, also keep a cut-away nearby for the borderline cases. Quilt blocks and simple tote motifs often do beautifully with tear-away. Dense monograms, filled logos, and heavily washed utility items may ask for more support than the fabric alone suggests.
Wash-Away and Heat-Away Stabilizers for Lace and Sheer Fabric
You finish a lace bookmark, rinse the stabilizer, and hold it up to the light. If the stitching stands on its own, you chose correctly. If the design collapses, stretches, or feels gummy, the chart was missing part of the decision.
That is why this part of a machine embroidery stabilizer chart needs more than a simple fabric match. Sheer and translucent projects ask two questions at once. Should any support remain after stitching, and can the stitches themselves carry the finished piece once that support is gone?
Wash-away and heat-away both belong in the temporary-support family, but they solve different problems. Wash-away is the usual choice when you want the stabilizer to disappear completely after the stitching is finished. Heat-away is the backup option for projects that should stay dry, as long as the fabric can safely handle the removal method.
When to choose wash-away
Wash-away works best when visible backing would spoil the result, or when the embroidery itself becomes the structure. Freestanding lace is the clearest example. The stabilizer acts like scaffolding during construction, then rinses out once the thread network is strong enough to stand alone.
Use it for:
- Freestanding lace: where stitches form the finished shape
- Sheer fabric: organza, voile, netting, and translucent panels
- Whitework and heirloom-style details: where leftover backing would show
- Appliqué on see-through bases: when a permanent backing would be visible from the front or back
A beginner chart often stops there, but the better decision tool adds one more layer. Stitch count and density matter just as much here as they do on knits or wovens. A light open lace can run on a lighter soluble film or a single fibrous layer. A dense lace coaster, ornament, or in-the-hoop lace bowl usually needs a heavier soluble sheet, two layers, or both. The fabric category tells you the stabilizer family. The design load tells you how much of it to use.
Pile fabrics create a separate case. If stitches are sinking into towels, fleece, or sherpa, the missing piece is usually a water-soluble topper on the surface, not a change to the backing underneath.
When heat-away makes more sense
Heat-away is for the project that needs temporary support but should not be soaked. Some velvets, specialty trims, and delicate placements fit that description. The tradeoff is simple. You avoid moisture, but you introduce heat risk.
Test first on a scrap from the actual project. That step matters more with heat-away than many hobbyists expect. A fabric can survive embroidery just fine and still glaze, flatten, or discolor during stabilizer removal.
| Wash-Away vs Heat-Away Stabilizer Comparison | Dissolving Method | Best For | Typical Layers | Removal Notes |
|---|---|---|---|---|
| Wash-away film | Water | Sheers, topper use, lighter support | Single or layered as needed | Rinse fully to avoid residue |
| Wash-away fibrous sheet | Water | Freestanding lace and structured soluble support | Often layered for lace | Allow complete drying after removal |
| Heat-away film | Heat | Projects where water is undesirable | Usually single | Test first to avoid heat damage |
Two mistakes show up late with these products. A partial rinse can leave stiffness or a slight film on the project. Too much heat can mark the fabric after the embroidery looks perfect in the hoop.
Wash performance belongs in the chart too. If the item will be washed after use, any leftover soluble residue needs to come out cleanly, especially on lace that should dry soft rather than papery. If the item is decorative and will stay dry, you may accept a slower rinse or a firmer finish if it helps the design hold its shape.
Soft CTA: Before you start a lace or sheer project, gather the exact stabilizer type, enough layers for the design density, and a small test scrap first. Mid-project substitutions rarely end well.
Adhesive, Film, and Specialty Stabilizers for Tricky Hooping
You're embroidering a shirt cuff, and the design is small enough to fit. The hoop is the problem. Clamp the cuff directly, and it can stretch, crease, or leave marks before the first stitch even starts.
That is the moment a stabilizer chart stops being a fabric chart and becomes a decision tool.
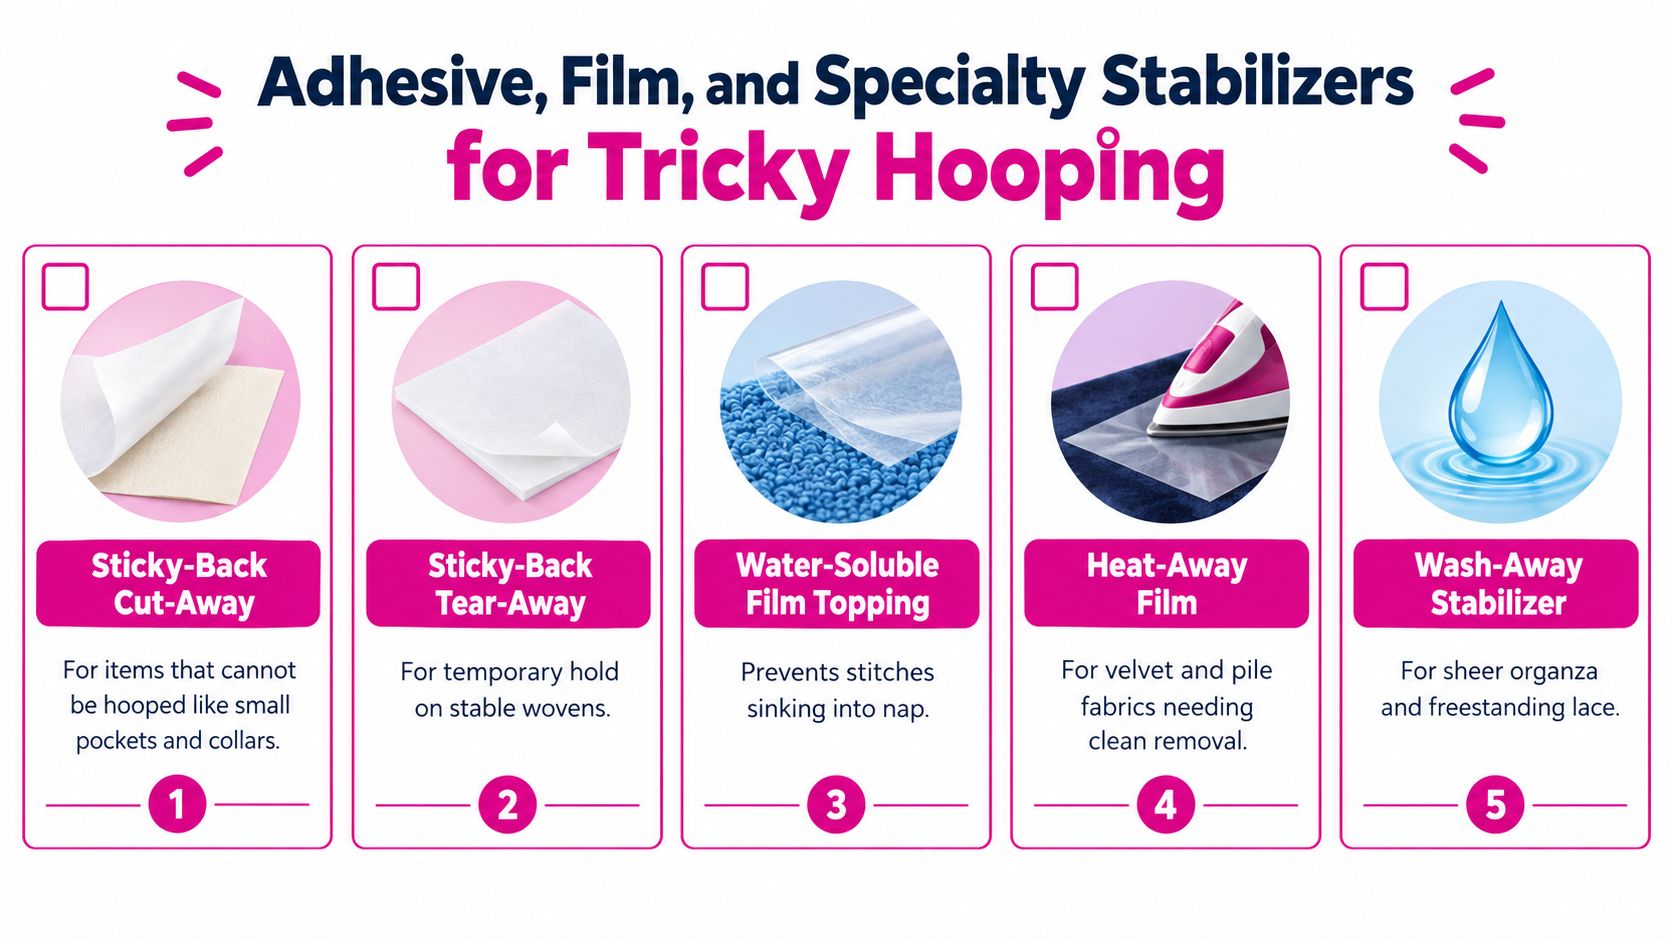
Sticky-back cut-away and sticky-back tear-away help when the item cannot be hooped flat. Collar points, cuffs, bag straps, cap fronts, and finished garments often fit this category. You hoop the stabilizer, then place the project on the adhesive surface so the item stays in its natural shape.
That solves placement. It does not automatically solve support.
Beginners often miss that distinction. A sticky product can hold an awkward item in place beautifully, but the design still needs the right long-term support under it. If the fabric is stretchy or the stitch count is high, a sticky cut-away usually makes more sense than a sticky tear-away because the adhesive handles hooping and the cut-away handles stitch stress after the item is worn and washed.
A stronger stabilizer chart should list specialty products by job, not just by material:
- Sticky-back cut-away: for hard-to-hoop items that also need permanent support
- Sticky-back tear-away: for stable items that need temporary hold during stitching
- No-show mesh: for light garments where a bulky or opaque backing may show through
- Water-soluble topper film: for textured surfaces where stitches would otherwise sink into the pile
- Self-adhesive water-soluble stabilizer: for delicate or awkward projects where you need temporary hold and clean removal
No-show mesh deserves special mention. It is often chosen for appearance, but it is still a support decision. On a lightweight knit or performance shirt, mesh can reduce show-through while still giving better recovery than a basic tear-away. If the design is dense, you may still need extra layers or a firmer cut-away underneath, even if the mesh looks neater from the back.
Topper film handles a different problem entirely. It sits on the fabric surface and keeps stitches from disappearing into texture. Towels, sherpa, velvet, fleece, and terry benefit because the thread forms on a smoother temporary surface instead of falling into the nap like wet paint soaking into a thick brush.
Our team in McKinney, Texas, tested this on towel samples and saw the same design look crisp with topper and fuzzy without it. The backing underneath still mattered, but the topper changed edge clarity enough that skipping it would have looked like a digitizing problem.
A quick visual walkthrough helps here:
Pro tip: If the hoop would mark the item, distort the opening, or force the piece out of shape, hoop the stabilizer and float the project. Then choose the adhesive or specialty format based on what the design needs after stitching, not just what gets it into the machine.
Soft CTA: If a project is awkward to hoop, ask two questions before you stitch. What will hold this item safely in place, and what will support this design after wear, washing, or texture get involved. That short check leads to better choices than treating every sticky stabilizer as the same tool.
Matching Stabilizer Weight to Stitch Count and Density
You load a design that looks small on screen, hoop a shirt, and press start. Halfway through, the fabric begins to tunnel and the letters pull inward. The chart did not fail you. The design was denser than its size suggested, and the stabilizer needed to be chosen as support for the stitching load, not just as a match for the fabric.
That is the shift beginners usually need. A stabilizer chart is a decision tool. Fabric type gets you into the right family, but stitch count, density, and how the item will be used decide the weight.
Stitch count is the easiest place to start because your software gives you a number. Treat that number as a rough load estimate, not a final answer. A design with fewer stitches usually pulls less. A design with many stitches usually needs more support. But two designs with the same count can behave very differently if one spreads those stitches over a wide area and the other packs them tightly into a small space.
A practical weight-selection framework
Use the chart in two passes. First, sort the design by stitch count. Then check how tightly those stitches are packed.
| Stabilizer Weight Selection by Stitch Count and Density | Density Rating | Tear-Away Weight | Cut-Away Weight | Layering Strategy |
|---|---|---|---|---|
| Under 5,000 stitches | Low | Light | Light | Single layer usually works |
| 5,001-10,000 stitches | Medium | Medium | Medium | Add a second layer if fabric is unstable |
| 10,001-15,000 stitches | High | Medium to heavy | Medium to heavy | Layer when fabric or placement is borderline |
| Over 15,000 stitches | High to very high | Heavy or reconsider tear-away use | Heavy to extra support | Layering is often safer |
Those ranges are guidelines, not promises. A loose floral outline at 9,000 stitches is a very different job from a compact badge design at 9,000 stitches.
Density is the tie-breaker.
Let density decide the close calls
A large open design behaves like spreading your weight across a wide floor. A compact dense design behaves more like standing on one tile. The pressure concentrates in one spot, so the fabric and stabilizer have to resist more pull in less space.
That is why a small logo can need heavier support than a larger motif.
Use this classroom rule:
- Large, open design: lighter support may be enough
- Small, packed design: choose more support than the size alone suggests
- Frequent-wash item: choose the more durable option
- Stretch fabric with dense stitching: use a stable base and be conservative
Wash performance matters here because the job of stabilizer does not end when the hoop comes off. A design that looks flat right after stitching can ripple later if the backing was barely adequate and the item gets washed, worn, and stretched. For garments, especially knits, it often helps to choose the stabilizer that still supports the embroidery after repeated laundering rather than the one that only looks neat on day one.
A simple way to judge the design before you stitch
If you are unsure whether a design is dense, check three things in your software or on the preview sheet:
-
Finished size
Small designs with medium or high stitch counts deserve extra attention. -
Type of stitching
Filled areas and stacked satin columns pull more than light running stitches. -
How much empty fabric is left inside the design area
Less open space usually means more concentrated tension.
Here is a beginner-friendly shortcut. If the design feels heavy for its footprint, choose stabilizer as if you were stepping up one category. That might mean moving from light to medium weight, from one layer to two layers, or from tear-away to cut-away if the fabric can distort.
A few examples make this easier to read in real life:
- 6,000 stitches in a wide name with open spacing on a woven napkin: light to medium support may be enough
- 6,000 stitches in a compact left-chest logo with filled blocks on a polo: medium cut-away is the safer choice
- 12,000 stitches in a large open floral on a tote: medium support may still work
- 12,000 stitches in a dense crest on a sweatshirt: heavier support or layering is usually the better call
Soft CTA: Save the stitch count, fabric type, and stabilizer choice for projects that stitch well. After a few repeats, your own notes become more useful than any generic chart because they connect the design load to the results you got.
Reading the Master Chart by Project Type
You are staring at the chart because your project does not fit one neat box. The fabric says knit, the design looks a little dense, and the item is a baby blanket that will be washed again and again. In that moment, the chart is not just a lookup table. It is a decision tool that helps you weigh support, softness, cleanup, and long-term shape.
That is the best way to read a master chart by project type. Start with the finished item, then narrow down by fabric behavior, design load, and wash life. A tote bag and a polo may both carry a medium-size logo, but they do not ask the stabilizer to do the same job. One needs temporary control during stitching. The other needs support that stays behind after laundering and wear.
How to locate the right row
Use a four-step scan instead of reading across the whole chart at once:
-
Name the project first
Garment, home decor, lace, towel, cap, quilt block, bag, or baby item -
Check how the base behaves
Stable woven, stretchy knit, sheer fabric, pile surface, or specialty material like vinyl -
Judge the design load
Light outline, medium logo, dense fill, layered satin, or lace-style build -
Finish with use and cleanup
One-time display, frequent wear, repeated washing, or full stabilizer removal
That order matters. Project type helps you avoid a common beginner mistake, treating every cotton item or every knit item the same. A sweatshirt patch area, a tee shirt chest logo, and a knit blanket can all fall under knit, but the support choice shifts once you factor in stitch concentration and how the item will be used.
Common project types and where they land
| Master Stabilizer Chart by Project Type | Fabric | Density | Stabilizer | Weight / Needle | Wash Rule |
|---|---|---|---|---|---|
| Left-chest polo | Knit | Medium | Cut-away | Medium support, ballpoint-style garment setup | Choose lasting support |
| Tote bag | Stable woven | Medium | Tear-away | Medium support | Upgrade if design is dense |
| Baby blanket | Knit or plush | Medium | Cut-away plus topper if textured | Soft support matched to surface | Prioritize comfort and wash life |
| Towel | Pile woven | Medium to dense | Tear-away or cut-away below plus water-soluble topper | Support below, film above | Remove topper after stitching |
| Cap front | Structured specialty | Dense | Sticky-back support with cap framing | Follow cap setup | Placement and hoop geometry matter |
| Freestanding appliqué or lace | Soluble base | Dense build | Wash-away | Layered soluble support | Remove fully after stitching |
| Quilt block | Stable woven cotton | Light to medium | Tear-away | Light to medium support | Usually temporary support is enough |
A chart like this works much like a trail map. The project row gets you into the right area, but the final choice still depends on how steep the climb is. In embroidery terms, that means stitch count, density, and wash performance can push you one step higher than the basic row suggests.
For example, a tote bag row may point you toward tear-away because the fabric is stable. If the design is a compact, fill-heavy crest, that same row may need a stronger interpretation, such as a heavier tear-away or a second layer. A baby blanket row may already suggest cut-away, but if the design is light and open, you might choose a softer cut-away rather than the firmest option. The chart gives the direction. Your design and use case set the final level of support.
Some projects naturally sit between rows. Lightweight denim can behave like a stable woven in the hoop but still live like a garment after embroidery. Performance blends can look stable at first, then stretch back into shape around the stitching after wear. In those overlap cases, choose the row with the stricter support rule when either of these is true: the design packs a lot of stitches into a small area, or the item will be washed often.
If two rows both seem reasonable, let design density and wash life break the tie.
If you want to stay in project-learning mode after this article, a related skill builder is the Linda's blog tutorials, where you can keep comparing supply choices across real sewing and embroidery projects.
Stabilizer Tradeoffs for Borderline Cases
You hoop a shirt that seems stable, load a logo that does not look especially large, and the finished stitching still tunnels, ripples, or feels too stiff. Borderline cases usually fail for that reason. The fabric choice looked right on the chart, but the design behavior changed the answer.
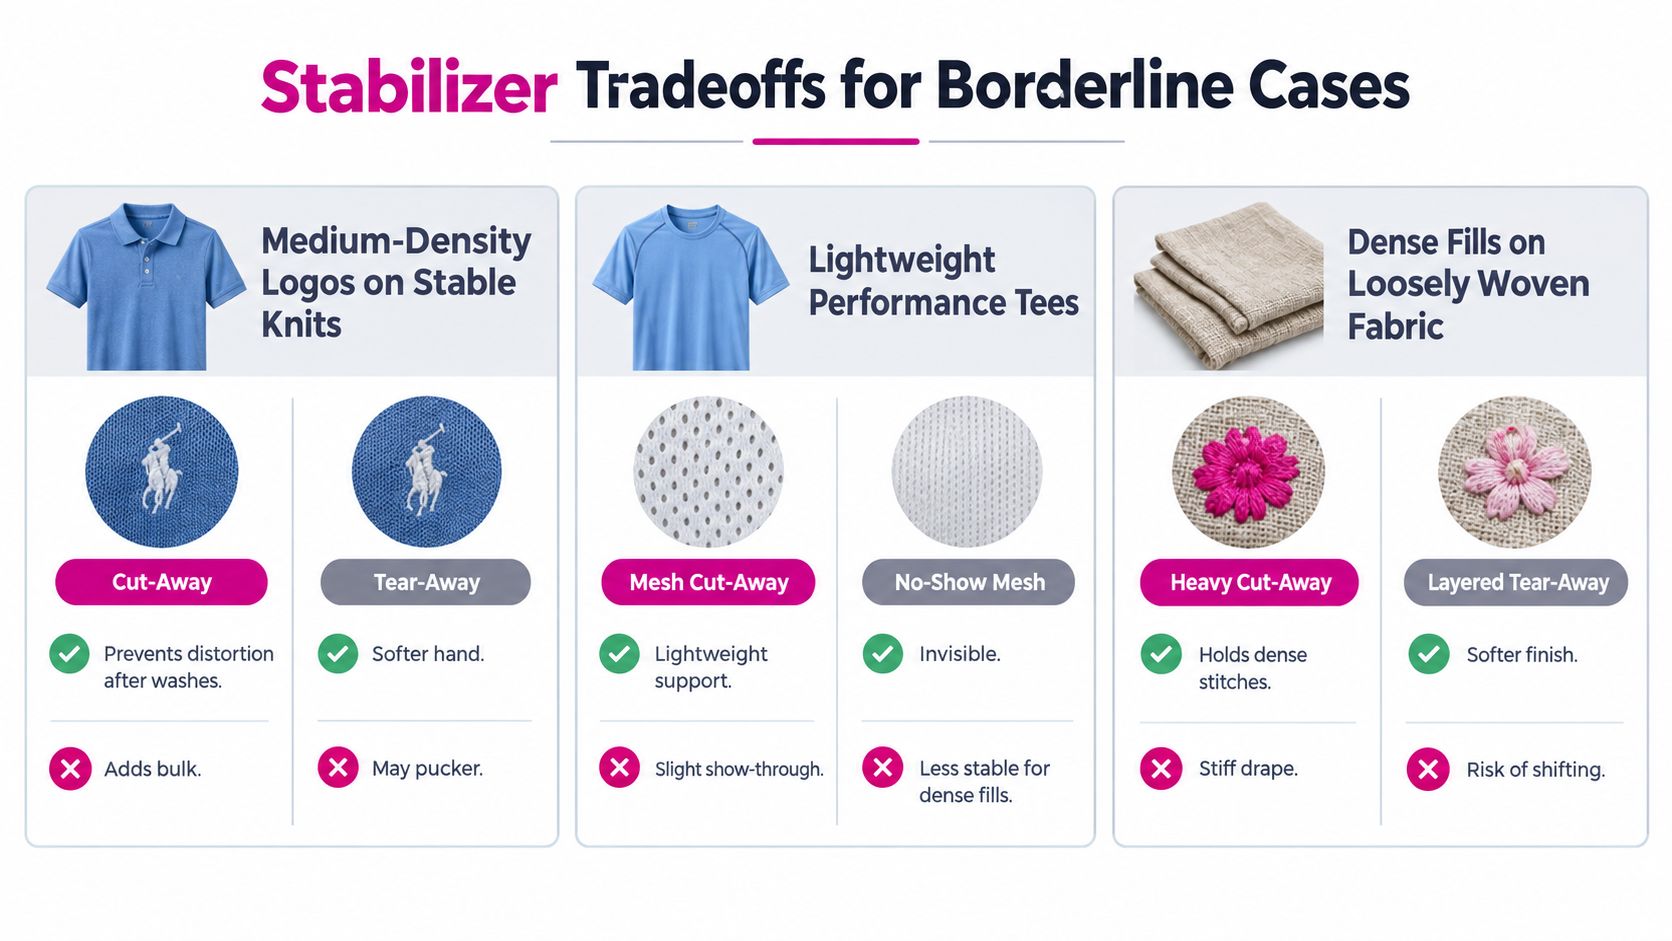
A stabilizer chart works best here as a decision tool. Fabric is only the first filter. After that, read the project the way an embroiderer does at the machine: How much thread is landing in one area? Will the item be washed over and over? Does the fabric recover its shape, or does it stretch and stay stretched? Those questions decide whether you stay with the chart's first suggestion or move up to more support.
Three common gray-zone decisions
Medium-density logo on a stable knit
A stable knit can sit in the hoop nicely and still flex after stitching. That is why tear-away can look fine during setup but disappoint after wear. For polos, tees, and similar garments, cut-away is usually the safer call because the support stays behind the stitches after the shirt stretches, washes, and settles. If you are worried about comfort, change the cut-away weight or choose a softer mesh cut-away instead of changing to tear-away.
Lightweight performance tee that gets washed often
Performance fabric creates a two-part problem. It is thin, and it keeps moving through wear and laundering. No-show mesh often handles that balance well because it supports the design without adding much bulk. A light, open design may do well with one soft layer. A denser logo often needs a firmer mesh or a second layer, even if the shirt itself feels smooth and stable in your hands.
Dense fill on loosely woven linen
Linen can fool beginners. On the table, it looks orderly. Under a packed fill, the yarns can spread and the grain can drift. A lighter motif may work with tear-away, especially if you want a cleaner back on a decorative item. Once the design gets compact or fill-heavy, stronger support makes more sense, either with a heavier backing or a mixed setup that controls both movement and surface texture.
A four-question filter for close calls
When two stabilizer options both seem plausible, run them through four checks:
- What happens in the hoop? If the fabric spreads, warps, or relaxes as you hoop it, choose more stable support.
- How concentrated is the design? A small logo packed with satin columns and fill behaves differently from an open floral of the same size.
- What happens after stitching? If the item will be worn, stretched, or washed often, support that remains in place usually wins.
- What matters more on the back? If a clean finish matters most, you may accept less permanent support, but only if the design itself is light enough.
A sample stitch-out settles many arguments quickly.
Patterns that solve borderline problems
- Float items that do not hoop well: caps with awkward panels, velvet, small blanks, and bulky shapes often behave better when the stabilizer is hooped and the item is positioned on top.
- Add topping when the surface has loft: towels, fleece, minky, terry, and sherpa can bury stitches even when the backing choice is correct.
- Treat garments and decor differently: a pillow front can tolerate decisions that would fail on an often-washed shirt.
- Let the design break ties: when the fabric sits between categories, dense stitching should push you toward the stronger option.
One useful rule helps many beginners. If you would be upset by distortion after the third or fourth wash, choose for the finished life of the item, not for the neatest look right after trimming.
Linda's Electric Quilters carries the embroidery supplies that make these chart decisions practical, including thread, batting, notions, and project materials for garment, towel, and quilted embroidery work. If you're ready to match your next design to the right backing and finish it with the right supplies, visit Linda's Electric Quilters.


