
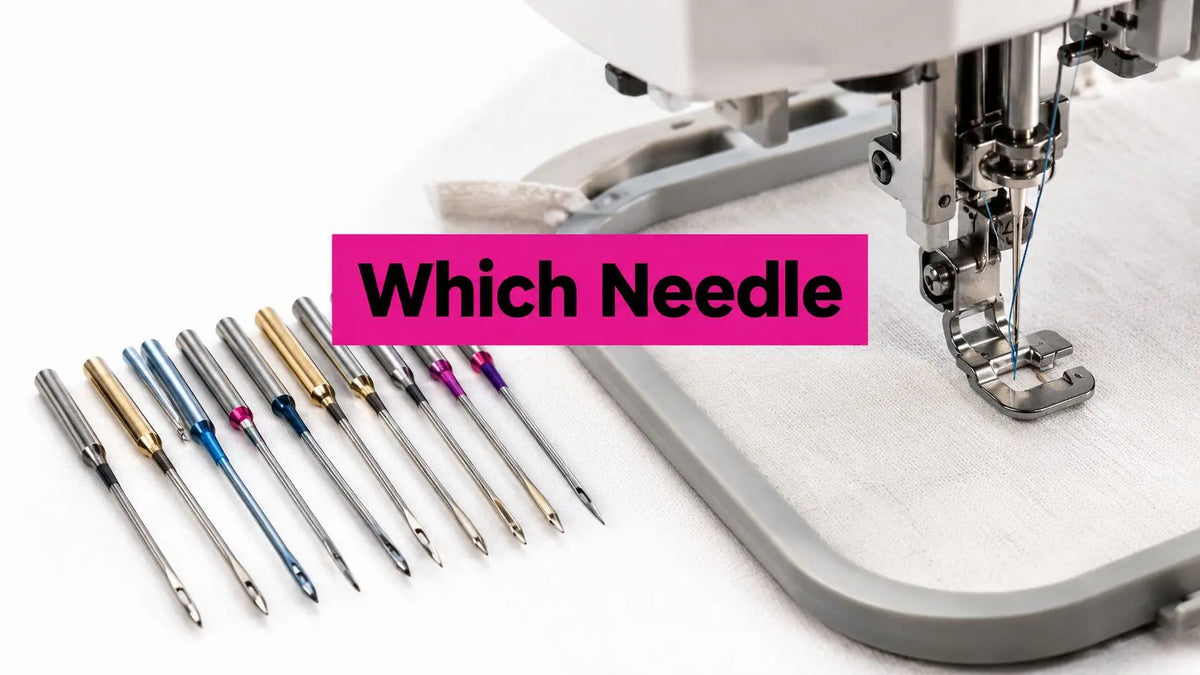
A 75/11 embroidery needle is the universal standard for 40-weight threads and medium-weight fabrics. Move to a larger eye or a different point when you're working with metallic thread, heavyweight materials, knits, or dense designs, because fabric structure and thread friction can cause shredding, skipped stitches, and distortion.
You know the frustration. The design looked clean in the preview, the stabilizer is secure, and the first few stitches appear perfect. Then the upper thread starts fraying, the machine breaks thread in the same place, or the fabric comes out with puckered edges and visible needle holes. Many embroiderers adjust tension first, but the needle is often the more important variable.
From a McKinney, Texas, workroom perspective, a machine embroidery needle isn't a generic consumable. It's a precision tool that has to match the thread, fabric structure, stitch density, and stabilizer stack. The right starting point is usually 75/11, but the right finishing choice depends on what the needle has to penetrate and how the thread moves through its eye.
The Anatomy of a Machine Embroidery Needle
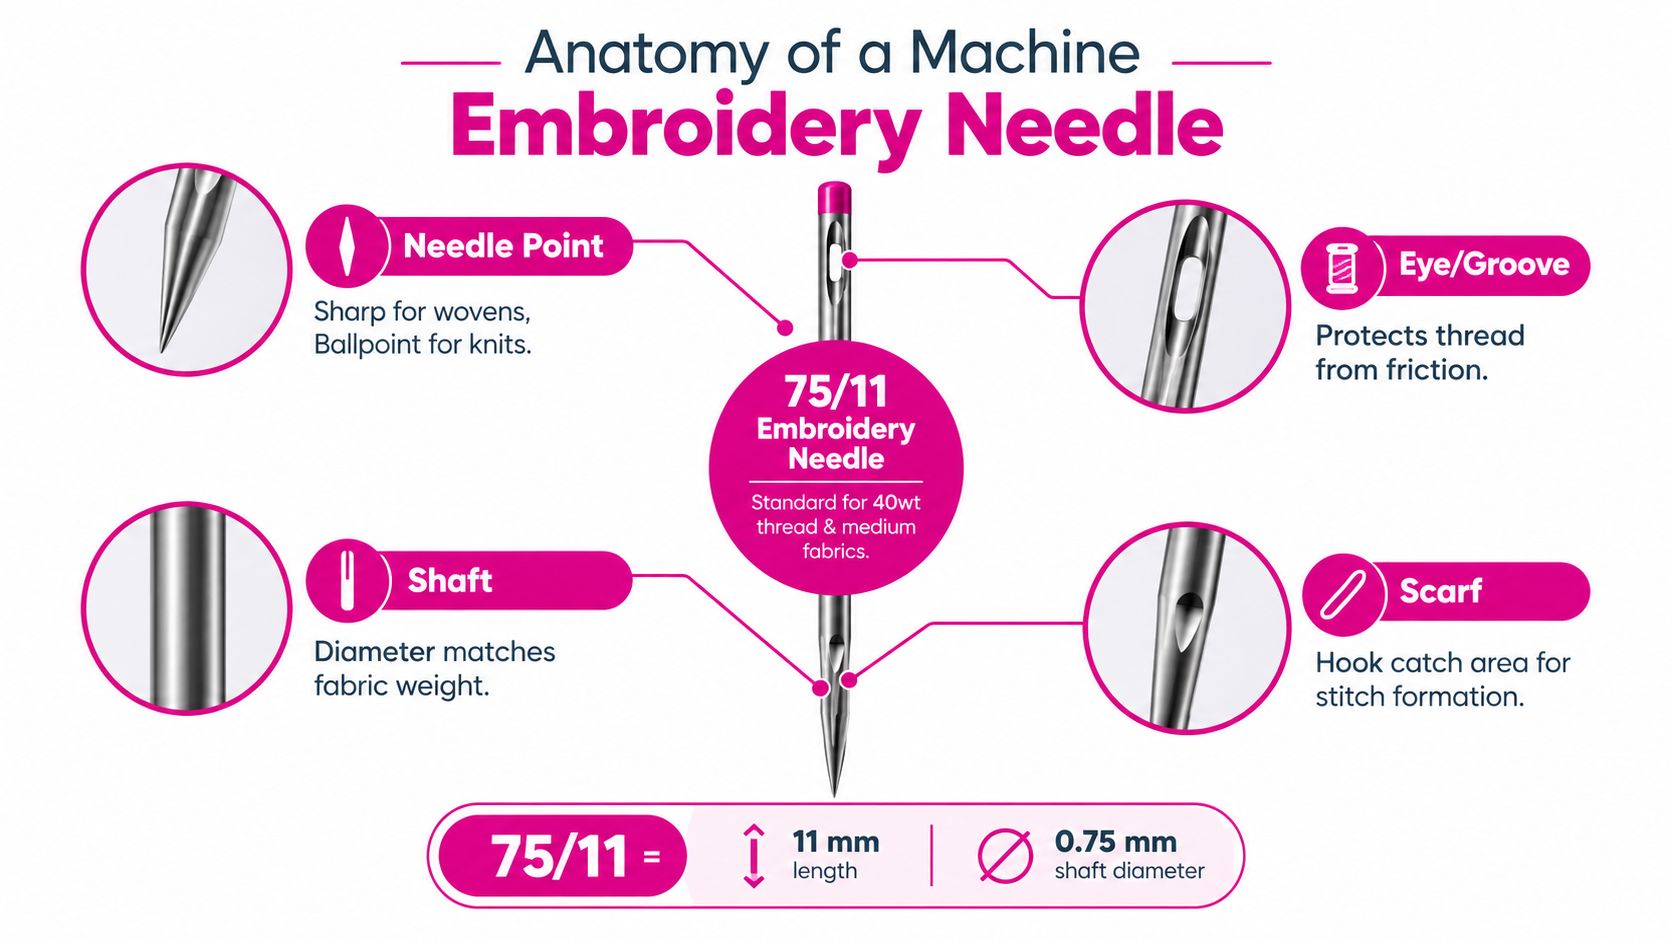
A standard embroidery needle is engineered for repeated penetration and controlled thread movement. Unlike a general-purpose needle, it has a larger eye and a specially shaped scarf. Those features give the thread more room to pass and help the hook catch the thread cleanly during stitch formation, even when a design contains dense areas. Sewing industry needle guidance identifies sizes from 65/9 to 75/11 as suitable for 60-weight and 40-weight threads.
The eye is where friction becomes visible first. If the opening is too tight for the thread, the thread rubs against the metal as the needle rises and falls. That repeated contact can loosen the thread's outer fibers, producing fuzz, flat spots, or a sudden break. A larger eye doesn't automatically solve every problem, but it creates a smoother path for threads that are delicate, textured, or thicker than standard embroidery polyester.
The scarf sits behind the needle eye. Its job is tied to hook timing and stitch formation. A properly shaped scarf gives the rotary hook a consistent area to catch the upper thread. A standard sewing needle may look similar at a glance, but its scarf and eye aren't necessarily designed for the same embroidery conditions.
What to inspect before stitching
Hold the needle under a bright light before installing it. Look for a smooth eye, a clean groove, and a point without a visible hook or flat spot. Run a fingernail gently along the needle rather than touching the point with your finger. If the nail catches, replace the needle.
A true embroidery needle should also have the correct eye and scarf profile for machine embroidery. That doesn't mean every brand will look identical, but the needle should appear purpose-built for thread passage rather than merely labeled as universal.
Pro-Tip: If thread begins shredding in a dense satin column, don't immediately increase upper tension. First remove the needle and inspect the eye and scarf. A tiny burr can behave like a file, especially with rayon or metallic thread.
Our team in McKinney, Texas, treats this inspection as part of setup, not as a repair step. The same principle applies whether you're using a single-needle home machine, a multi-needle format, or an embroidery attachment on a quilting system. Clean threading paths, a correctly seated bobbin casing, and a smooth needle work together. Tensioning can't compensate for a damaged eye.
If your design is ready to stitch, keep fresh embroidery needles in the sizes your projects use most often. A small supply of the correct needle is more useful than trying to rescue a stitch-out with a worn one.
Decoding Needle Sizes and Thread Weights
Needle packaging usually shows two numbers, such as 75/11. The first is the European metric size, and the second is the American size. The metric number reflects the blade diameter in hundredths of a millimeter, so NM 75 equals 0.75 mm and NM 90 equals 0.9 mm. Schmetz's needle reference explains this dual sizing system and identifies 75/11 as the standard pairing for 40-weight thread, with 90/14 suited to heavier fabrics.
A higher number means a thicker needle. That doesn't mean the largest needle is the safest choice. A needle that's too large can leave unnecessary holes, disturb delicate fabric, or make small lettering look heavier than intended. A needle that's too small can restrict the thread, increase friction, and create breaks.
Embroidery needle size and thread weight matrix
| Needle Size | Ideal Thread Weight | Best Fabric Application |
|---|---|---|
| 65/9 | 60-weight thread | Fine details and lighter embroidery work where a smaller needle helps reduce bulk |
| 75/11 | 40-weight thread and suitable 60-weight thread | General machine embroidery and medium-weight fabrics |
| 90/14 | Heavier specialty threads | Heavyweight materials, dense designs, denim, caps, puffy foam, and thicker thread applications |
Machine embroidery needles commonly fall within the 70/10 to 90/14 operating range, with 75/11 serving as the most useful default for general work. The choice still depends on whether the thread can pass freely through the eye and whether the shaft can enter the fabric and stabilizer without bending.
Why the default sometimes fails
A 75/11 needle works well for many medium-weight projects, but it isn't a universal answer for every spool. Fine 60-weight thread may benefit from 65/9 when the design contains small lettering or delicate detail. Thicker materials and specialty threads may need 90/14 because the larger shaft and eye provide more clearance.
Don't confuse thread weight labels with thickness in the ordinary sense. Embroidery thread systems use their own numbering conventions, and the thread's actual construction affects friction. A smooth polyester thread, a rayon thread, and a metallic thread can behave differently even when a size chart suggests the same needle.
If you're stocking a project kit, choose the needle and thread as a pair. Buy enough matching embroidery thread and replacement needles before starting the final garment, quilt label, towel, or cap. A test stitch-out on the same fabric and stabilizer gives you more useful information than relying on the spool label alone.
Matching Needle Points to Fabric Structures
Thread weight is only half of the selection process. The needle point must suit the fabric structure. A sharp point pierces tightly woven fabric in a controlled location, which supports crisp lettering and clean outlines. A ballpoint point behaves differently. It pushes between fibers instead of cutting directly through them, making it more appropriate for knits and lightly woven materials. Madeira's needle guide describes this distinction and connects ballpoint needles with reduced holes and distortion in stretchy garments.
Sharp points for stable woven materials
Use a sharp embroidery point for tightly woven cotton, firm linen, stable canvas, and other woven fabrics where the design needs a precise entry point. Denim and caps can also require a sharp point, but the needle size must increase when the material, foam, or stabilizer stack becomes heavy.
Towels are more complicated. The surface has loft, and the loops can pull toward the needle or obscure fine detail. A stable design, suitable topping, and careful hooping matter as much as the needle. If the design is dense, a needle that's too small may struggle through the combined fabric and stabilizer layers.
Ballpoint points for knits and stretch garments
Performance wear, jersey, lightweight fleece, and other stretchy fabrics can show permanent damage when a sharp needle cuts through the knit structure. A ballpoint needle separates fibers more gently, but it won't fix poor stabilizer selection or loose hooping. Stretch still needs support, and the stabilizer must control movement without flattening the garment's intended hand.
Watch for three symptoms when the point is wrong:
- Snagged loops: The point is catching rather than separating fibers.
- Skipped stitches: The fabric is moving, the needle isn't forming a reliable loop, or the point isn't entering the structure cleanly.
- Fabric distortion: The needle and thread are pulling the surface instead of allowing the stitches to settle.
Match the point to the whole project
A cap combines curved fabric, dense construction, and often a rigid stabilizer. Denim adds resistance. Puffy foam adds loft and bulk. A lightweight knit needs fiber-friendly penetration. These aren't interchangeable conditions, even when the design uses the same 40-weight thread.
Before you hoop the final piece, test the point on a scrap that includes the same fabric layers. Check the front for holes and puckering, then inspect the reverse for thread loops, bobbin exposure, and distortion around dense areas. When you're ready to improve a knit or stabilize a difficult project, compare a premium ballpoint needle assortment with the stabilizer options available from your preferred sewing supplier.
Handling Specialty Threads and High Density Designs
Specialty thread exposes weaknesses that ordinary polyester can hide. Metallic thread has a surface that can catch against a tight eye or rough groove. A standard 75/11 embroidery needle can be a tight fit for metallic thread, and Superior Threads recommends a larger eye and deeper groove, such as a Topstitch 90/14, to reduce friction and help prevent shredding.
That recommendation isn't just about making the hole larger. The eye shape gives the thread more clearance, while the deeper groove helps shield it as the needle travels through the fabric. If the metallic thread is repeatedly rubbing against the same edge, changing tension alone won't remove the source of abrasion.
Dense designs need clearance
A dense satin column, filled background, or compact monogram puts more thread into a small area. The fabric may become firm under the design, and each new penetration has to pass through accumulated thread and stabilizer. A needle that worked on an open outline can struggle when the stitch density rises.
For dense work, examine the thread after a short test run. Fuzzing, sudden breaks, and a metallic strand that appears stripped are signs of friction. Small lettering deserves the opposite approach. A fine 60-weight thread paired with 65/9 can reduce visual bulk and keep tiny details from looking crowded, provided the fabric can support that finer setup.
Let the machine and thread cooperate
Slow the machine when a thread manufacturer or machine manual calls for slower operation, especially with metallics and dense designs. Use a smooth thread path, keep the spool feeding evenly, and avoid sharp turns between the spool and needle. A vertical spool pin, a thread net when appropriate, and a clean tensioning path can reduce unnecessary drag.
For an additional visual walkthrough, use a related video tutorial or a live shopping clip that demonstrates metallic-thread tensioning on your machine. Watch how the thread leaves the spool, passes through the guides, and enters the eye. That physical path often reveals more than a tension number on the screen.
Shop for specialty thread and compatible needles together rather than buying the spool first and improvising afterward. A larger eye, correct groove, and suitable point can protect the thread and save a decorative project from repeated restarts.
Troubleshooting Stitching Failures and Fabric Damage
A bad stitch-out isn't always a tension problem. Upper-thread tension, bobbin tension, hooping, stabilizer choice, and needle condition interact, but the needle is the fastest variable to check because it directly contacts the fabric and thread.
Start with the failure pattern. Thread breaking at one area of a design points toward friction, density, a burr, or a difficult transition. Skipped stitches can indicate a damaged point, unsuitable point style, fabric movement, or timing-related trouble. Puckering may come from hooping or stabilizer tension, but a needle that's too small can also drag the thread and fabric through a dense stack.
A practical diagnostic order
- Stop and remove the needle. Check the point, eye, and scarf under good light.
- Test the thread path. Confirm the thread is seated in every guide and that the bobbin casing is correctly positioned.
- Inspect the fabric side. Look for holes, snags, pulled loops, and raised edges around dense stitching.
- Compare the needle to the material. Heavy fabric, denim, and puffy foam need more support than medium-weight fabric.
- Run a scrap test. Use the same fabric, stabilizer, thread, and design element before restarting the final piece.
If you adjust tension and the problem persists, replace the needle before changing several other settings. Changing tension, speed, density compensation, and stabilizer at the same time makes the result difficult to interpret.
Heavy materials require a larger needle
Brother's embroidery support guidance recommends 75/11 for embroidery but specifies 90/14 for heavyweight fabrics and stabilizing products such as denim and puffy foam. It also warns that 75/11 may bend or break in those conditions. Brother's guidance on embroidery needle selection is a useful manufacturer reference when your project combines thick fabric with foam or heavy stabilizer.
A bent needle can strike the presser foot, damage the hoop area, or break inside a garment. Don't continue stitching because the break appears intermittent. Remove the needle, clear the thread path, and inspect the machine before installing a fresh one.
Keep replacement needles near the machine, including the size suited to your everyday thread and a larger option for heavyweight projects. Clearance or BOGO promotions can be useful for building that supply, but the needle still needs to match the job. Cheap excess stock doesn't help if the point, eye, or size is wrong.
Needle Maintenance and Community Questions
Treat needles as precision tools. Store them in a closed container where they won't rub against scissors, pins, or other metal notions. Keep different sizes separated and label the package clearly, especially when 65/9, 75/11, and 90/14 needles are all in the same workroom.
Before each project, check the needle for a bent shaft, dull point, damaged eye, or burr. Replace it after a demanding stitch-out, after a needle strike, or whenever the thread begins breaking without another clear cause. Dense designs, heavy stabilizer stacks, denim, caps, and foam can wear a needle faster than a simple outline.
A good maintenance routine is simple:
- Before threading: Confirm the needle size and point match the fabric and thread.
- Before final stitching: Test on the same fabric and stabilizer combination.
- After a break: Inspect the needle instead of reinstalling it automatically.
- After storage: Check that the point and eye remain protected.
- During cleanup: Remove lint from the needle area and inspect the bobbin casing.
The same care helps longarm quilters. While a longarm needle and an embroidery needle serve different stitching systems, both depend on clean thread passage, accurate tensioning, and a properly supported material. Loft, hand, and fabric movement affect how the thread settles, whether you're quilting a layered top or embroidering a garment.
Frequently asked questions
What needle should I use for standard machine embroidery?
Start with a 75/11 embroidery needle for most medium-weight fabrics and 40-weight embroidery thread. Confirm that the eye is smooth and that the thread passes freely. If the fabric is heavyweight, the design is unusually dense, or the thread is thicker, consider a larger needle.
Should I use a sharp or ballpoint needle for embroidery?
Use a sharp point for tightly woven fabrics and crisp designs. Choose a ballpoint point for knits and lightly woven fabrics, because it pushes fibers aside rather than cutting directly through them. Test the choice on scrap fabric when the garment has stretch or a delicate surface.
What needle is suitable for metallic embroidery thread?
A larger-eye needle with a deeper groove is generally more suitable than a tight 75/11 eye. A Topstitch 90/14 is one example recommended for metallic thread because it can reduce friction and shredding.
Why does my embroidery thread keep breaking?
Inspect the needle first for a burr, bent point, or rough eye. Then check threading, bobbin seating, stitch density, and upper tension. If the thread is metallic or another specialty construction, the eye may be too tight even when the needle size appears acceptable.
How should I dispose of used embroidery needles?
Place used needles in a rigid, puncture-resistant container with a secure lid. Don't leave them loose in a scrap bin or regular fabric waste. Follow local disposal guidance for sharps, particularly if your household or studio has a designated collection program.
Linda's Electric Quilters offers embroidery needles, thread, stabilizers, batting, and other project supplies for makers working across quilting and embroidery techniques. Visit Linda's Electric Quilters to choose a needle and thread combination that will help you finish your next machine embroidery project with cleaner stitches and fewer frustrating breaks.


