
Table of Contents
- Why Metallic Embroidery Thread Breaks and How to Fix It
- What You'll Need Before Starting
- Step 1: Choose the Best Needle for Metallic Embroidery Thread
- Step 2: Adjust Machine Embroidery Metallic Thread Tension Correctly
- Step 3: Reduce Metallic Thread Embroidery Machine Speed
- Step 4: Set Up a Metallic Thread Thread Stand for Embroidery
- Step 5: Inspect and Clear the Thread Path
- Step 6: Test and Troubleshoot Before Full Projects
- Recommended Metallic Thread Products
- Frequently Asked Questions
Last Updated: October 12, 2026
Why Metallic Embroidery Thread Breaks and How to Fix It
Metallic embroidery thread breaks more often than standard thread because it's delicate by nature: a thin metallic coating wrapped around a core fiber.
At Linda's Electric Quilters, we work with quilters and embroidery artists every day who struggle with metallic thread breakage. The good news is that it's preventable.
This guide walks you through seven essential steps to prevent metallic thread breakage: which needle to use, how to adjust tension, and how to set up your machine for success.
What You'll Need Before Starting
Before you begin, gather these supplies:
- A selection of needle sizes (90/14 metallic, 90/14 topstitch, and 80/12 universal needles)
- Your metallic embroidery thread
- A thread stand or cone adapter
Check your embroidery machine manual for safe tension and speed ranges, knowing your machine's specs prevents damage and breakage. Have a scrap of stabilizer and fabric ready for test stitching; testing before your full project saves time and thread.
Step 1: Choose the Best Needle for Metallic Embroidery Thread
The needle is your first line of defense against metallic thread breakage.
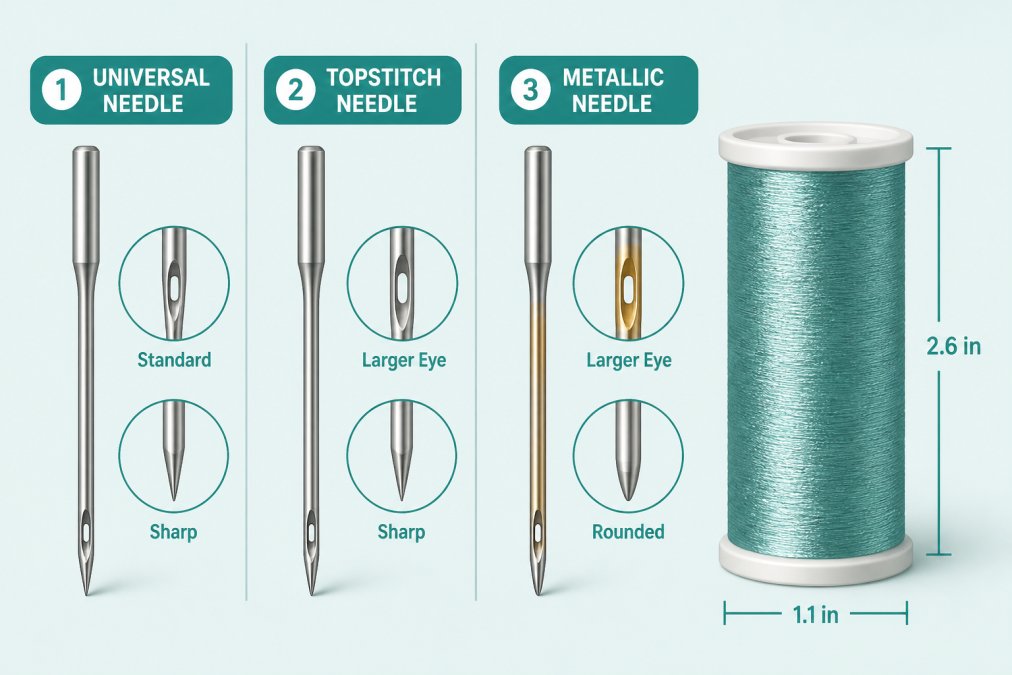
Use a needle with a larger eye. A 90/14 metallic or 90/14 topstitch needle has an eye roughly 40% larger than a standard needle, letting metallic thread pass through without friction.
Here's what to know about needle selection for metallic embroidery thread:
- 90/14 Metallic Needle: Designed specifically for metallic thread. This is your best choice.
- 90/14 Topstitch Needle: Works well for metallic thread. The large eye accommodates the delicate coating.
- 80/12 Universal Needle: Better than standard needles, but still smaller than a metallic needle. Use only if you don't have a metallic needle available.
Change your needle before every project using metallic thread. Even a slightly bent or dulled needle increases friction and causes breakage, and a fresh needle costs a few cents.
Step 2: Adjust Machine Embroidery Metallic Thread Tension Correctly
Tension is the pressure your machine applies as thread feeds through the needle. Too much crushes the metallic coating; too little causes skipped or looping stitches.
For metallic thread, start with tension that's 10-20% lower than your standard thread tension.
How to adjust tension safely:
- Make a small adjustment (move the dial down by one number)
- Stitch a few lines on scrap fabric
- Look at the stitch quality, the top and bottom threads should lock evenly
- If stitches still break, lower tension slightly and test again
- If stitches skip or loop, raise tension slightly
Never make big jumps in tension adjustment, small changes help you find the sweet spot for your machine and thread combination.
Step 3: Reduce Metallic Thread Embroidery Machine Speed
Machine speed is how fast your embroidery machine stitches per minute. Higher speeds mean more friction and stress on delicate metallic thread; slowing down gives the thread time to feed smoothly and prevents snagging.
Slow your machine down by 25-50%. If your machine runs at 800 stitches per minute normally, try 400-600 spm for metallic thread.
Check your machine manual for the recommended speed range; most embroidery machines can safely run 400-600 spm for metallic thread.
Step 4: Set Up a Metallic Thread Thread Stand for Embroidery
A thread stand holds the spool above your machine and lets the thread unwind smoothly.
Use a vertical thread stand positioned to the left or right of your machine. The spool should sit level and the thread should feed straight down into the machine's thread guide, preventing twisting as it unwinds.
If your thread stand isn't available, try these alternatives:
- Spool orientation: Turn the spool so the thread feeds from the side instead of the end. This reduces the angle and tension.
- Thread cone adapter: Use a cone adapter to hold the spool at a better angle.
- Improvised stand: A tall cup or holder positioned next to your machine works in a pinch.
The key is keeping the thread path straight and the spool stable, any twist or angle before the needle adds stress and causes breakage.
Step 5: Inspect and Clear the Thread Path
The thread path is the route your thread travels from spool to needle. If it has burrs, rough spots, or lint buildup, the metallic coating snags and breaks. What you need is a repeatable inspection method plus a way to tell which part of the path is damaging the thread.
Inspect these areas in order, from spool to needle:
- Spool pin or thread stand eyelet
- Upper thread guides and tension discs
- Take-up lever eye
How to detect a burr without guessing:
- Turn the machine off and remove the needle.
- Pull a length of metallic thread slowly through the full path by hand, section by section.
- Any place the thread catches, drags, or makes an audible scrape is a suspect.
- Confirm with a cotton swab: run the swab along the inside of each guide. A burr will snag visible fibers from the swab. This is more reliable than a fingertip, which can miss small rough spots.
- For the needle plate hole, run the swab around the inside edge in a full circle.
Match the damage pattern to the location. Where the thread fails tells you where to look:
- Frays just above the needle: the needle eye, needle bar guide, or take-up lever is the culprit.
- Frays at the spool or stand: the spool pin, stand eyelet, or first guide is rough, or the spool is unwinding at a bad angle.
- Frays mid-path between guides: a guide is misaligned or the thread is rubbing a metal edge.
Clearing burrs and debris:
- Use a fine-grit abrasive cord or a dedicated burr-removal tool to polish the inside of a guide. Work in one direction, then re-test with a swab.
- Never use sandpaper on the needle plate hole from the top only; polish the inside edge where the thread actually contacts metal.
- Blow out lint with compressed air, then wipe guides with a lint-free cloth. Lint mixed with metallic coating dust acts like an abrasive.
If you find damage you cannot smooth, or a guide that keeps re-grooving, stop and consult your machine manual or a technician rather than keep polishing.
Step 6: Test and Troubleshoot Before Full Projects
Before stitching your full project, test your setup on scrap fabric to catch problems early and avoid wasting thread and time. But a test only helps if you know what to change when it fails, so use the diagnostic sequence below instead of adjusting settings at random.
Set up a controlled test stitch:
- Thread the machine with metallic thread using your chosen needle, tension, speed, and thread stand.
- Use the same stabilizer and fabric as your real project.
- Stitch a simple pattern for 2-3 minutes at your target speed.
- Record the result: did it break, fray, shred, or untwist, and where along the thread did it fail?
- Change one variable at a time and re-test. Changing two settings at once tells you nothing.
Diagnostic sequence, in order:
- Did it break within the first few hundred stitches? Suspect the needle first. Replace it with a fresh 90/14 metallic or topstitch needle and re-test.
- Did it break after running clean for a while? Suspect heat and friction buildup. Slow the machine by another 10-20% and re-test.
- Does the thread fray just above the needle? Inspect the needle eye, needle bar guide, and take-up lever for burrs using the swab method in Step 5.
- Does the thread shred along its length? Back the upper tension off by one increment and re-test. Shredding points to tension discs, not the needle.
- Does the thread untwist or birdnest? The spool is unwinding the wrong way or the thread stand is feeding at a bad angle. Reorient the spool and re-test.
- Does it break only on dense or high-stitch-count areas? The design is the problem, not the machine. Reduce stitch density or simplify the design.
- Does it break only at high speed? You have found your machine's ceiling for this thread. Set your working speed 50-100 spm below that point.
Distinguish the four failure modes. They look similar but have different fixes:
- Breakage: a clean snap. Usually needle, tension, or speed.
- Fraying: coating worn away along a section. Usually a burr or guide contact.
- Shredding: thread splitting into strands. Usually tension discs or a contaminated path.
Document your working settings. Write down needle size and type, upper tension number, machine speed in stitches per minute, thread stand position, and spool orientation, plus break frequency at each setting.
This test takes 10 minutes but prevents hours of rework, and you'll know exactly what settings work before committing thread and fabric to your finished piece.
Recommended Metallic Thread Products
For reliable metallic embroidery work, we recommend quality threads designed to minimize breakage. At Linda's Electric Quilters, we carry several options:
Madeira Metallic #40 Smooth is a flexible metallic thread with a smooth texture that feeds easily. Its 68% polyester core and 32% PE metallized coating create lower breakage than pure metallic threads, and each 220-yard spool works well for quilting and decorative stitching.

Spotlite™ 40wt Metallic Gold is a rayon-core metallic thread designed for smooth running and reduced shedding. It's less prone to breakage than traditional metallic threads, runs up to 800 spm on domestic machines, and works for embroidery, quilting, and decorative stitches.

Both options are engineered to reduce the breakage problems that plague standard metallic threads: a strong core with a metallic coating prevents fraying and stress.
Frequently Asked Questions
Why does my metallic embroidery thread keep breaking?
Metallic thread breakage usually stems from friction in the needle eye, incorrect tension, or machine speed that's too fast. Metallic threads have a delicate metallic coating that fractures under stress. Common culprits include using a regular needle instead of a 90/14 metallic needle, running the machine faster than 600 stitches per minute, or upper tension set too high. Start by switching to the correct needle size and reducing speed to 500-600 spm for your first test.
What's the best needle for metallic embroidery thread?
A 90/14 metallic needle or 90/14 topstitch needle is ideal for metallic embroidery thread. These needles have a larger eye (about 40% bigger than standard needles) that reduces friction and prevents the delicate metallic coating from shredding. Always use a fresh needle, a burr or slight wear will catch the metallic coating and cause immediate breakage.
How do I adjust tension for metallic embroidery thread?
Start with your normal upper-thread tension setting, then reduce it by one or two numbers (for example, from 5 to 3 or 4). Metallic thread is more fragile than standard thread and breaks easily under high tension. Run a test sew-out on scrap fabric with your chosen design at the lower tension. If the stitch looks loose, increase tension in small increments, one number at a time, until the stitch balances. Never return to standard tension for metallic thread.
Should I reduce machine speed when embroidering with metallic thread?
Yes. Slow your embroidery machine to 500-600 stitches per minute (spm) when using metallic thread; many machines default to 800+ spm. The slower speed gives the delicate metallic coating time to feed through the needle eye without friction or shredding. If breakage continues at 600 spm, drop to 400-500 spm. Slower stitching also improves stitch quality and gives you better control over complex designs.
Metallic thread breakage is frustrating, but it's fixable. The right needle, proper tension, reduced speed, a good thread stand, and a clean thread path eliminate most breakage problems. Test your setup before your full project, and you'll stitch with confidence. Start with these seven steps, and you'll see a dramatic improvement in your metallic embroidery results.


